• Skip to main content
  • Skip to secondary menu
  • Skip to primary sidebar
  • Skip to footer
Studio 73 Designs

Studio 73 Designs

Wire Jewelry Making & Wire Wrapping Techniques

  • Start Here!
  • Get Your FREE Wire-Wrapping Guides
  • Shop Tutorials
    • Cart
    • Checkout
  • Blog
  • About
  • Contact Me
ALL IN ONE Printable Wire-Wrapping Tutorial Bundle is currently On Sale! Check it out HERE.

How to Wire-Wrap a Crescent Moon Wire-Wrapping Tutorial

Are you a beginner? If you are new to Wire-Wrapping, you might want to check out my Printable Wire-Wrapping Pendant Tutorial Bundle for Beginners

If you enjoy my content, you can support me on Patreon 🙂 Cheers!

March 10, 2023 by Madelynn

Page 1
Page 2
Page 3
Page 4
Page 5
Page 6


Crescent moon wire-wrapping tutorial (page 3)


Prefer this tutorial in a PRINTABLE FORMAT?

Click here for the PDF version of Crescent Moon Wire-Wrap Tutorial
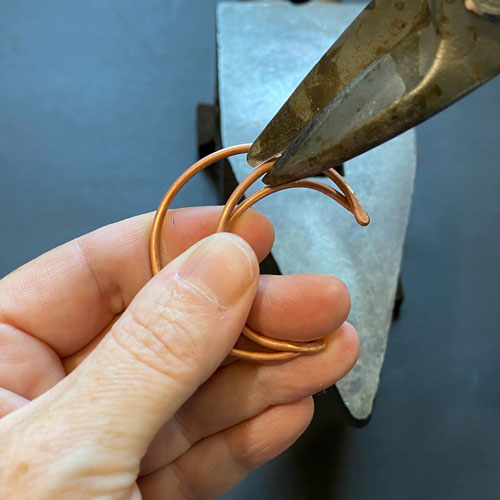
 

Step 7

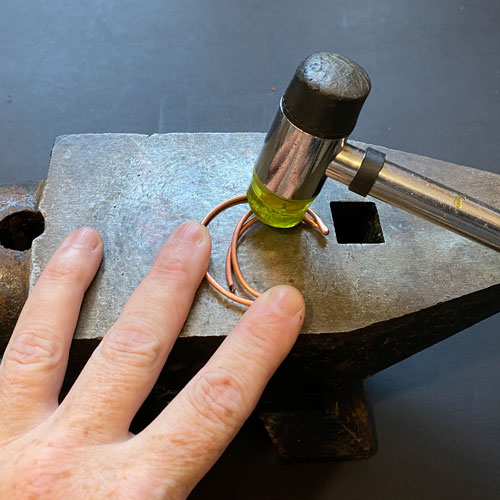
You may find that your wire ends are a little long. If they are, just snip them so they more even (fig. 7a, 7b). Using a rubber mallet, gently hammer the frame to straighten out any kinks in the wire (fig. 7c).

wire wrap jewelry

FREE WIRE-WRAPPING GUIDE TO YOUR EMAIL! 

JOIN NEWSLETTER

SEND GUIDE TO EMAIL

We respect your privacy. Unsubscribe at anytime.

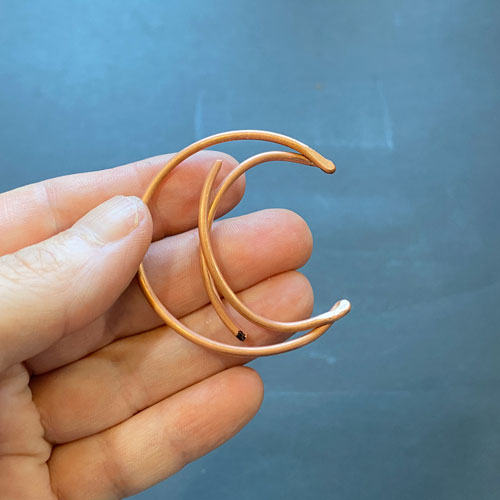
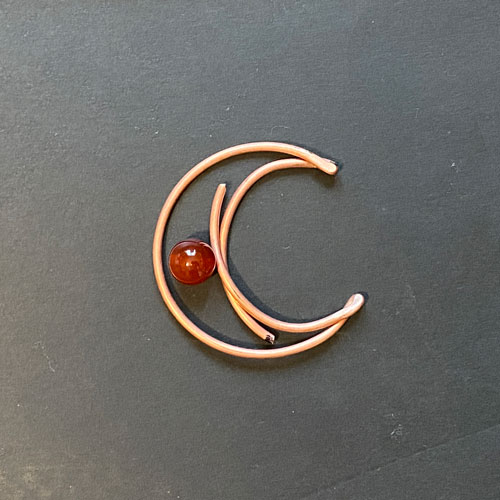
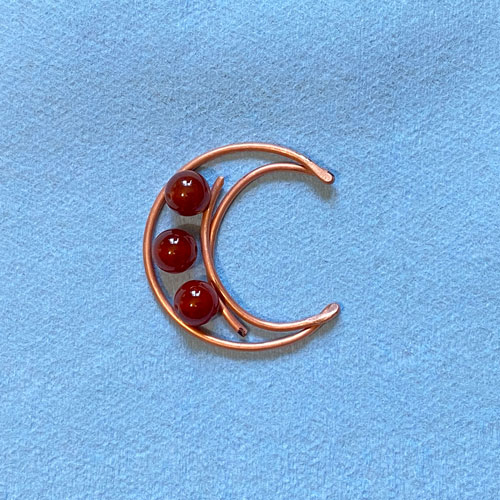
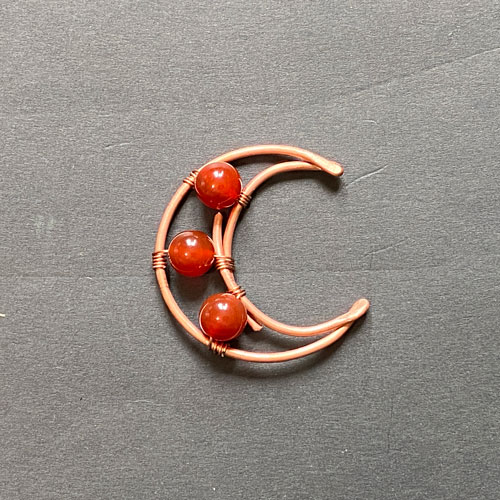
Now we can start planning the bead placement. That’s the fun part! I’ve made some crescent moons with one bead and three beads. In this tutorial, I will be using 3 carnelian beads (fig. 7d, 7e).

 
Wire Wrapping Tutorial Wire-Wrapped Crescent Moon Pendant Tutorial
fig. 7a
 
Wire Wrapping Tutorial Wire-Wrapped Crescent Moon Pendant Tutorial
fig. 7b
 
Wire Wrapping Tutorial Wire-Wrapped Crescent Moon Pendant Tutorial
fig. 7c
 
Wire Wrapping Tutorial Wire-Wrapped Crescent Moon Pendant Tutorial
fig. 7d
 
Wire Wrapping Tutorial Wire-Wrapped Crescent Moon Pendant Tutorial
fig. 7e
 

Step 8

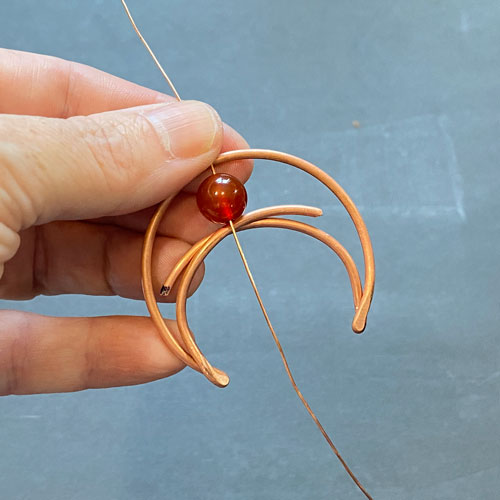
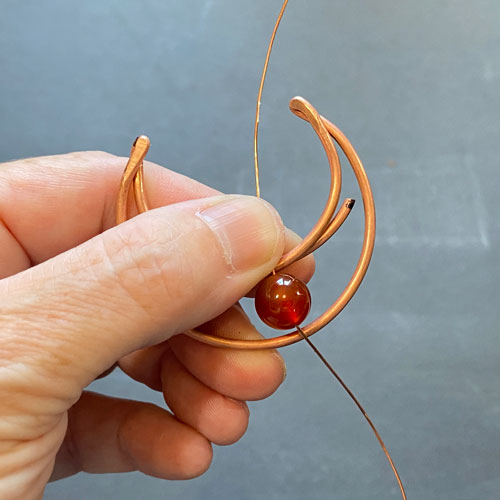
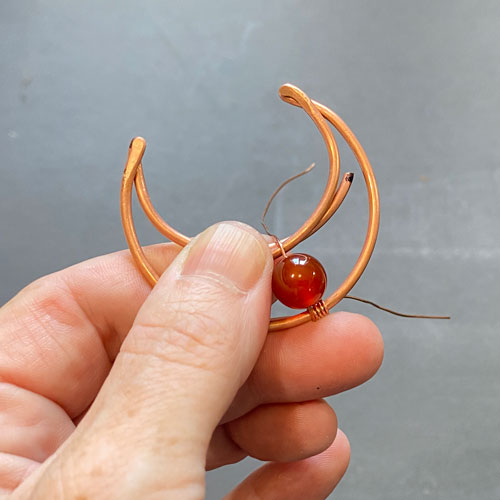
I like to start by securing the center bead first. Feed your first bead onto your strand of 24 gauge wire and position it in the center of moon (fig. 8a).
Secure one end by wrapping a few times around the frame (fig. 8b, 8c, 8d).

 
Wire Wrapping Tutorial Wire-Wrapped Crescent Moon Pendant Tutorial
fig. 8a
 
Wire Wrapping Tutorial Wire-Wrapped Crescent Moon Pendant Tutorial
fig. 8b
 
Wire Wrapping Tutorial Wire-Wrapped Crescent Moon Pendant Tutorial
fig. 8c
 
Wire Wrapping Tutorial Wire-Wrapped Crescent Moon Pendant Tutorial
fig. 8d
 

RELATED CONTENT

  • Beginner’s Guide to Jewelry Wire for Wire-Wrapping
  • How to Wire-Wrap Crystals: Wire-Wrapping Tutorial for Beginners
  • Wire-Wrapping Tutorial: Simple Wire Brooch
  • How to Wire-Wrap a Briolette:  Wire-Wrapped Swarovski Crystal Pendant Tutorial
  • Wire-Wrapping for Beginners


Step 9

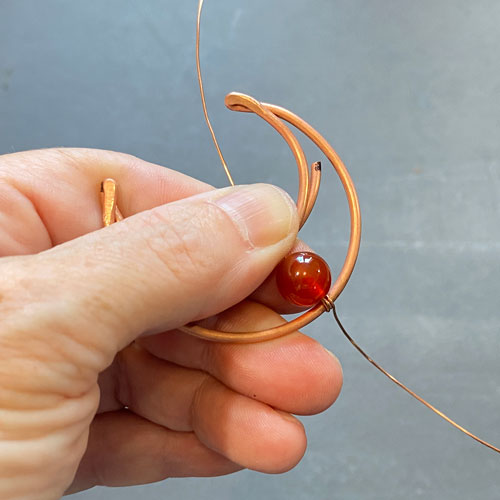
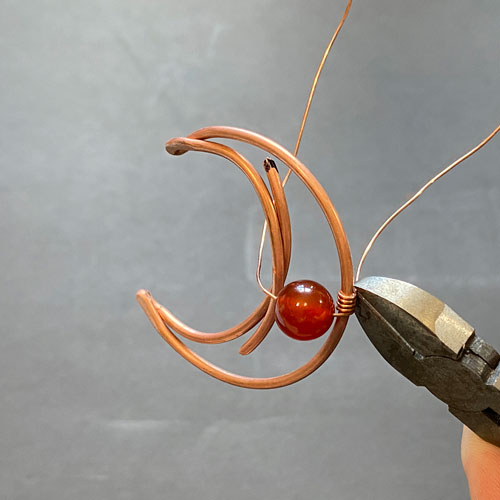
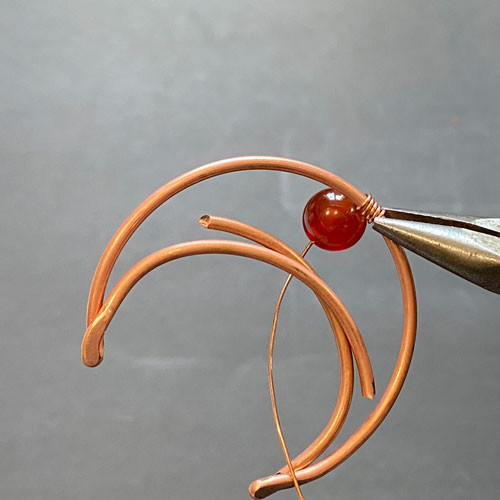
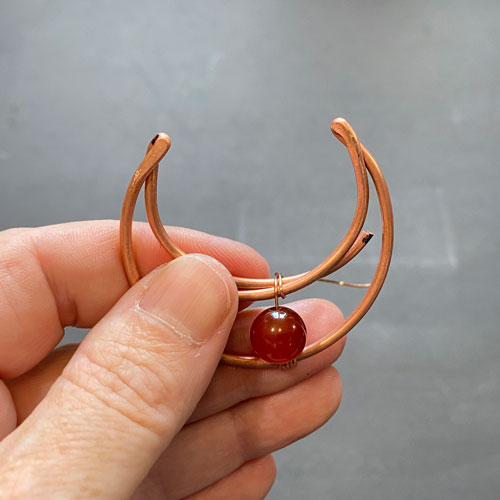
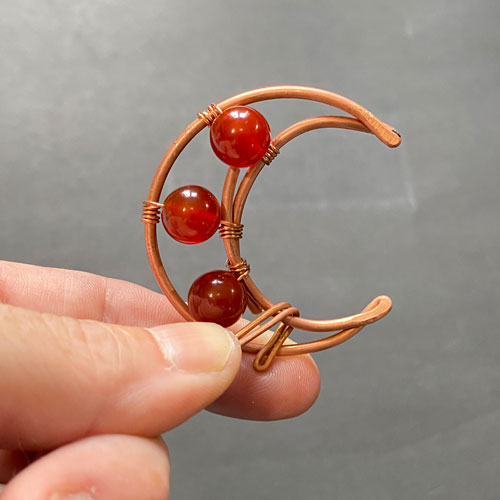
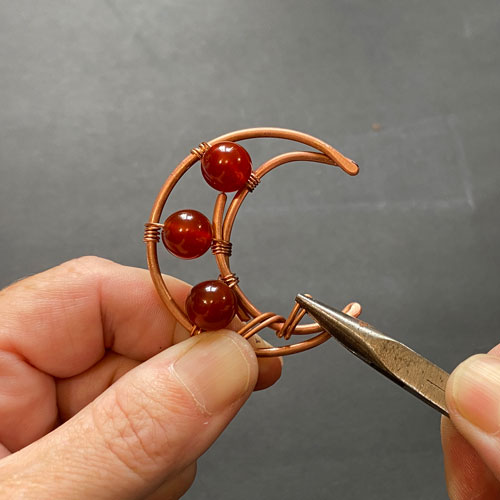
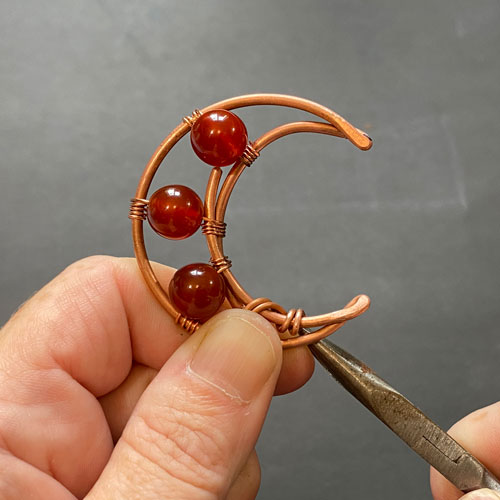
Trim excess wire and tuck end in with needle nose pliers (fig. 9a, 9b). Repeat on other side of wire (fig. 9c, 9d). Repeat for two other beads (fig. 9e).

 
Wire Wrapping Tutorial Wire-Wrapped Crescent Moon Pendant Tutorial
fig. 9a
 
Wire Wrapping Tutorial Wire-Wrapped Crescent Moon Pendant Tutorial
fig. 9b
 
Wire Wrapping Tutorial Wire-Wrapped Crescent Moon Pendant Tutorial
fig. 9c
 
Wire Wrapping Tutorial Wire-Wrapped Crescent Moon Pendant Tutorial
fig. 9d


Wire Wrapping Tutorial Wire-Wrapped Crescent Moon Pendant Tutorial
fig. 9e


Step 10

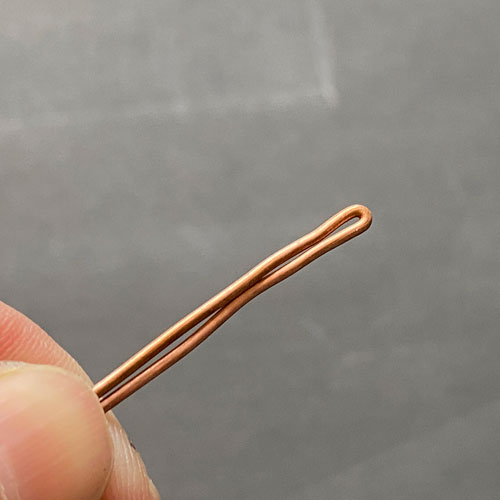
Grab your piece of 18 gauge wire and fold in two (fig. 10a). Make a bend about 1/2” down from tip (fig. 10b). Use this to “hook” into the frame (fig. 10c).
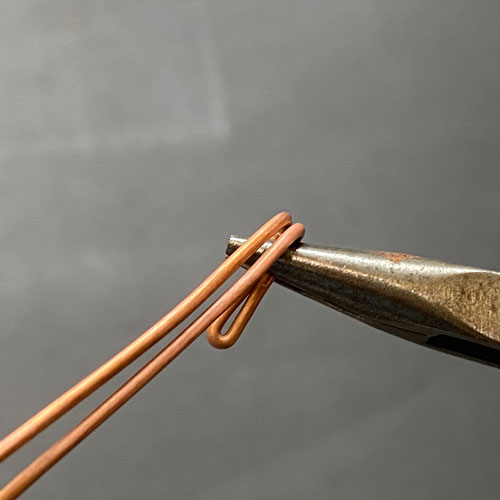
Using needle nose pliers, grab the tip and pull it up, around and to the back of the frame. Tuck in your end (fig. 10e).

 
Wire Wrapping Tutorial Wire-Wrapped Crescent Moon Pendant Tutorial
fig. 10a
 
Wire Wrapping Tutorial Wire-Wrapped Crescent Moon Pendant Tutorial
fig. 10b
 
Wire Wrapping Tutorial Wire-Wrapped Crescent Moon Pendant Tutorial
fig. 10c
 
Wire Wrapping Tutorial Wire-Wrapped Crescent Moon Pendant Tutorial
fig. 10d
 
Wire Wrapping Tutorial Wire-Wrapped Crescent Moon Pendant Tutorial
fig. 10e
 

KEEP READING…

Page 1 – Materials, Steps 1-2
Page 2 – Steps 3-6
Page 3 – Steps 7-10
Page 4 – Steps 11-14
Page 5 – Steps 15-18
Page 6 – Steps 19-21


RELATED CONTENT

  • Check out this TUTORIAL BUNDLE!!!
  • How to Make Jump Rings
  • How to Use Liver of Sulfur as Patina
  • Wire-Wrapping Tutorial: Simple Wire Brooch
  • Wire-Wrapping Tutorials: 13 DIY Wire-Wrapped Pendants

Pages: Page 1 Page 2 Page 3 Page 4 Page 5 Page 6

Filed Under: Tutorials/DIY Tagged With: crescent moon, wire-wrapped beads, wire-wrapping tutorial

Primary Sidebar

MadelynnHey there! Thanks for visiting 🙂

My name is Madelynn and I’m the owner of Studio 73 Designs.

Studio 73 Designs is managed by a team of wire wrapping jewelry enthusiasts.

If you enjoy my content, you can support me on Patreon 🙂 Cheers!

Follow Me

  • Facebook
  • Instagram
  • Pinterest
  • Twitter
  • YouTube

ARE YOU INTERESTED IN WIRE-WRAPPING?

Sign up below and get access to my FREE wire-wrapping guides!

Sign Up
Wire Wrapping Tutorials
Wire Wrapping for Beginners Start Here
Beginner's Guide to Jewelry Wire for Wire-Wrapping
Wire Wrapping Tools and Supplies for Beginners
How to wire wrap stones without holes wire-wrapping tutorial for beginners
Wire Wrapping Tutorials DIY Jewelry Kits

Footer

ARE YOU INTERESTED IN WIRE-WRAPPING?

Sign up below and get access to my FREE wire-wrapping guides!

Sign Up

Site Navigation

Home
About
Contact
Blog
Privacy Policy
Disclaimer
Terms & Conditions

Follow Me

  • Facebook
  • Instagram
  • Pinterest
  • Twitter
  • YouTube

© 2023 · Studio 73 Designs