• Skip to main content
  • Skip to secondary menu
  • Skip to primary sidebar
  • Skip to footer
Studio 73 Designs

Studio 73 Designs

Wire Jewelry Making & Wire Wrapping Techniques

  • Start Here!
  • Get Your FREE Wire-Wrapping Guides
  • Shop Tutorials
    • Cart
    • Checkout
  • Blog
  • About
  • Contact Me
11 TUTORIALS IN ONE Printable Wire-Wrapping Tutorial Bundle is currently On Sale! Check it out HERE.

Wire-Wrapping Crystal Tower Point Tutorials

Are you a beginner? If you are new to Wire-Wrapping, you might want to check out my Printable Wire-Wrapping Pendant Tutorial Bundle for Beginners

If you enjoy my content, you can support me on Patreon 🙂 Cheers!

October 29, 2023 by Madelynn

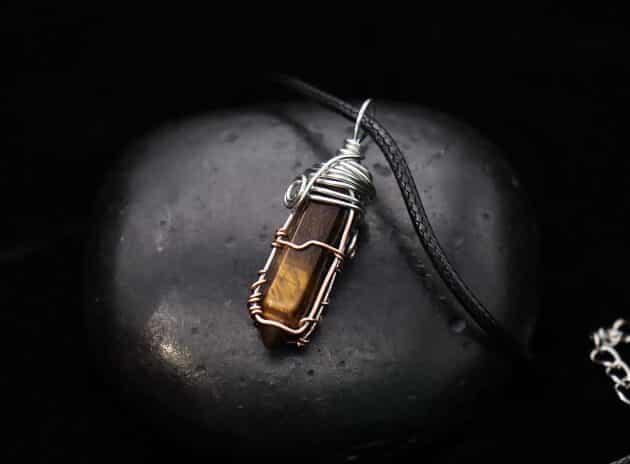
Hi my lovely wire wrappers!

I’m back with a beautiful pendant piece for you to create.

If you have a precious crystal point stone in your possession, I believe my Wire-Wrapping Crystal Tower Point Pendant will hold it gracefully around your neck.

Follow me in my easy to follow step-by-step tutorial here!

wire wrap jewelry

FREE WIRE-WRAPPING GUIDE TO YOUR EMAIL! 

JOIN NEWSLETTER

SEND GUIDE TO EMAIL

We respect your privacy. Unsubscribe at anytime.

Best part about this tutorial is that no soldering required and beginner friendly.

Wire-Wrapping Crystal Tower Point Tutorials

LEVEL: BEGINNER

MATERIALS + TOOLS

  • Crystal Point
  • Silver Copper Wire (20AWG) x Length (23 inches)
  • Brown Copper Wire (23AWG)
  • Wire Cutter
  • Nylon jaw pliers
  • Stepped Bail-Making Pliers
  • Round Nose Pliers
  • Bent Nose Pliers
  • Long Flat Nose Pliers
  • Finest Steel Wire Wool
  • Masking Tape
  • Pen/Marker Pen

WIRE-WRAPPING CRYSTAL TOWER POINT TUTORIALS 

Step 1 of 9 

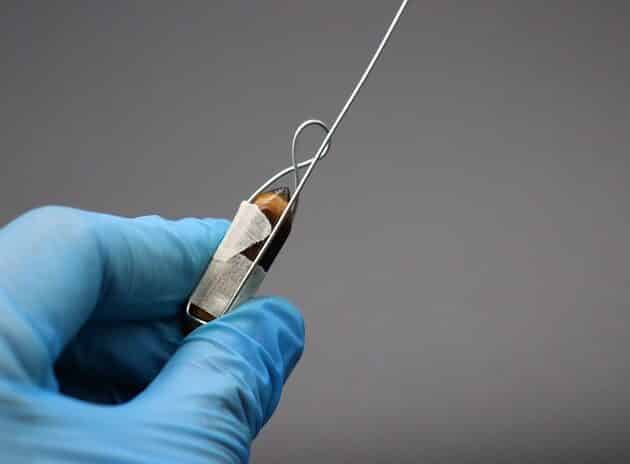
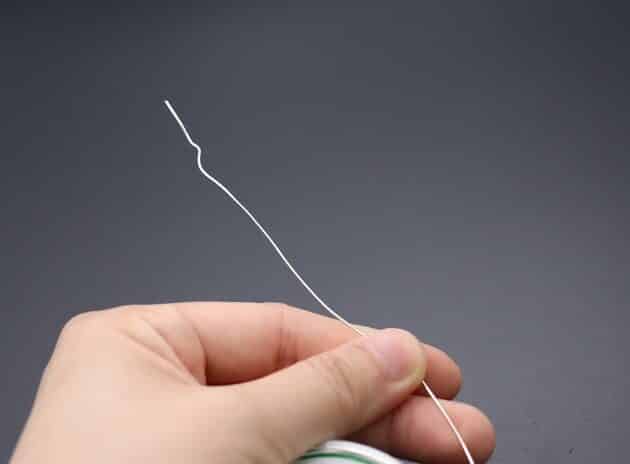
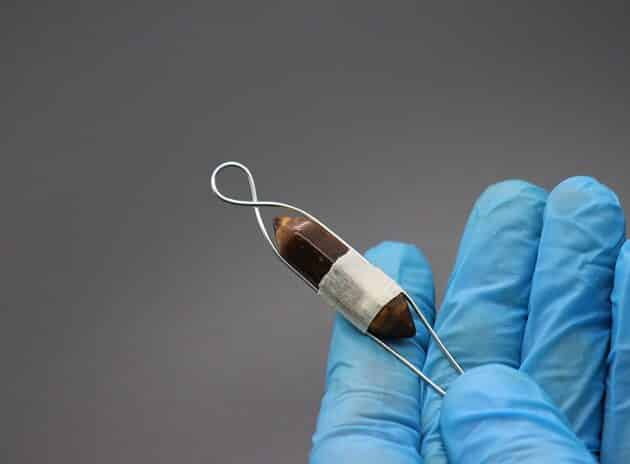
Firstly, measure your crystal point stone and take note of its length (fig. 1a).

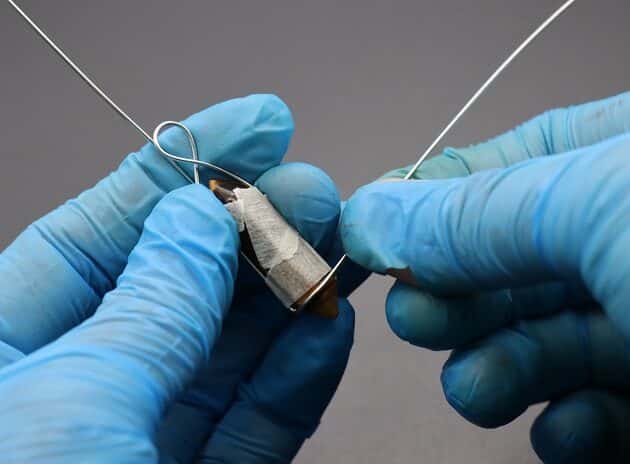
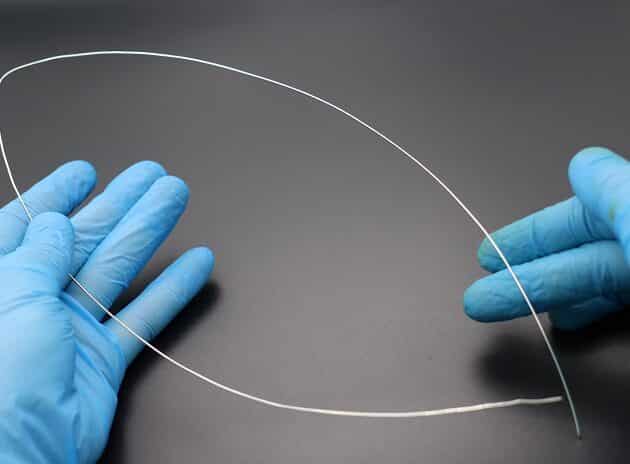
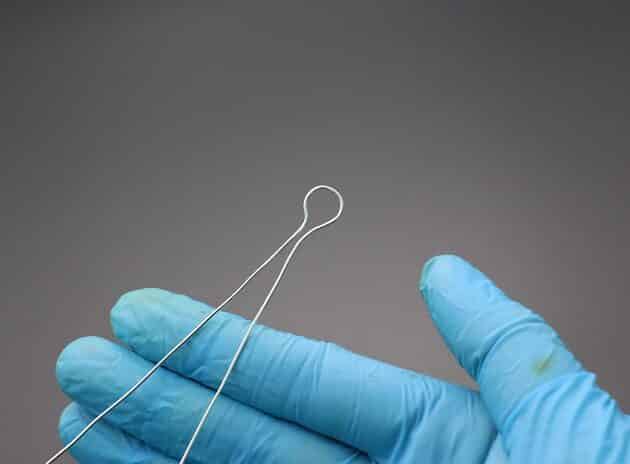
Then, cut 23 inches length of 20-gauge silver coated copper wire and bend it in half (fig. 1b, 1c).

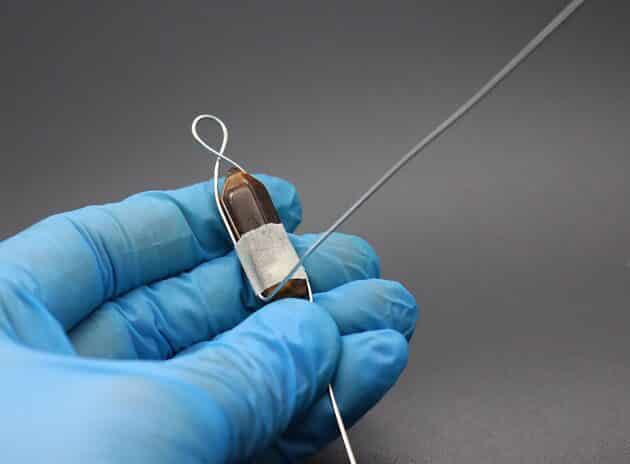
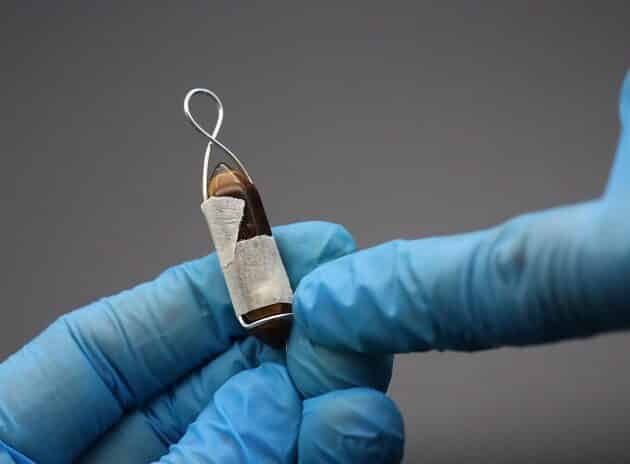
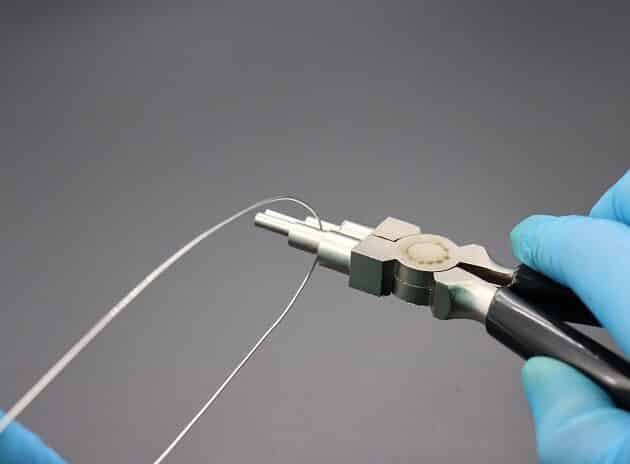
We start the framing process by making a circular bail at the middle with a stepped bail-making pliers as shown (fig. 1d, 1e).

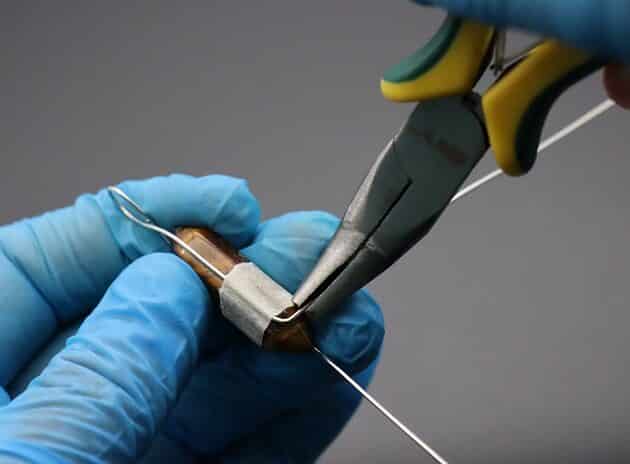
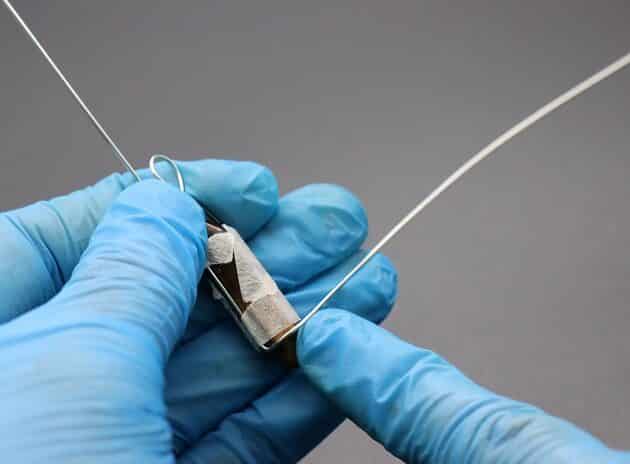
Next, cross the wires and tape them in position with a masking tape as shown (fig. 1f, 1g).

Wire-Wrapping Crystal Tower Point Tutorials 1
fig. 1a
Wire-Wrapping Crystal Tower Point Tutorials 2
fig. 1b
Wire-Wrapping Crystal Tower Point Tutorials 3
fig. 1c
Wire-Wrapping Crystal Tower Point Tutorials 4
fig. 1d
Wire-Wrapping Crystal Tower Point Tutorials 5
fig. 1e
Wire-Wrapping Crystal Tower Point Tutorials 6
fig. 1f
Wire-Wrapping Crystal Tower Point Tutorials 7
fig. 1g

Step 2 of 9

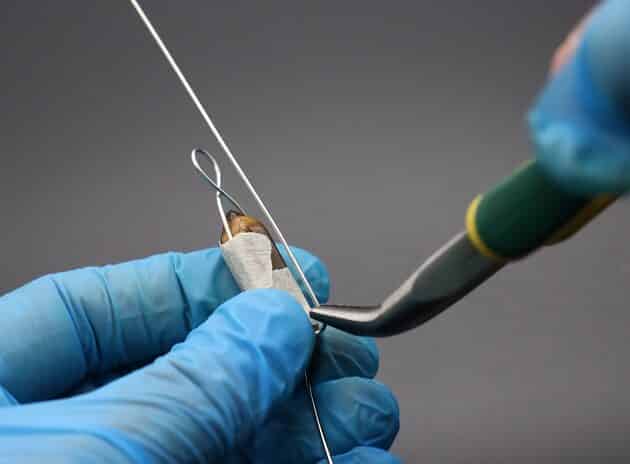
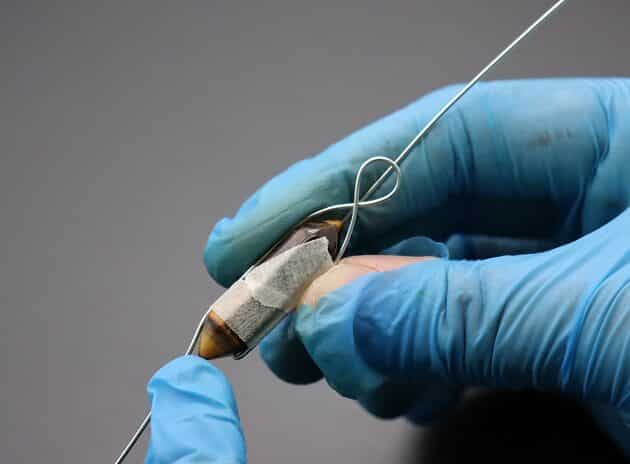
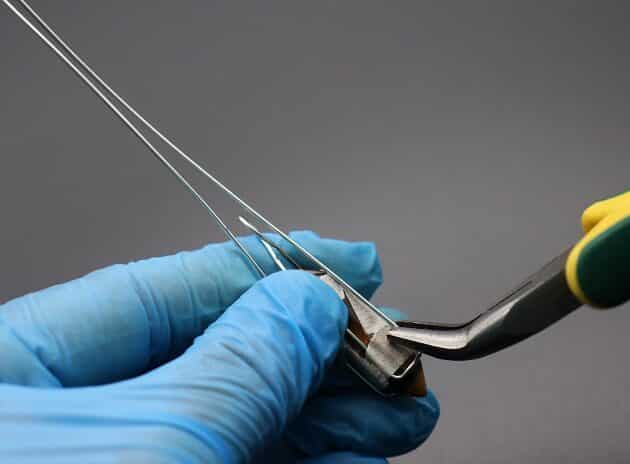
Secondly, make a 90-degree bend to the right (fig. 2a) on the wire at base of the crystal tip with a bend nose pliers.

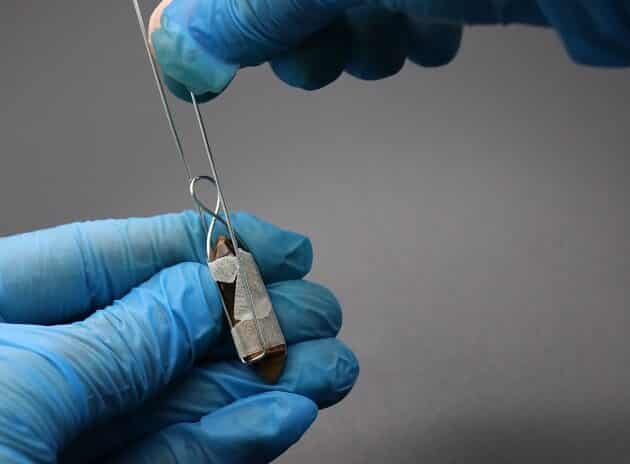
Then, wrap the wire along the base (fig. 2b, 2c) and make another 90-degree bend upwards at the midpoint (fig. 2d, 2e).

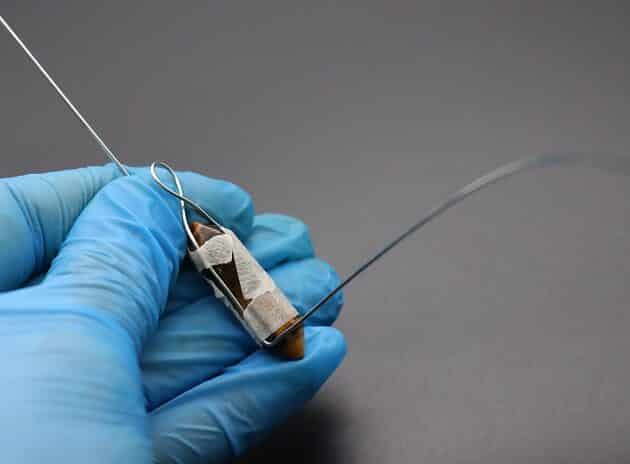
You can cross-check with the circular bail as shown (fig. 2f).

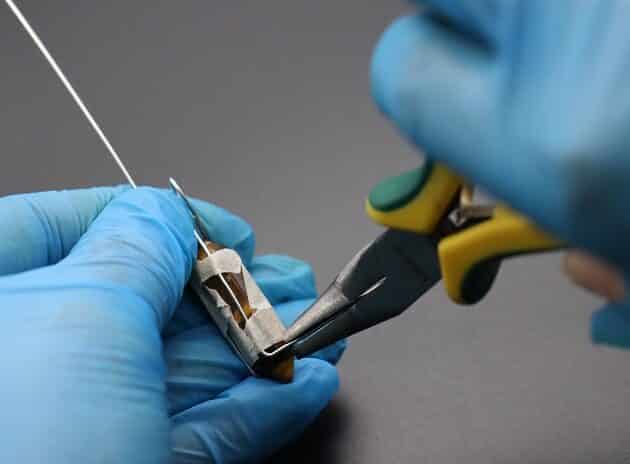
Repeat the process on the other side (fig. 2g, 2h, 2i, 2j, 2k, 2l).

Wire-Wrapping Crystal Tower Point Tutorials 8
fig. 2a
Wire-Wrapping Crystal Tower Point Tutorials 9
fig. 2b
Wire-Wrapping Crystal Tower Point Tutorials 10
fig. 2c
Wire-Wrapping Crystal Tower Point Tutorials 11
fig. 2d
Wire-Wrapping Crystal Tower Point Tutorials 12
fig. 2e
Wire-Wrapping Crystal Tower Point Tutorials 13
fig. 2f
Wire-Wrapping Crystal Tower Point Tutorials 14
fig. 2g
Wire-Wrapping Crystal Tower Point Tutorials 15
fig. 2h
Wire-Wrapping Crystal Tower Point Tutorials 16
fig. 2i
Wire-Wrapping Crystal Tower Point Tutorials 17
fig. 2j
Wire-Wrapping Crystal Tower Point Tutorials 18
fig. 2k
Wire-Wrapping Crystal Tower Point Tutorials 19
fig. 2l

Step 3 of 9

After completing Step 2, the completed wire frame should look like as shown: front (fig. 3a), bottom (fig. 3b), back (fig. 3c).

Wire-Wrapping Crystal Tower Point Tutorials 20
fig. 3a
Wire-Wrapping Crystal Tower Point Tutorials 21
fig. 3b
Wire-Wrapping Crystal Tower Point Tutorials 22
fig. 3c

Step 4 of 9

We give the silver wire frame a firm hold on the crystal stone by weaving.

Start a new length of 23-gauge copper wire and anchor it at the bottom frame as shown (fig. 4a, 4b).

Cut the excess wire from the anchor site with a wire cutter (fig. 4c).

Then, continue to weave the copper wire with a simple coil decoration on the silver wire frame (fig. 4d, 4e).

Cut the excess wire to finish up the design (fig. 4f).

Repeat the process on the other side with a similar decoration (fig. 4g, 4h, 4i, 4j).

Note: After cutting the wire, make sure it is close to frame and tugged at the back to avoid getting caught on surfaces.

Wire-Wrapping Crystal Tower Point Tutorials 23
fig. 4a
Wire-Wrapping Crystal Tower Point Tutorials 24
fig. 4b
Wire-Wrapping Crystal Tower Point Tutorials 25
fig. 4c
Wire-Wrapping Crystal Tower Point Tutorials 26
fig. 4d
Wire-Wrapping Crystal Tower Point Tutorials 27
fig. 4e
Wire-Wrapping Crystal Tower Point Tutorials 28
fig. 4f
Wire-Wrapping Crystal Tower Point Tutorials 29
fig. 4g
Wire-Wrapping Crystal Tower Point Tutorials 30
fig. 4h

Step 5 of 9

Moving on, start a new length of 23-gauge copper and make a coil on the midpoint of the silver wire frame (fig. 5a).

Then, proceed to make the same coil on the other frames (fig. 5b, 5c).

End the design by making a last coil on the starting frame (Jump to fig. 8f).

Wire-Wrapping Crystal Tower Point Tutorials 33
fig. 5a
Wire-Wrapping Crystal Tower Point Tutorials 34
fig. 5b
Wire-Wrapping Crystal Tower Point Tutorials 35
fig. 5c

Step 6 of 9

We finish up the silver wire frame by bending the excess silver wires to the left direction (fig. 6a, 6b, 6c, 6d).

Make a square shape at the top base of the crystal point as shown (fig. 6e).

Then, wrap the excess wire around the top frame (fig. 6f).

Wire-Wrapping Crystal Tower Point Tutorials 36
fig. 6a
Wire-Wrapping Crystal Tower Point Tutorials 37
fig. 6b
Wire-Wrapping Crystal Tower Point Tutorials 38
fig. 6c
Wire-Wrapping Crystal Tower Point Tutorials 39
fig. 6d
Wire-Wrapping Crystal Tower Point Tutorials 40
fig. 6e
Wire-Wrapping Crystal Tower Point Tutorials 41
fig. 6f

Step 7 of 9

After that, cut out the excess wire (fig. 7a).

Complete the design by making an ending coil with a round nose pliers (fig. 7b, 7c).

Wire-Wrapping Crystal Tower Point Tutorials 42
fig. 7a
Wire-Wrapping Crystal Tower Point Tutorials 43
fig. 7b
Wire-Wrapping Crystal Tower Point Tutorials 44
fig. 7c

Step 8 of 9

On the top end of the silver wire, continue to wrap it upwards towards the bail (fig. 8a).

Then, pull the wire downwards and make a curve as shown (fig. 8b).

Cut the excess wire (fig. 8c) and finish up with a coil design using round nose pliers (fig. 8d, 8e, 8f).

Wire-Wrapping Crystal Tower Point Tutorials 45
fig. 8a
Wire-Wrapping Crystal Tower Point Tutorials 46
fig. 8b
Wire-Wrapping Crystal Tower Point Tutorials 47
fig. 8c
Wire-Wrapping Crystal Tower Point Tutorials 48
fig. 8d
Wire-Wrapping Crystal Tower Point Tutorials 49
fig. 8e
Wire-Wrapping Crystal Tower Point Tutorials 50
fig. 8f

Step 9 of 9

Lastly, we make the final touch up for the pendant. 

Use a long flat nose pliers and give the middle copper wire a minimal design (fig. 9a, 9b).

Repeat on the back side of the pendant (fig. 9c, 9d).

Finish up with polishing using a finest steel wire wool (fig. 9e, 9f).

Wire-Wrapping Crystal Tower Point Tutorials 51
fig. 9a
Wire-Wrapping Crystal Tower Point Tutorials 52
fig. 9b
Wire-Wrapping Crystal Tower Point Tutorials 53
fig. 9c
Wire-Wrapping Crystal Tower Point Tutorials 54
fig. 9d
Wire-Wrapping Crystal Tower Point Tutorials 55
fig. 9e
Wire-Wrapping Crystal Tower Point Tutorials 56
fig. 9f

FINISHED WIRE-WRAPPING CRYSTAL TOWER POINT PENDANT DESIGN

Wire-Wrapping Crystal Tower Point Tutorials 57
Finished Wire-Wrapping Crystal Tower Point Tutorials (Front)
Wire-Wrapping Crystal Tower Point Tutorials 58
Finished Wire-Wrapping Crystal Tower Point Tutorials (Side)

Want to Support me?

If you enjoyed my content,  please consider support me on Patreon:). This helps me to create more amazing free content to share with you 🙂


If you’d like to see my work and follow my wire journey, you can find me here:

Facebook Instagram Twitter Pinterest YouTube Etsy

madelynn signature                                

Filed Under: Tutorials/DIY

Primary Sidebar

MadelynnHey there! Thanks for visiting 🙂

My name is Madelynn and I’m the owner of Studio 73 Designs.

Studio 73 Designs is managed by a team of wire wrapping jewelry enthusiasts.

If you enjoy my content, you can support me on Patreon 🙂 Cheers!

Follow Me

  • Facebook
  • Instagram
  • Pinterest
  • Twitter
  • YouTube

ARE YOU INTERESTED IN WIRE-WRAPPING?

Sign up below and get access to my FREE wire-wrapping guides!

Sign Up
Wire Wrapping Tutorials
Wire Wrapping for Beginners Start Here
Beginner's Guide to Jewelry Wire for Wire-Wrapping
Wire Wrapping Tools and Supplies for Beginners
How to wire wrap stones without holes wire-wrapping tutorial for beginners
Wire Wrapping Tutorials DIY Jewelry Kits

Footer

ARE YOU INTERESTED IN WIRE-WRAPPING?

Sign up below and get access to my FREE wire-wrapping guides!

Sign Up

Site Navigation

Home
About
Contact
Blog
Privacy Policy
Disclaimer
Terms & Conditions

Follow Me

  • Facebook
  • Instagram
  • Pinterest
  • Twitter
  • YouTube

© 2023 · Studio 73 Designs