• Skip to main content
  • Skip to secondary menu
  • Skip to primary sidebar
  • Skip to footer
Studio 73 Designs

Studio 73 Designs

Wire Jewelry Making & Wire Wrapping Techniques

  • Start Here!
  • FREE Wire-Wrapping Guides
  • Shop Tutorials
    • Cart
    • Checkout
  • Contact
  • Join Member
  • Member Login
Join PREMIUM MEMBERSHIP (FREE-TRIAL): 70+ Wire Wrapping Tutorials: Gain access to ALL step-by-step tutorials with high-quality images, no ads, plus all future tutorials. Check it out HERE.

How to add your logo to photos with PicMonkey

July 17, 2020 by Madelynn

Whether you are an Etsy seller or online entrepreneur, you may at some point want to add your logo to some of your photos.

I add my logo to all my product pics now – it maintains a level of consistency plus it looks great!
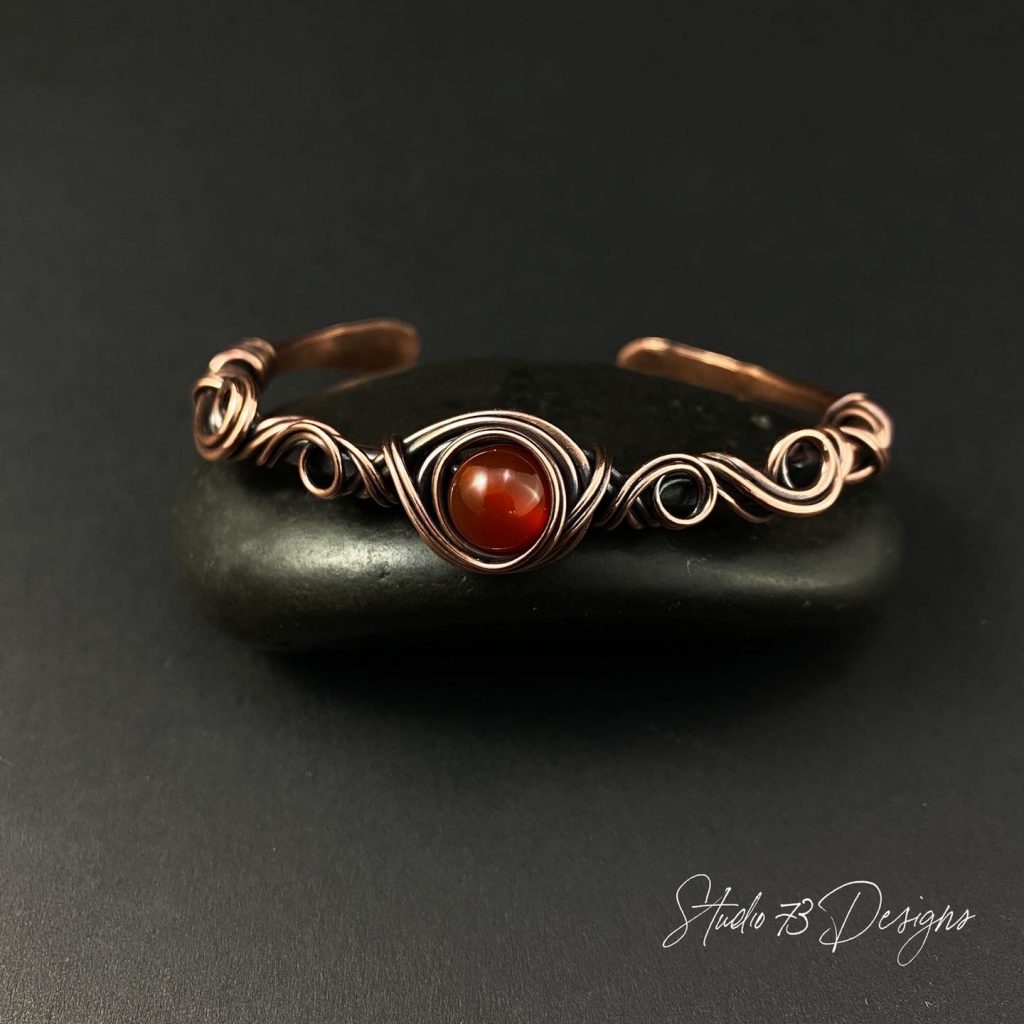
Here is an example:


If you don’t have Photoshop, don’t sweat it – You can use PicMonkey. If you don’t currently have an account with PicMonkey, you can easily sign up for a free 7-day trial.

wire wrap jewelry

FREE WIRE-WRAPPING GUIDE TO YOUR EMAIL! 

JOIN NEWSLETTER

SEND GUIDE TO EMAIL

We respect your privacy. Unsubscribe at anytime.


How to Add Logo to Photos

Before you start, make sure that your logo is in PNG format with a transparent background.

Don’t have a logo yet?

Check out “How to design your own signature logo for photos“


Step 1 – Log into PicMonkey


Step 2 – In top left corner, click on “Create New” and then open your image from your computer.


Once the image is uploaded, it should look something like this:


Step 3 – To add your logo file, click on “graphics” (left of screen) and then click “Add your own image” to upload your logo file.


Step 4 – Once you’ve located your logo, it will be placed automatically on your photo. You simply have to move it where you want it, by dragging and dropping. You can also resize the logo simply by grabbing one of the corner handles and “pulling” out.


Step 5 – Once you’re happy with the photo, you can save it to your computer by clicking “Download” in top right corner.


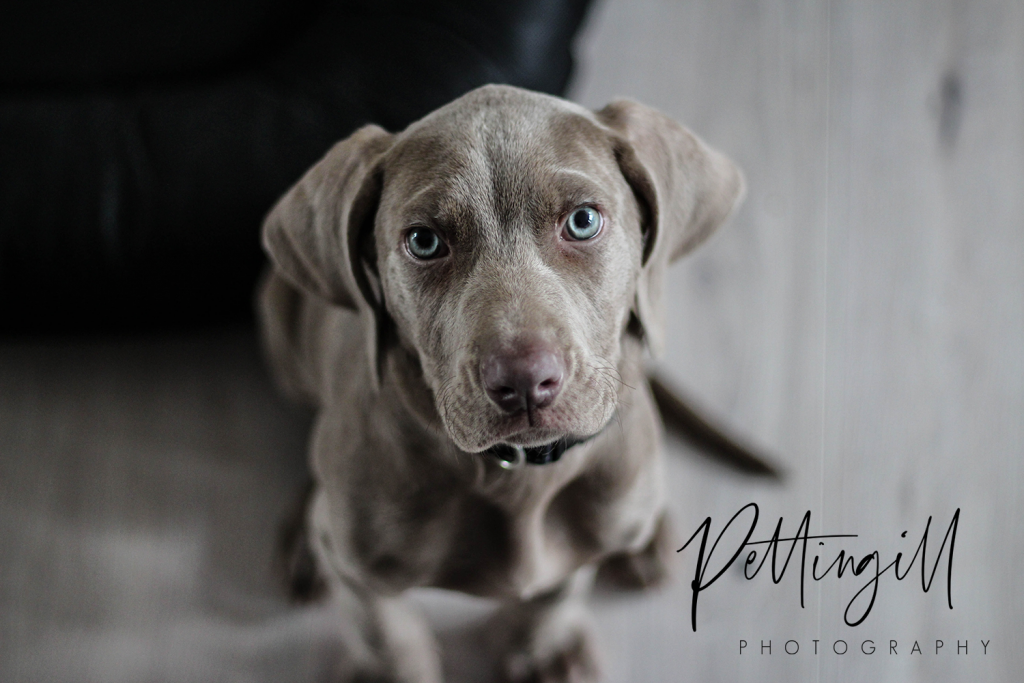
That’s it! Here is what mine looks like….


RELATED: How to design your own signature logo for photos


PIN IT FOR LATER


If you’d like to see my work and follow my wire journey, you can find me here:

Etsy
Facebook
Instagram
Twitter
Pinterest
YouTube

madelynn signature


Filed Under: Tutorials/DIY

Primary Sidebar

MadelynnHey there! Thanks for visiting 🙂

My name is Madelynn and I’m the owner of Studio 73 Designs.

Studio 73 Designs is managed by a team of wire wrapping jewelry enthusiasts 🙂 Cheers!

Follow Me

  • Facebook
  • Instagram
  • Pinterest
  • Twitter
  • YouTube

ARE YOU INTERESTED IN WIRE-WRAPPING?

Sign up below and get access to my FREE wire-wrapping guides!

Sign Up
Wire Wrapping Tutorials
Wire Wrapping for Beginners Start Here
Beginner's Guide to Jewelry Wire for Wire-Wrapping
Wire Wrapping Tools and Supplies for Beginners
How to wire wrap stones without holes wire-wrapping tutorial for beginners
Wire Wrapping Tutorials DIY Jewelry Kits

Footer

ARE YOU INTERESTED IN WIRE-WRAPPING?

Sign up below and get access to my FREE wire-wrapping guides!

Sign Up

Site Navigation

Home
About
Contact
Blog
Privacy Policy
Disclaimer
Terms & Conditions

Follow Me

  • Facebook
  • Instagram
  • Pinterest
  • Twitter
  • YouTube

© 2026 · Studio 73 Designs

wire-wrapping tutorials

Learn Wire-Wrapping

Want to create beautiful wire-wrapped jewelry? Join membership today and get access to 70+ step-by-step wire-wrapping tutorials with high-quality images

Learn More
x