Hello my dear wire wrapper!
If you like to personalize how your jewelry design look, then my Wire-Wrapping Simple Shark Tooth Pendant Tutorial is a good start for you.
Here you get to explore the basic art of wire-wrapping and learn simple techniques to craft a pendant from scratch.
Don’t worry. My instructions are easy to follow and it comes with step-by-step progress pictures.

FREE WIRE-WRAPPING GUIDE TO YOUR EMAIL!
JOIN NEWSLETTER
We respect your privacy. Unsubscribe at anytime.
Happy wrapping!

LEVEL: BEGINNER
MATERIALS + TOOL
- Shark Tooth
- Gold Copper Wire (22 AWG)
- Wire Cutter
- Stepped Bail-Making Pliers
- Mini Long Needle Nose Pliers
- Finest Steel Wire Wool
- Masking Tape
Prefer this wire-wrapping tutorial in a PRINTABLE FORMAT? (High Resolution Photos)
Click here for the PDF version of “Wire-Wrapping Simple Shark Tooth Pendant Tutorial”
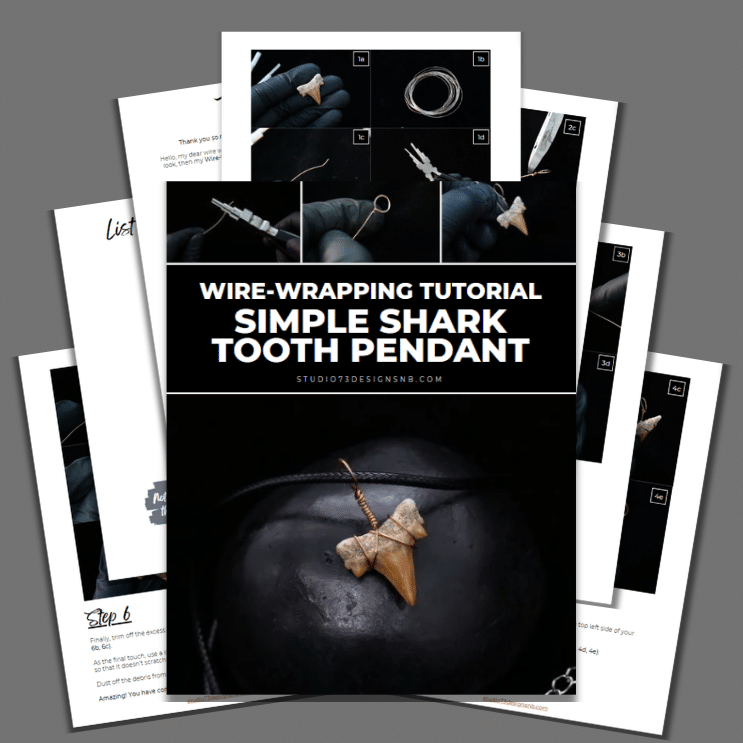
WIRE-WRAPPING SIMPLE SHARK TOOTH PENDANT TUTORIAL
Step 1 of 6
Ready all items from the Materials and Tool list (fig. 1a, 1b).
Form the wire bail for your pendant with a string of 22 gauge gold copper wire and stepped bail-making pliers (fig. 1c, 1d).
Start by curling your 22 gauge wire into a loop as shown (fig. 1e, 1f).


Step 2 of 6
Twist the front end of your 22-gauge wire to close the loop (fig. 2a).
Then, use a wire cutter to trim off the excess wire (fig. 2b, 2c).
Secure the loop by tightening the wire with a long needle nose pliers (fig. 2d, 2e).
Your pendant bail is complete.


Step 3 of 6
Now, let’s wire-wrap your shark tooth with a simple design.
Firstly, place your 22-gauge wire behind the shark tooth (fig. 3a, 3b).
Then, make a wrap on the right side of your shark tooth (fig. 3c, 3d).


Step 4 of 6
Secondly, pull your loose 22-gauge wire diagonally to the top left side of your shark tooth (fig. 4a, 4b, 4c.
Then, make a wrap on the left side your shark tooth (fig. 4d, 4e).


