I’m so excited to have finally finished this wire wrapped Tree of Life tutorial – perfect for any DIY wire jewelry making enthusiast!
In this post, I will show you how to make a tree of life pendant, step by step.
The tree of life is a symbol that has been used throughout history in many different cultures. It often represents the idea of rebirth or regeneration, as well as the interconnectedness of all life.
In some traditions, the tree of life is also seen as a symbol of wisdom and knowledge.

FREE WIRE-WRAPPING GUIDE TO YOUR EMAIL!
JOIN NEWSLETTER
We respect your privacy. Unsubscribe at anytime.
This Tree of Life wire wrap tutorial is quite long with over 90 photos so I definitely recommend grabbing the printable version. You can print the tutorial at home and store in a binder for easy reference.
This wire wrap tutorial is best suited for the advanced beginner or intermediate wire-wrapping artist.
Prefer this wire wrapping tutorial in a PRINTABLE FORMAT?
Click here for the PDF version of the Wire Wrapped Tree of Life Tutorial

WIRE WRAPPED TREE OF LIFE TUTORIAL
LEVEL: INTERMEDIATE
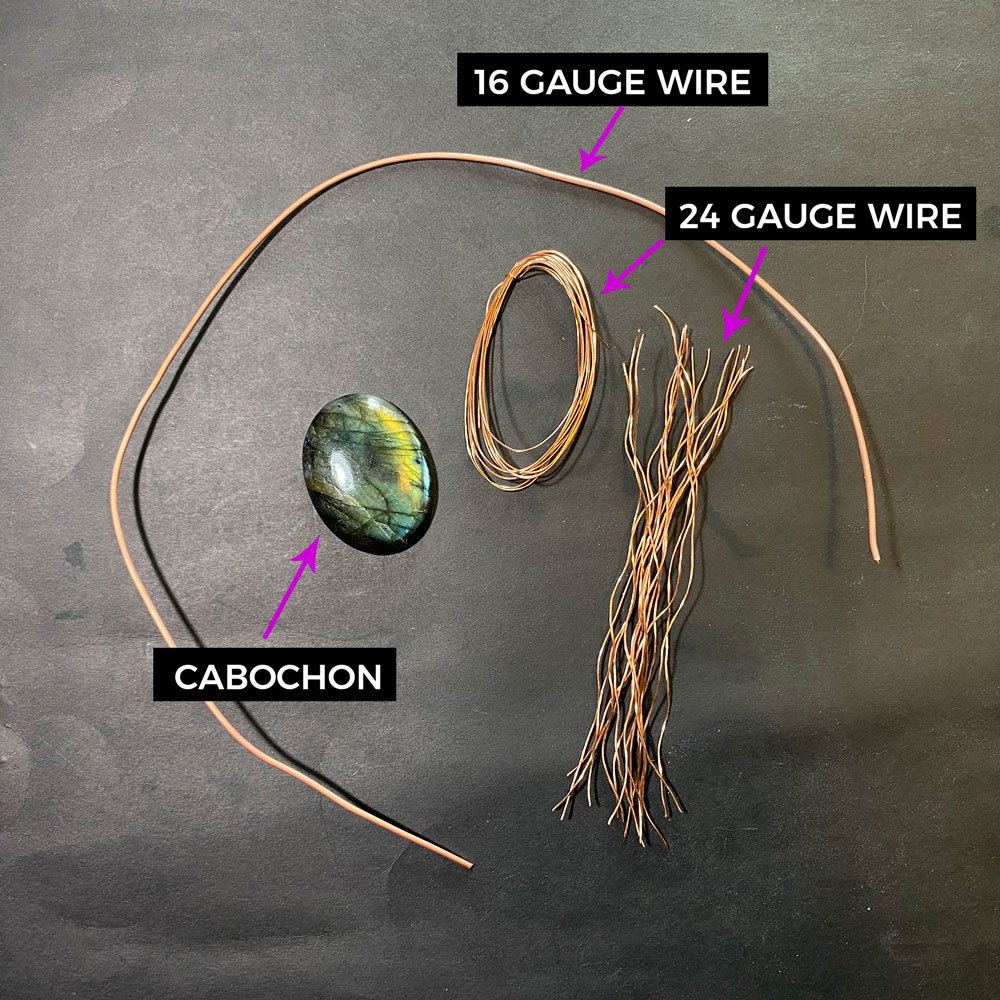
MATERIALS + TOOLS
- 18″ – 16 gauge copper wire (dead soft)
- 16 strands (5″ each) of 24 gauge wire
- 14″-16″ of 24 gauge (for bail)
- Large cabochon (mine measures 1.5″ x 2″)
- Needle nose pliers
- Wire cutters
- 6-Barrel Pliers
- Heavy duty cutters
- Anvil or bench block
- Hammer
- Liver of sulfur (optional)

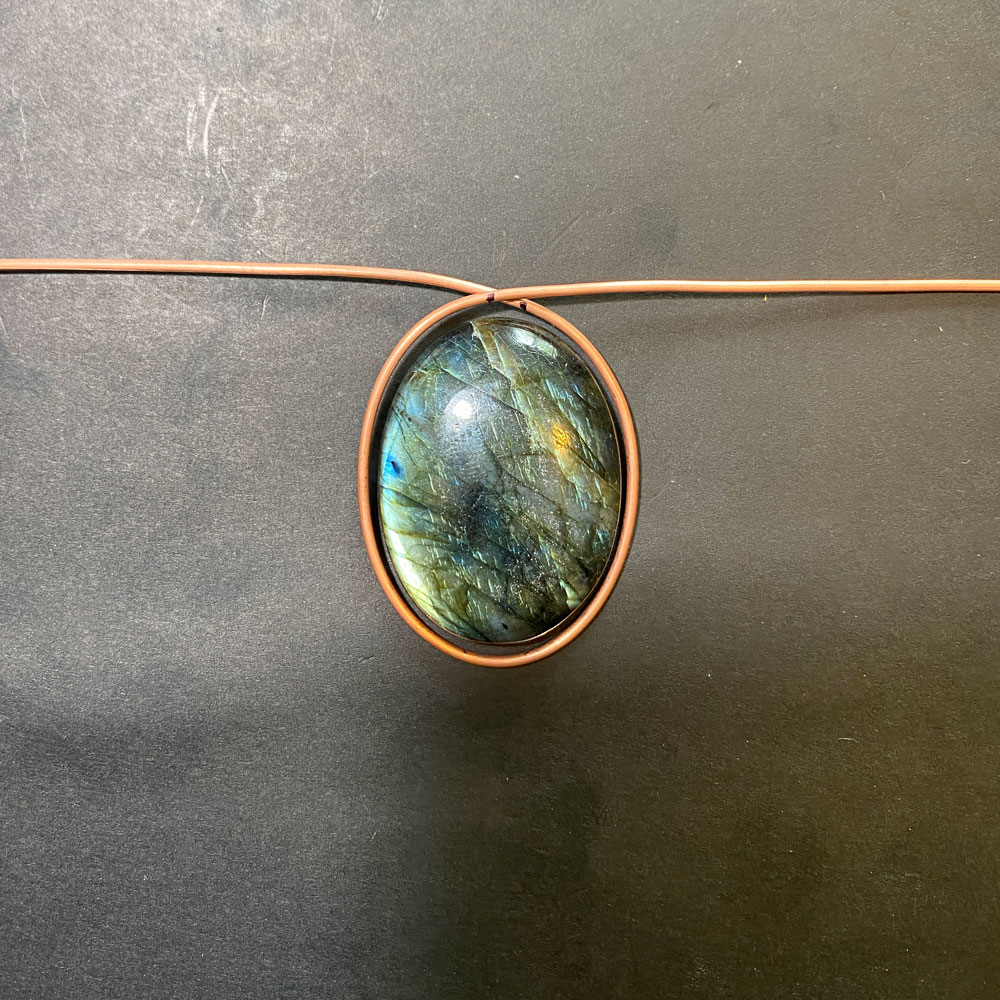
Step 1
First thing is to make the frame of the Tree of Life pendant.
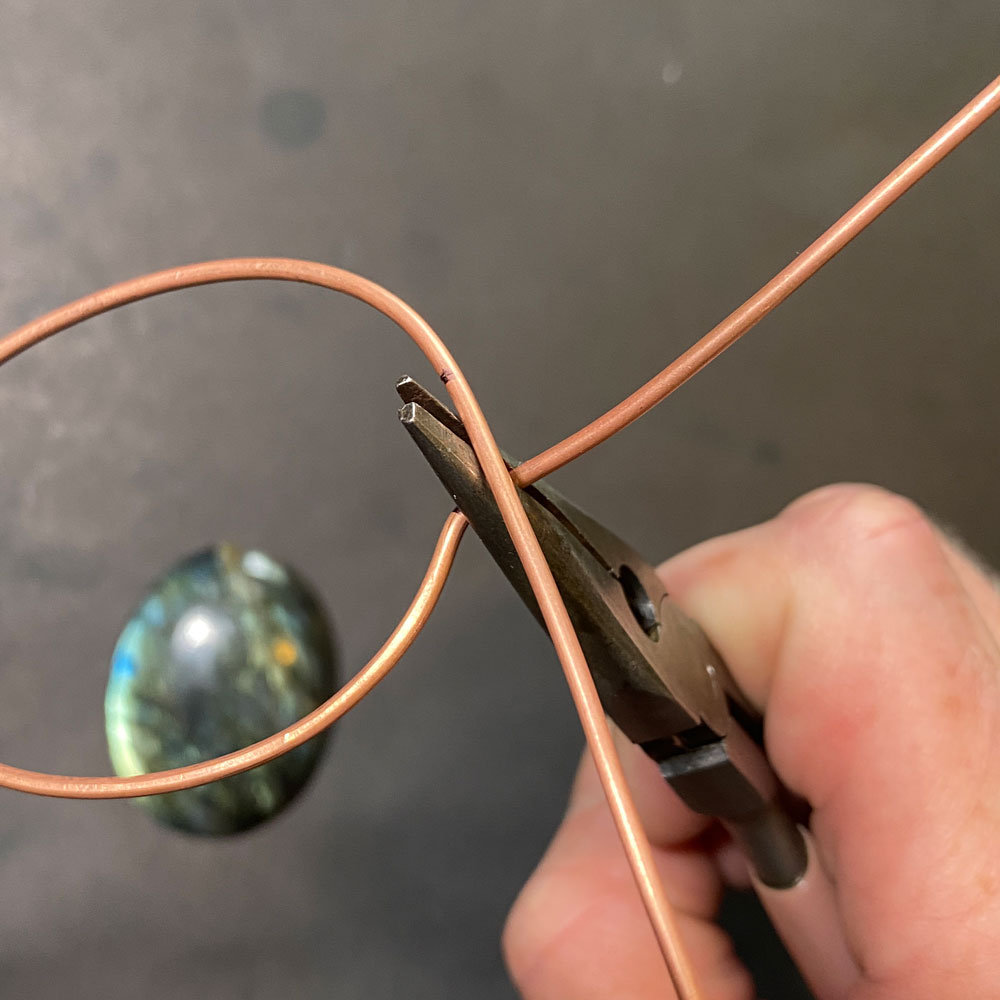
Line up the mid-point of your 16 gauge wire and start forming the wire around the cabochon (fig. 1a, 1b).
Carefully wrap the wire around each side of stone until wires cross at the top (fig. 1c, 1d).
Once you release the frame, the wires will bounce back a bit, leaving a gap around the cabochon (fig. 1e).
The gap is IMPORTANT. It should be big enough to accommodate the 24 gauge wire that you will be wrapping around the frame on all sides.


Prefer this wire-wrapping tutorial in a PRINTABLE FORMAT?
Click here for the PDF version of the Tree of Life Wire Wrap Tutorial
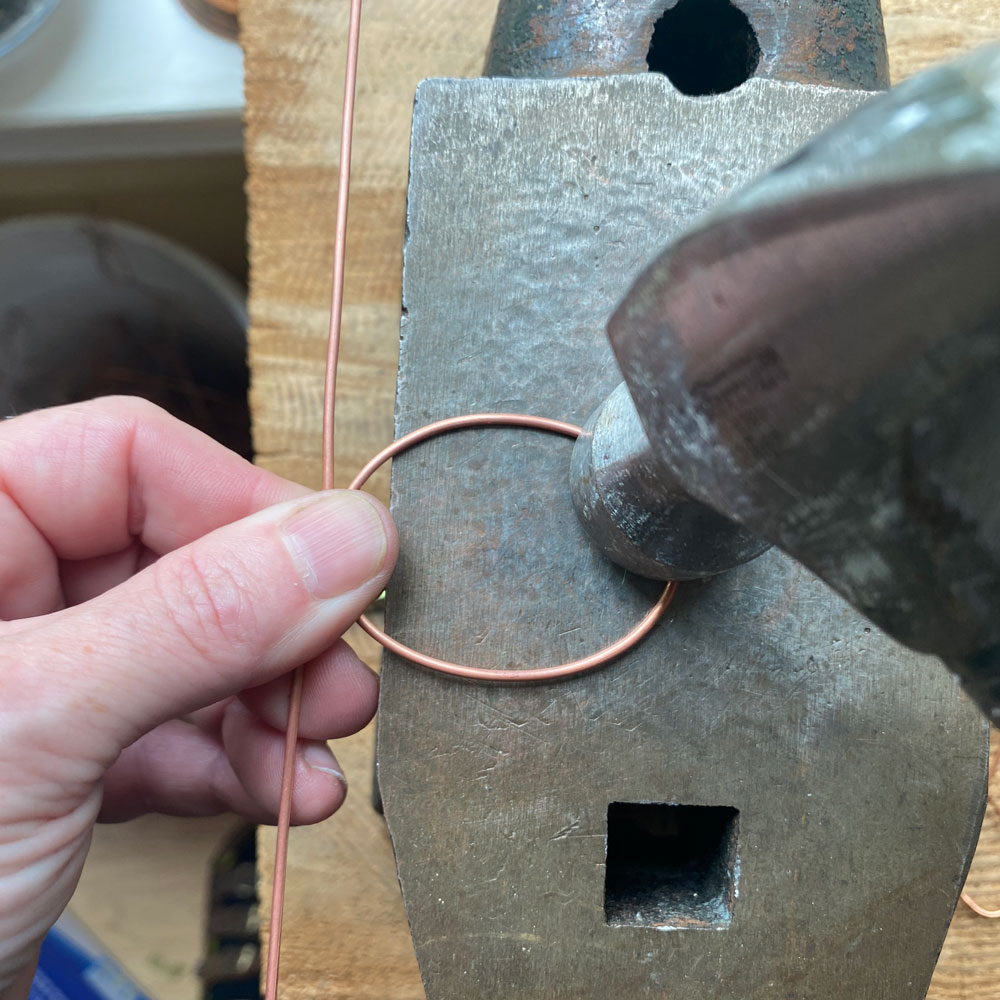
Step 2
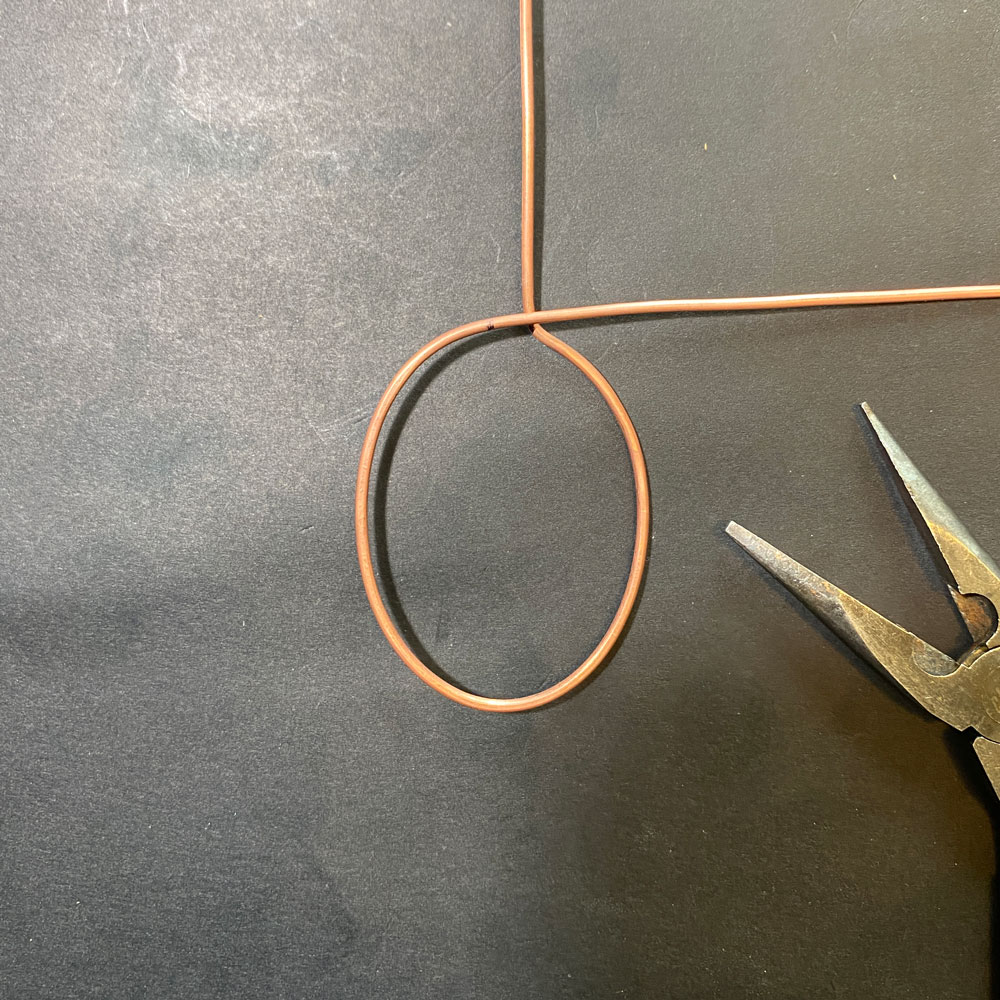
Once you’re happy with the size of the frame for your Tree of Life pendant, you can hammer it lightly – this helps the frame keep its shape (fig. 2a, 2b).
Once hammered, you can use a Sharpie to add marks where you will bend both bail wires in place (fig. 2c).

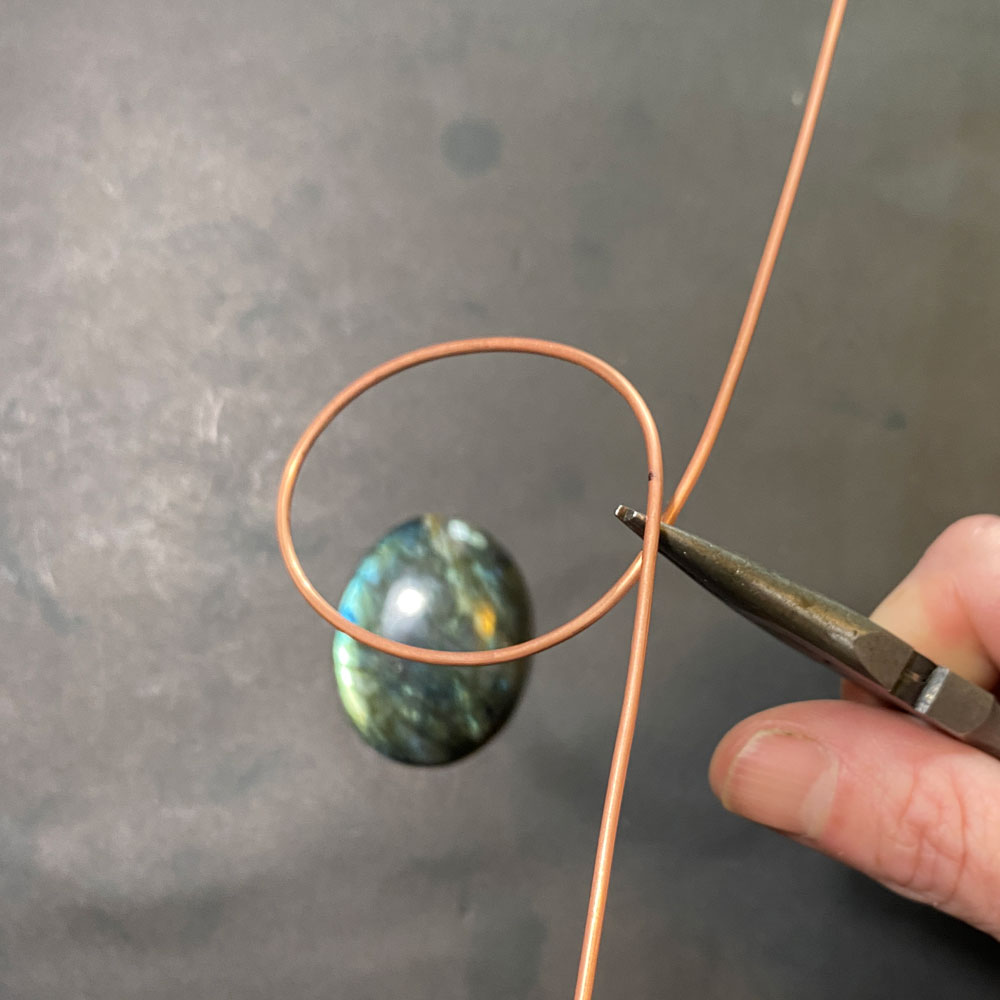
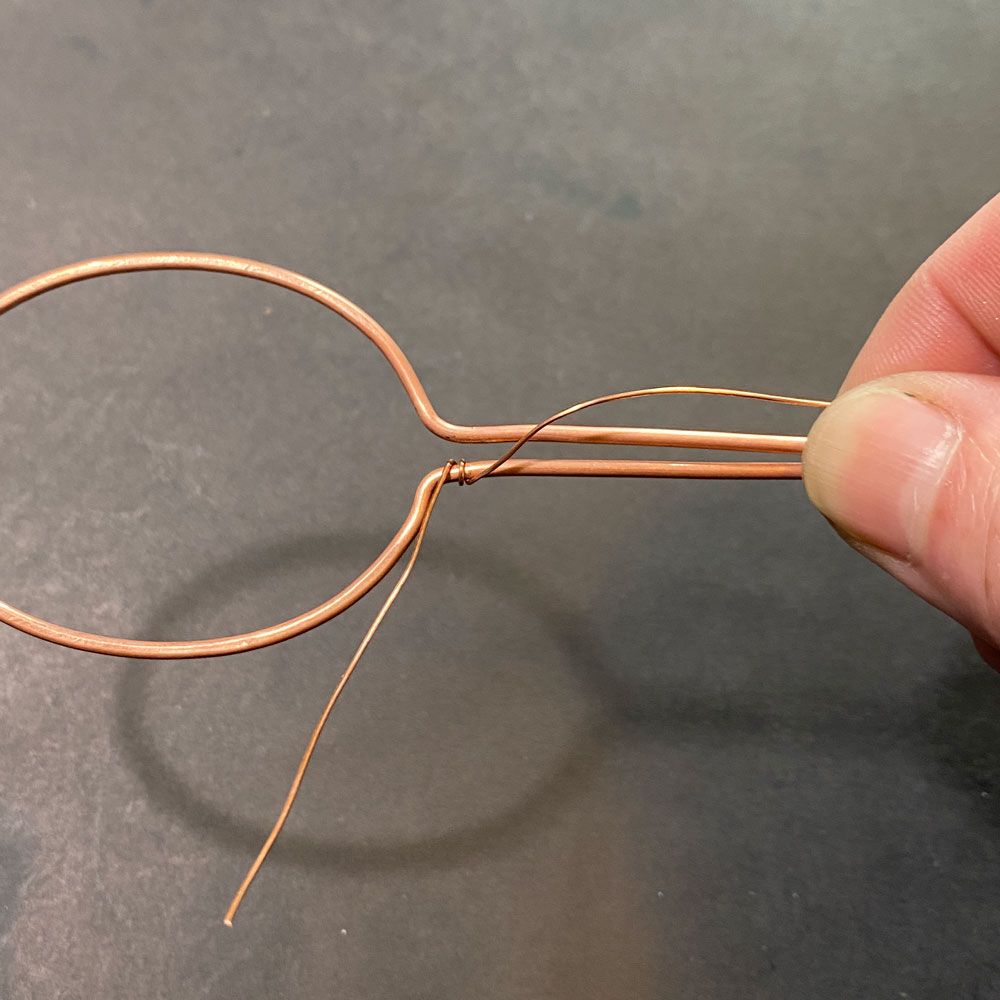
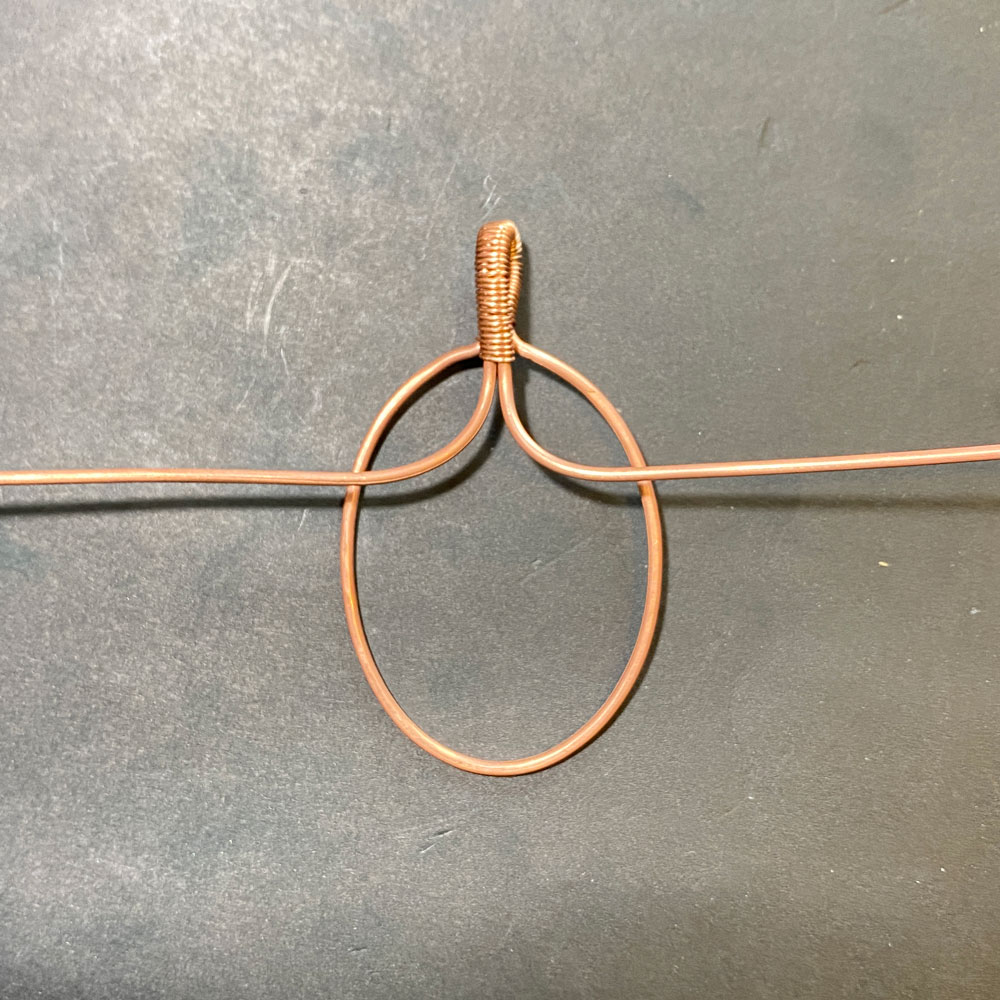
Step 3
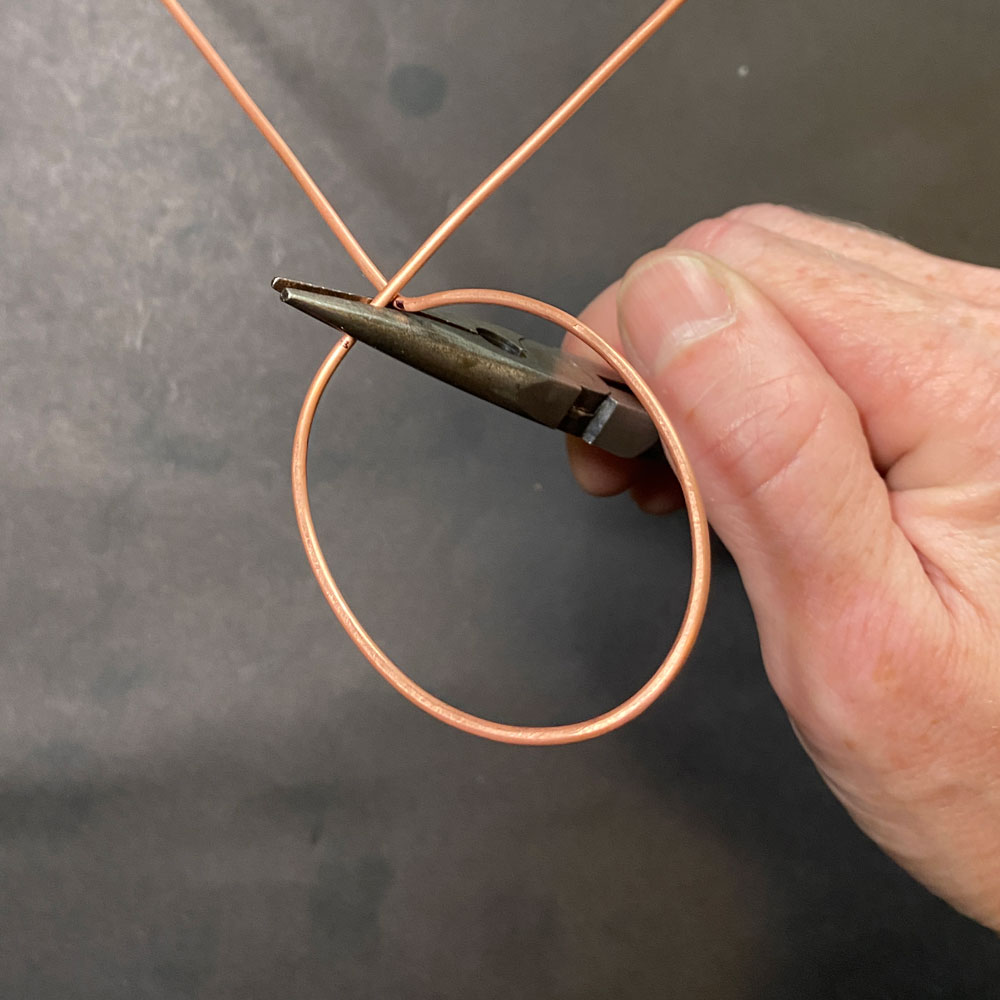
Using a pair of needle nose pliers, grab one of the bail wires (on the Sharpie mark). Make a straight bend. (fig. 3a, 3b, 3c)
Step 4
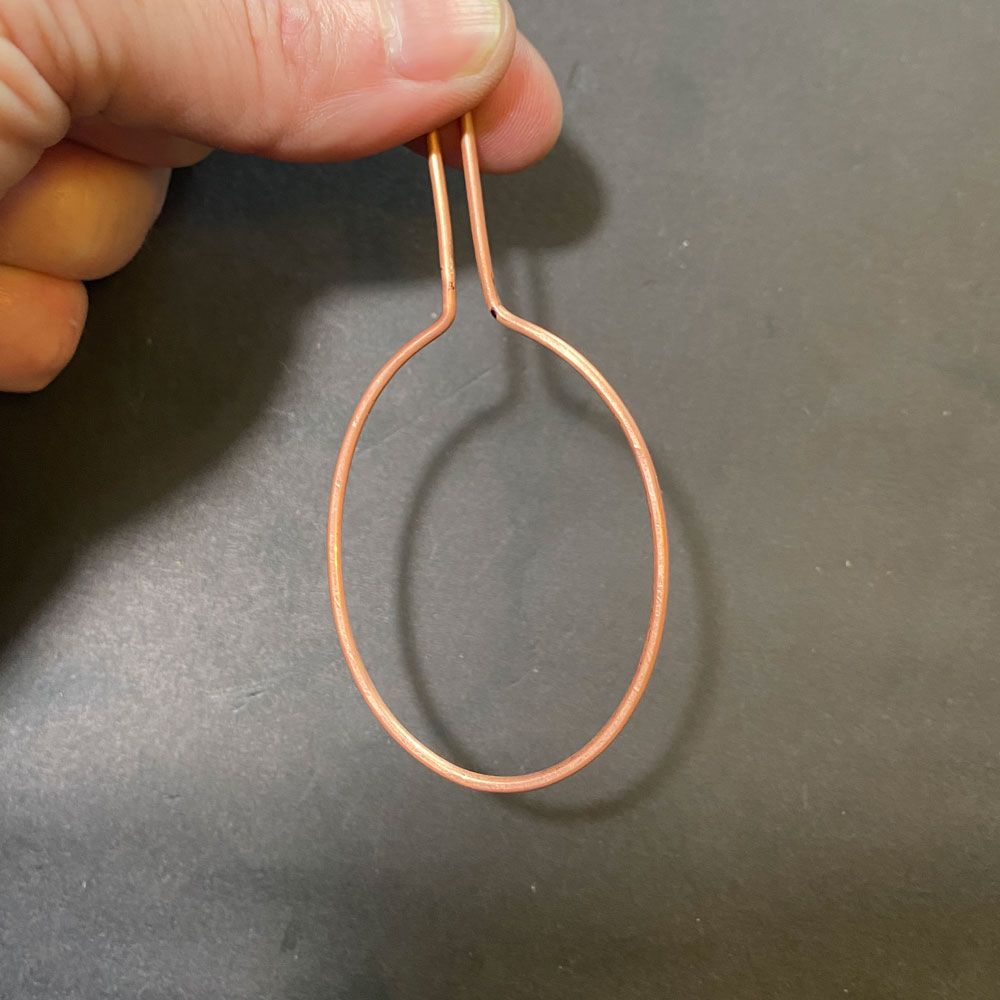
Repeat on other side and keep it as symmetrical as possible – this can take some practice (fig. 4a, 4b, 4c, 4d).


Prefer this wire wrapping tutorial in a PRINTABLE FORMAT?
Click here for the PDF version of the Wire Wrapped Tree of Life Tutorial
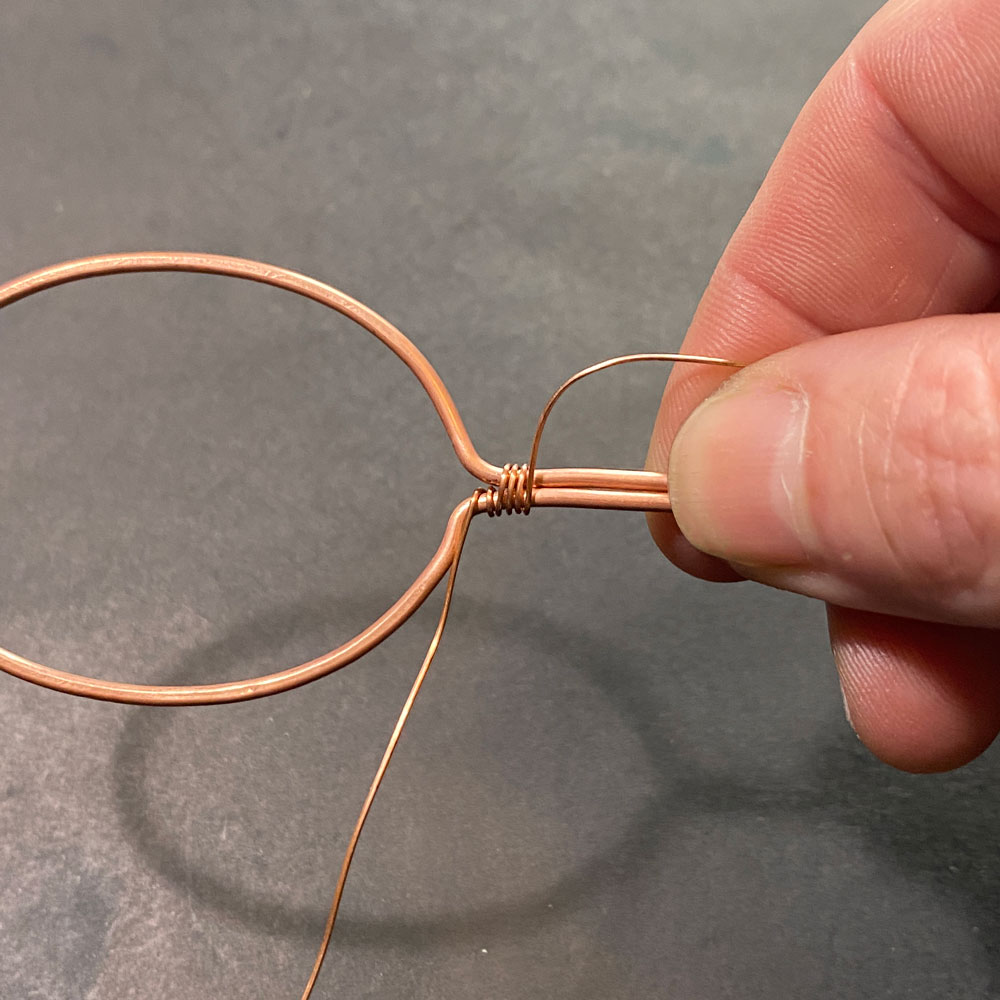
Step 5
Using your long piece of 24 gauge wire, make a couple wraps on one of the bail wires to anchor it (fig. 5a).
Start wrapping around both wires (fig. 5b).
From time to time, I use my finger nail to push wires together (fig. 5c).
Keep wrapping both bail wires until the wrap is approximately 1.25″- 1.5″ long (fig. 5d).
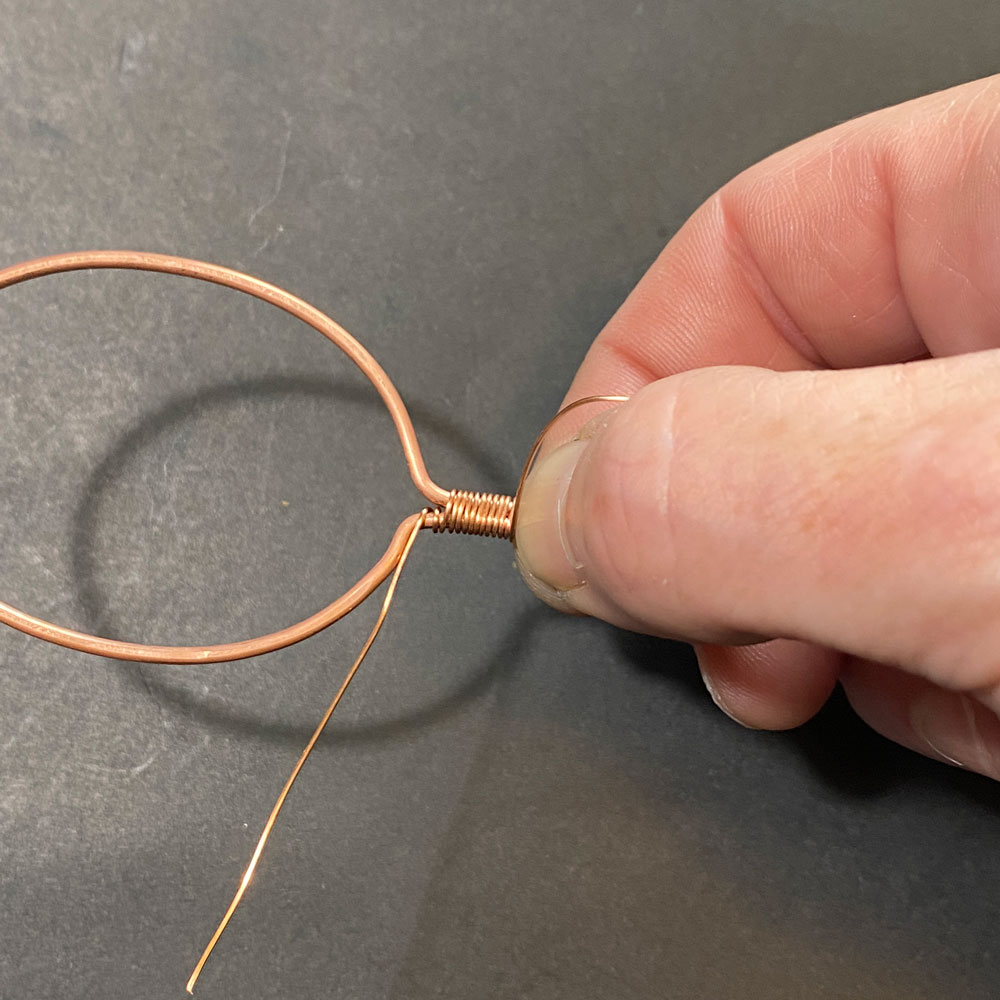
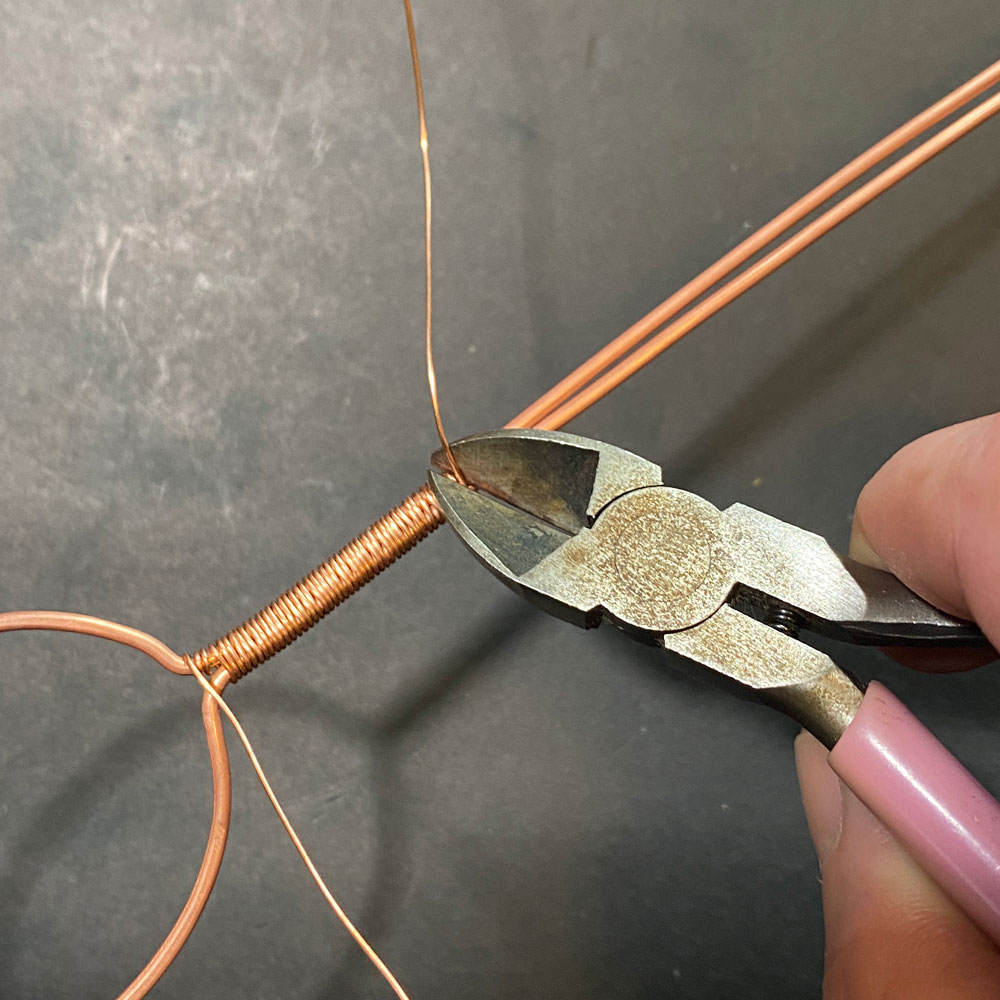
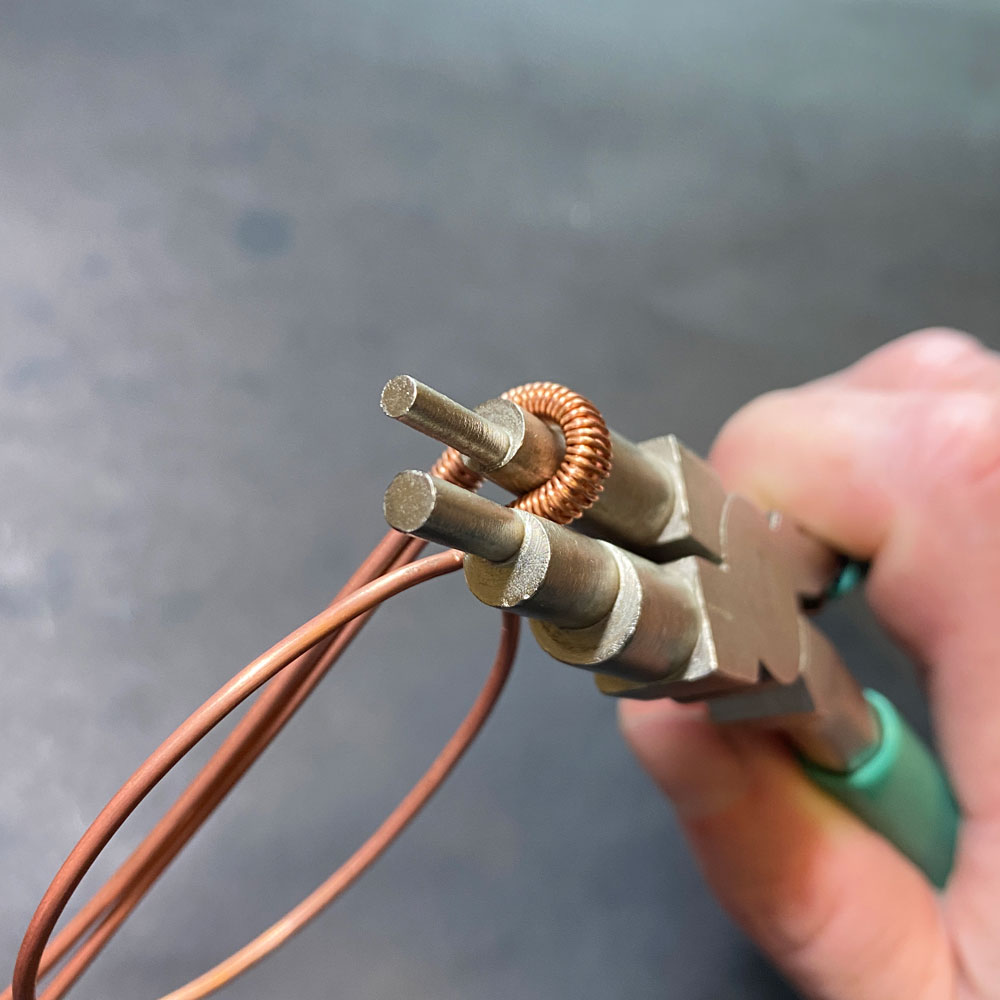
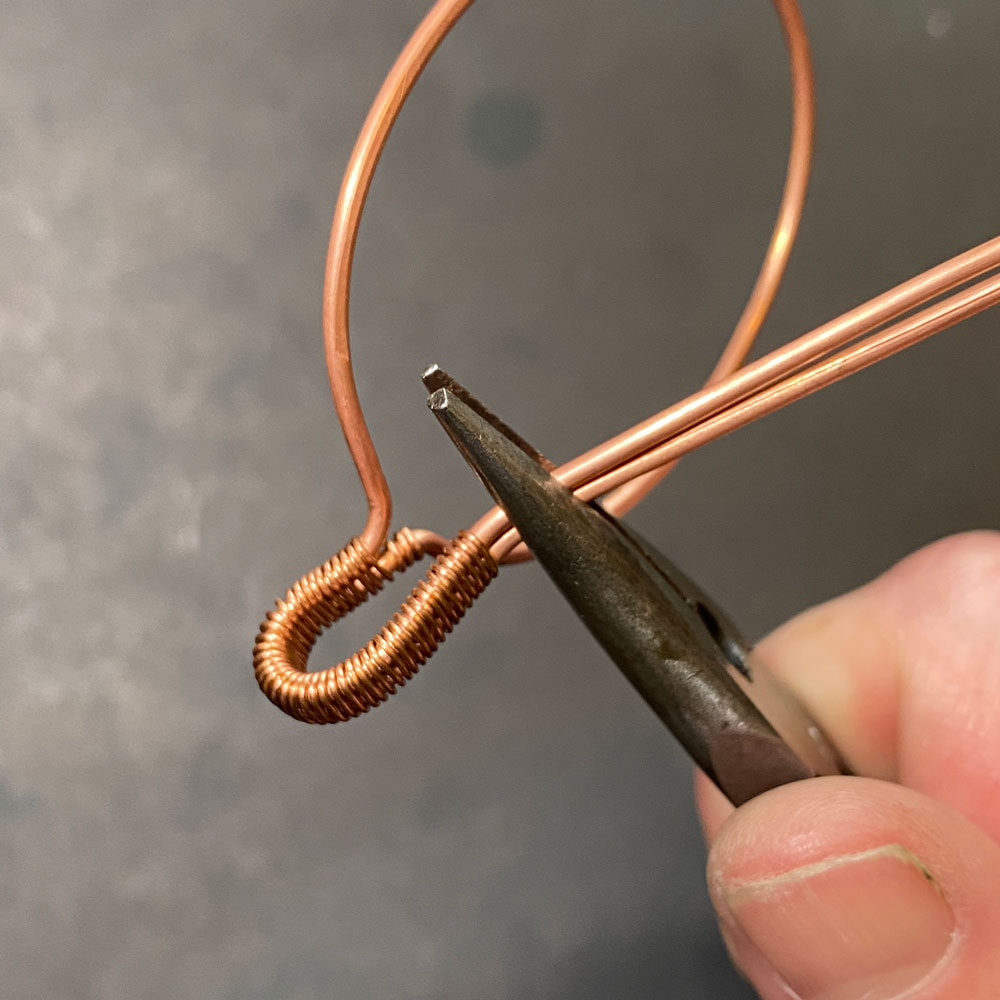
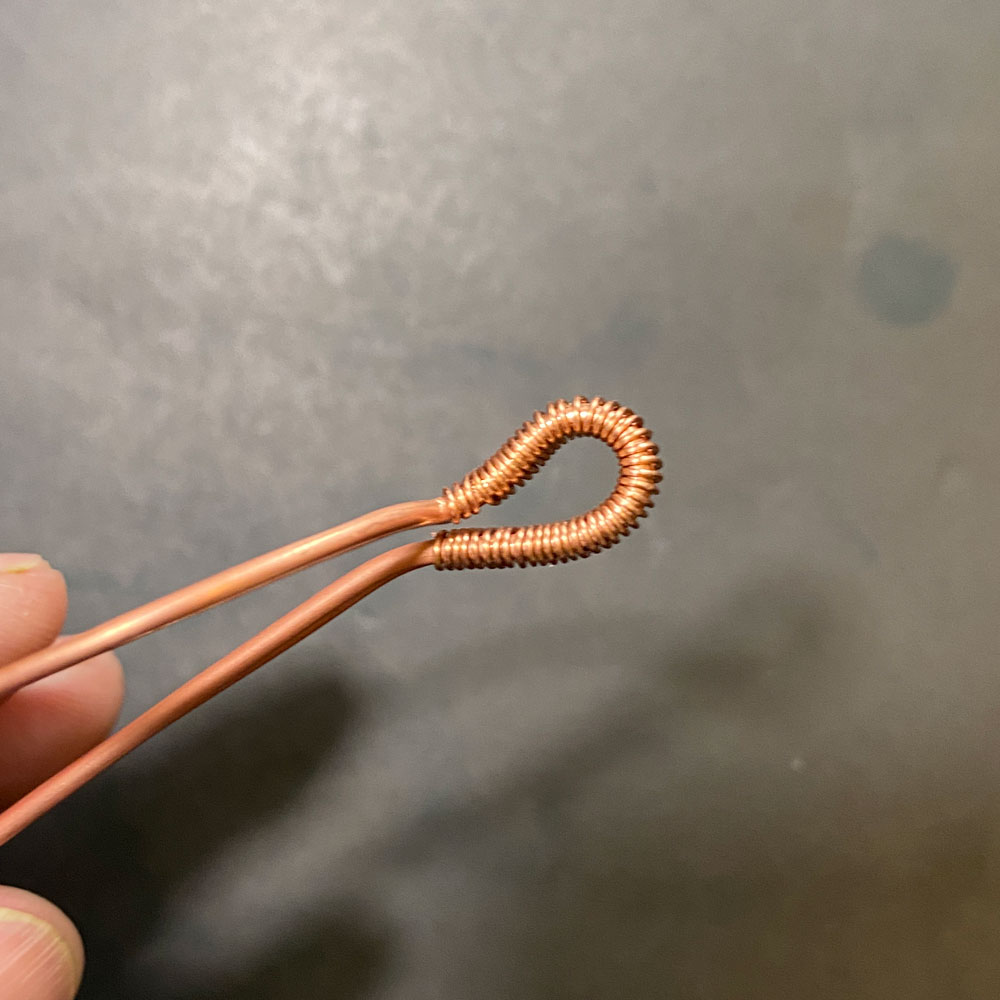
Step 6
Using wire cutters, trim excess wires and tuck ends in with needle nose pliers (fig. 6a, 6b, 6c).

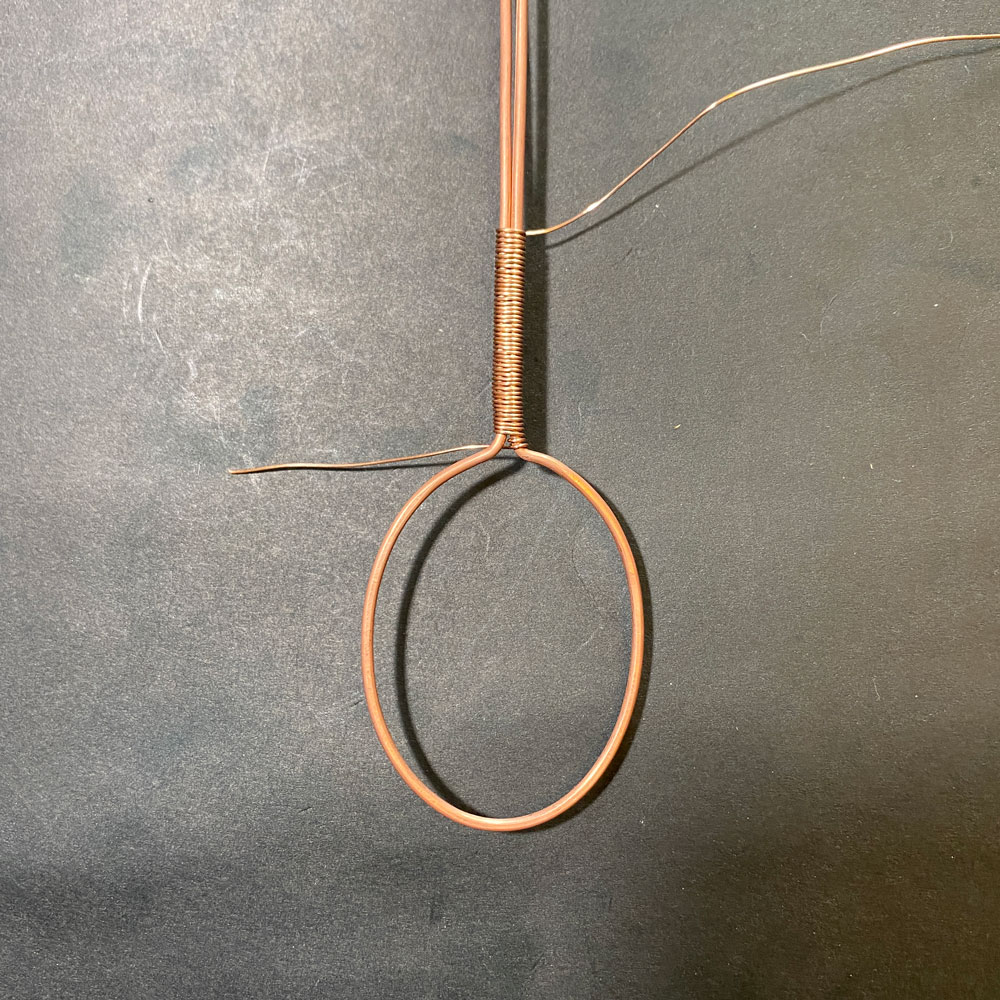
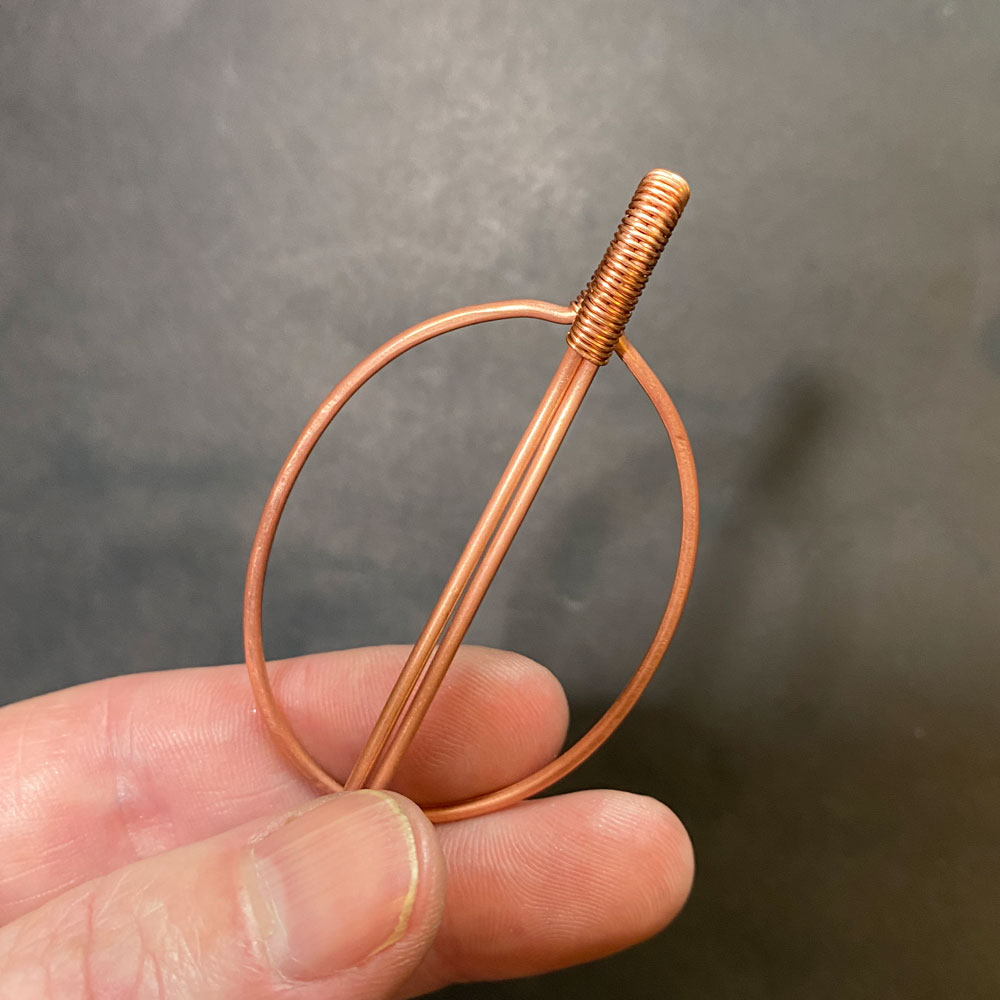
Step 7
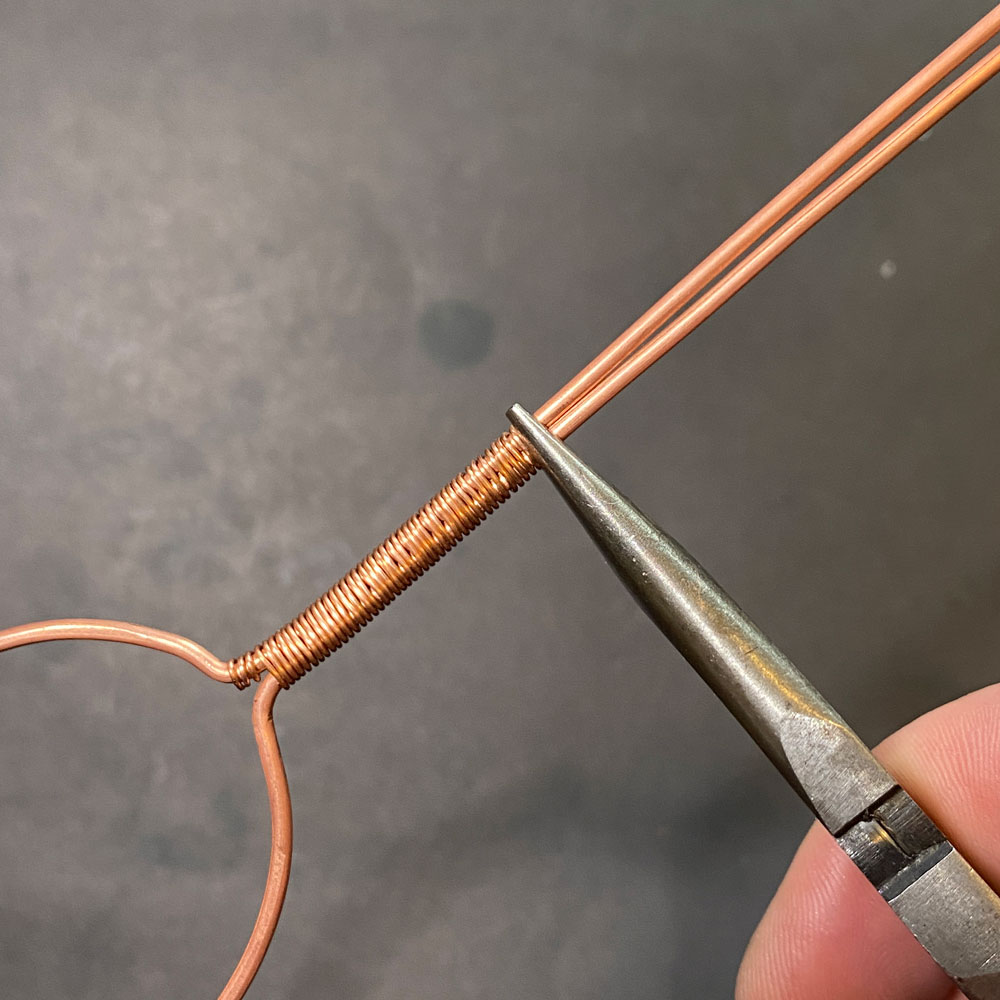
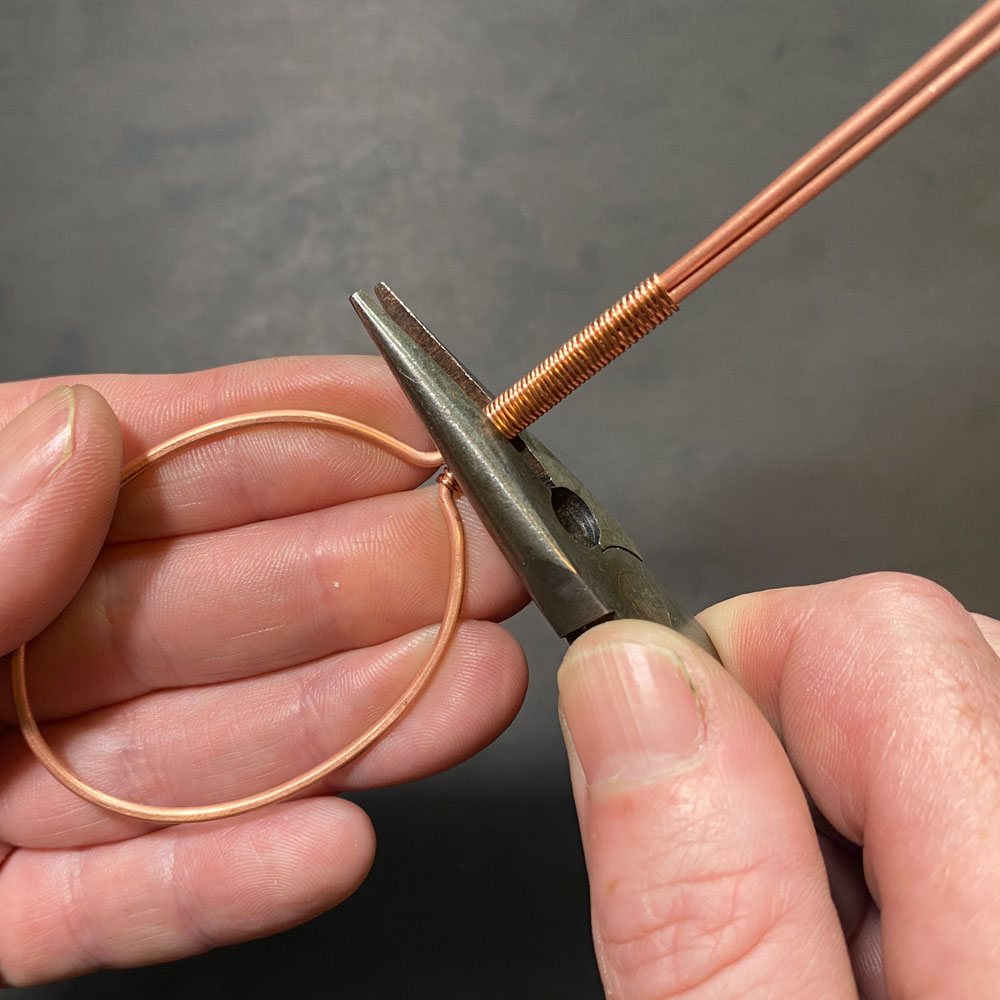
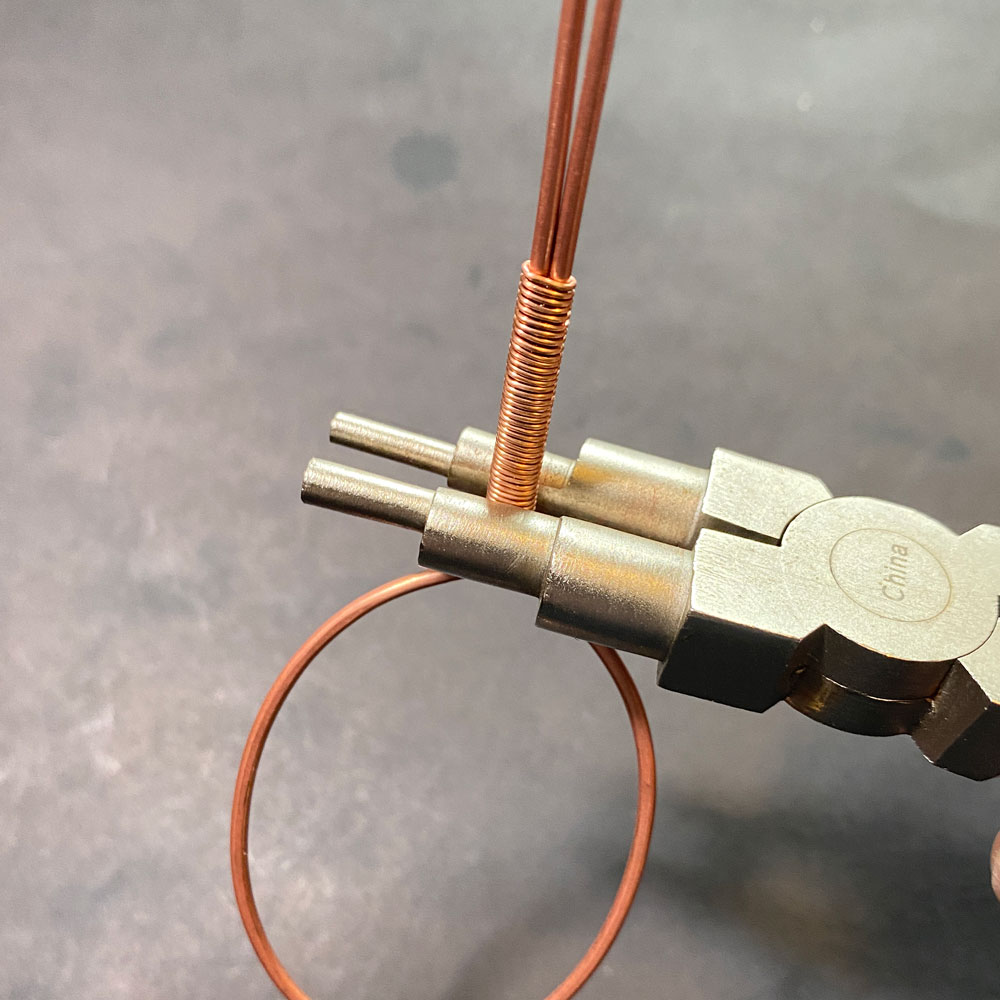
Using your needle nose pliers, carefully bend the bail forward slightly (fig. 7a).
Using barrel pliers, form your bail (fig. 7b, 7c).
Using needle nose pliers, make a bend in wire so it comes flush with the frame (fig. 7d, 7e, 7f).
Prefer this wire-wrapping tutorial in a PRINTABLE FORMAT?
Click here for the PDF version of the Tree of Life Wire-Wrap Tutorial
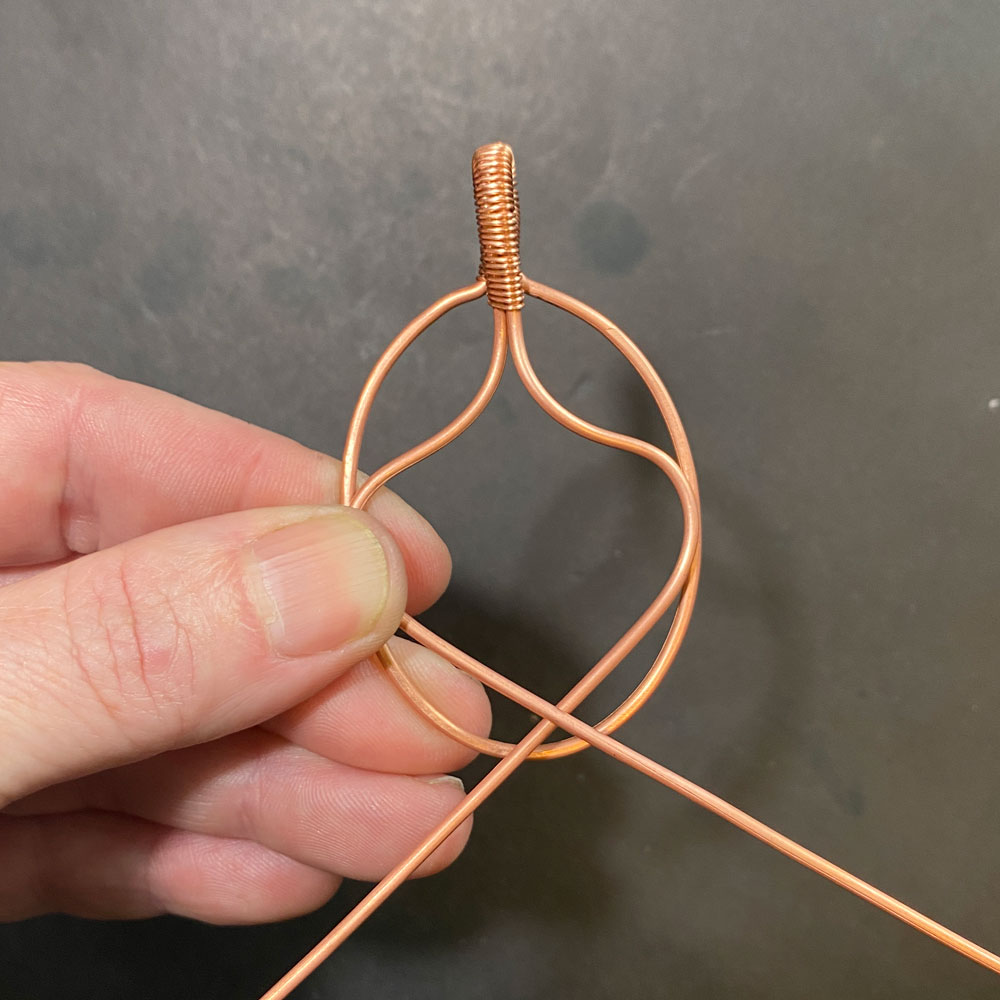
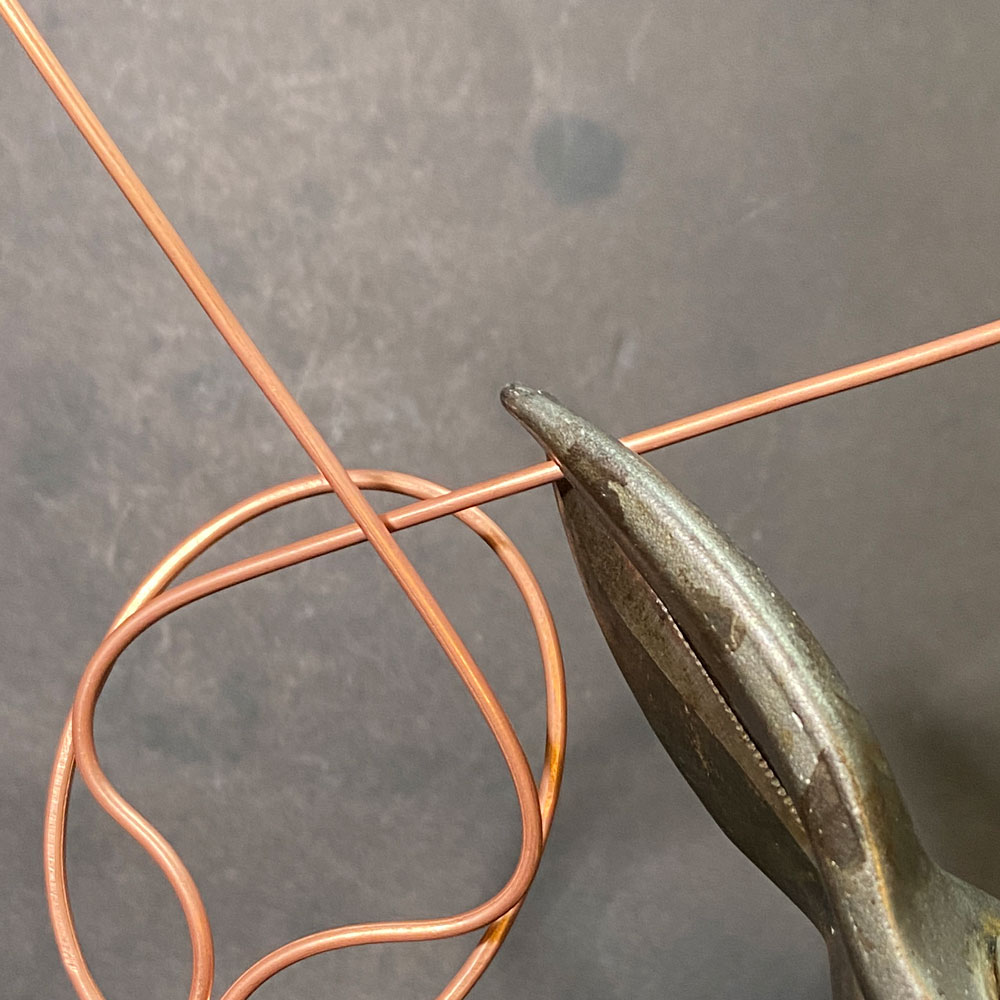
Step 8
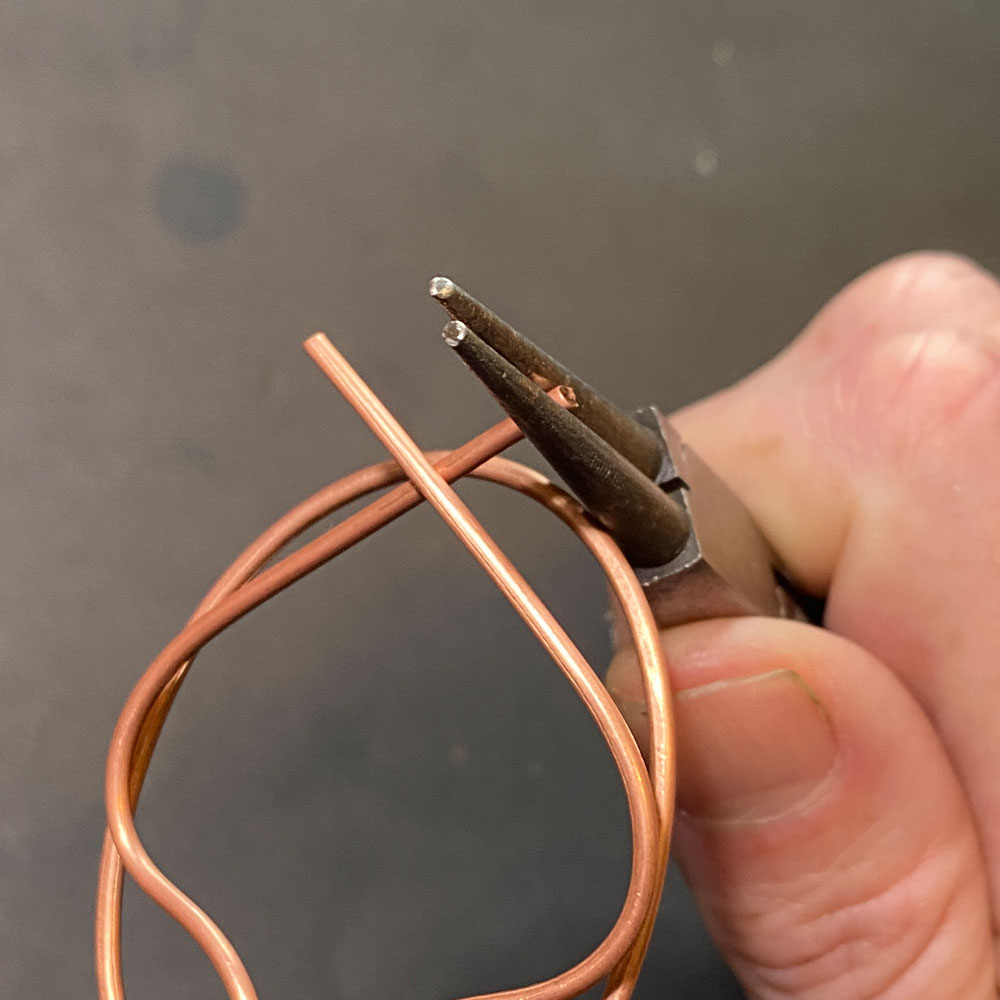
Using your fingers, bend the wires outward, as shown (fig. 8a, 8b).
Now bend both wires inward, keeping both as symmetrical as possible (fig. 8c).
Cut excess wire, leaving about 0.5″ from crossing point (fig. 8d, 8e).

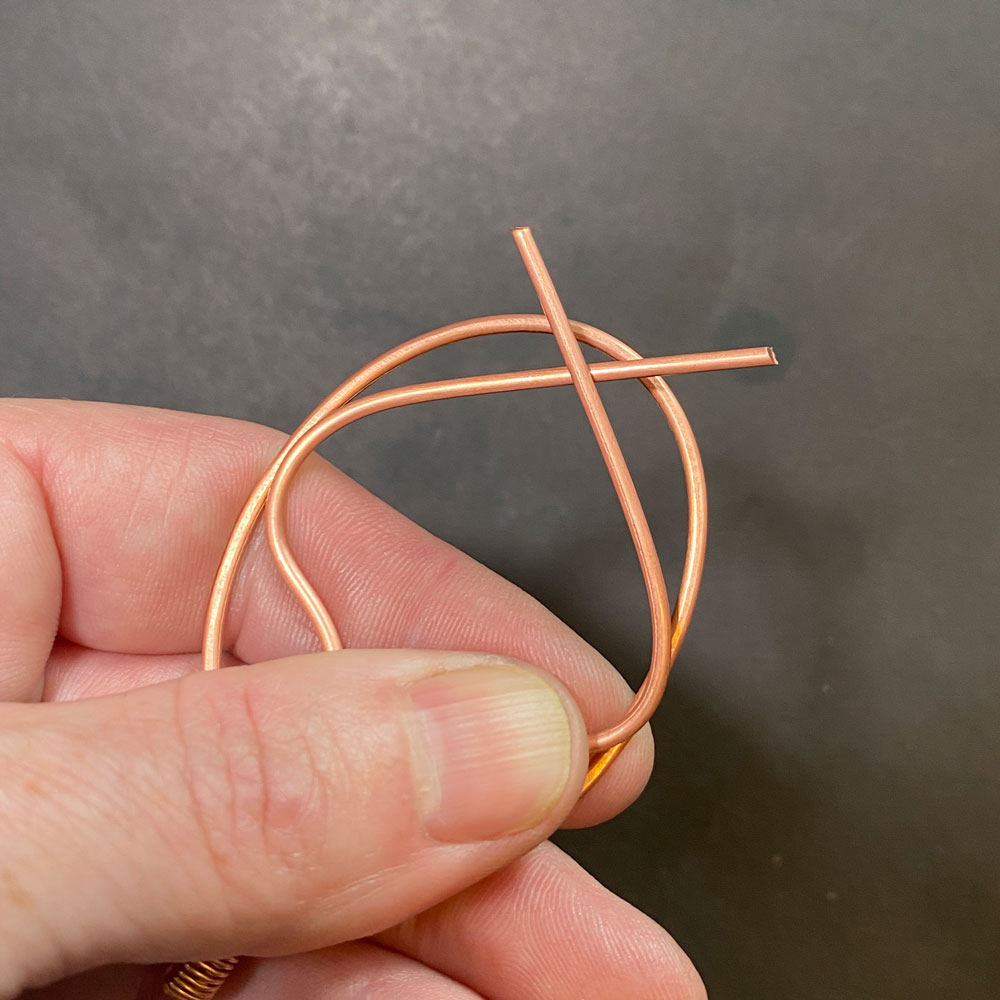
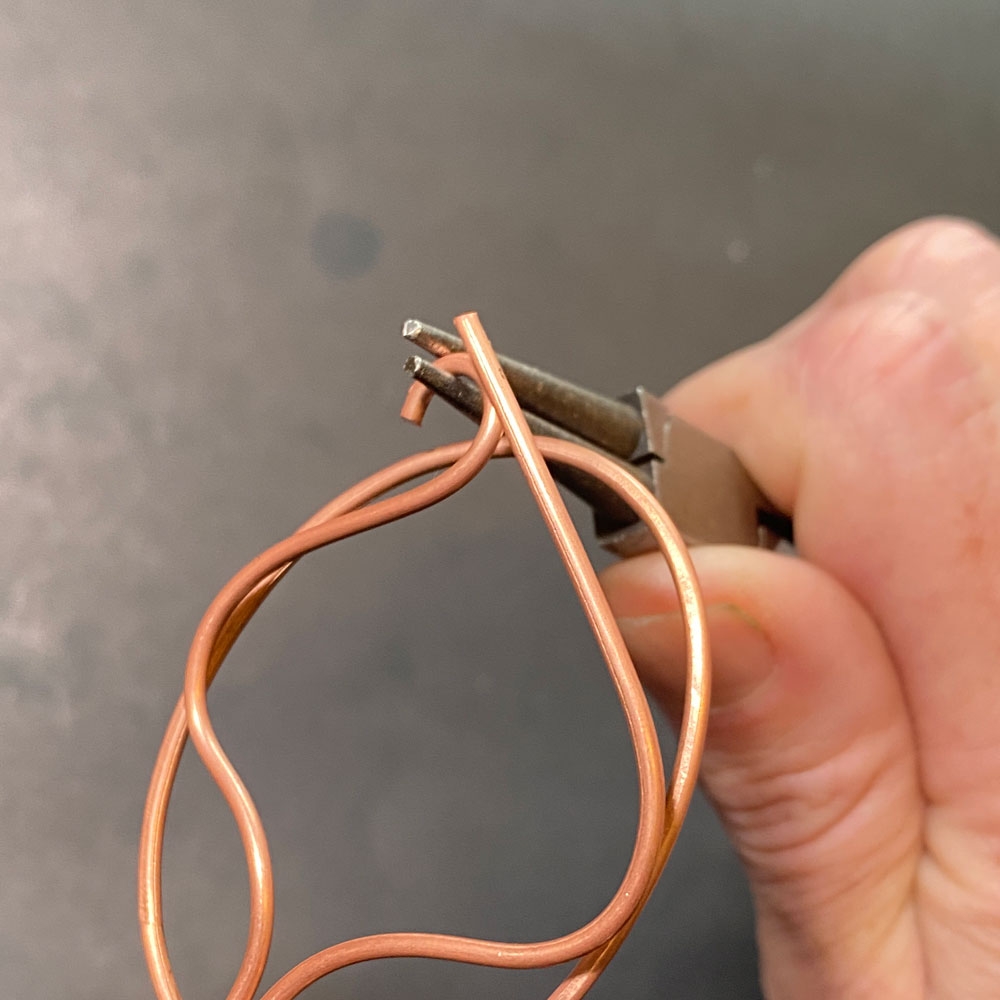
Step 9
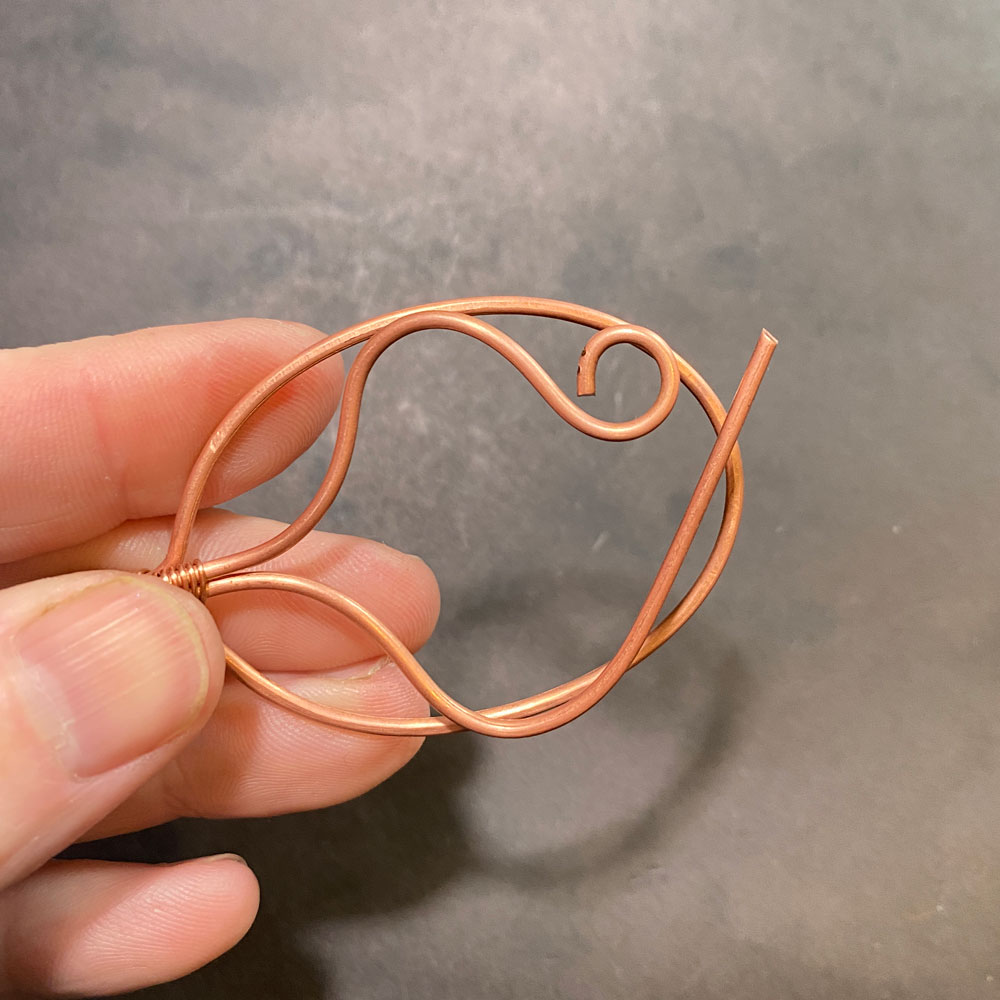
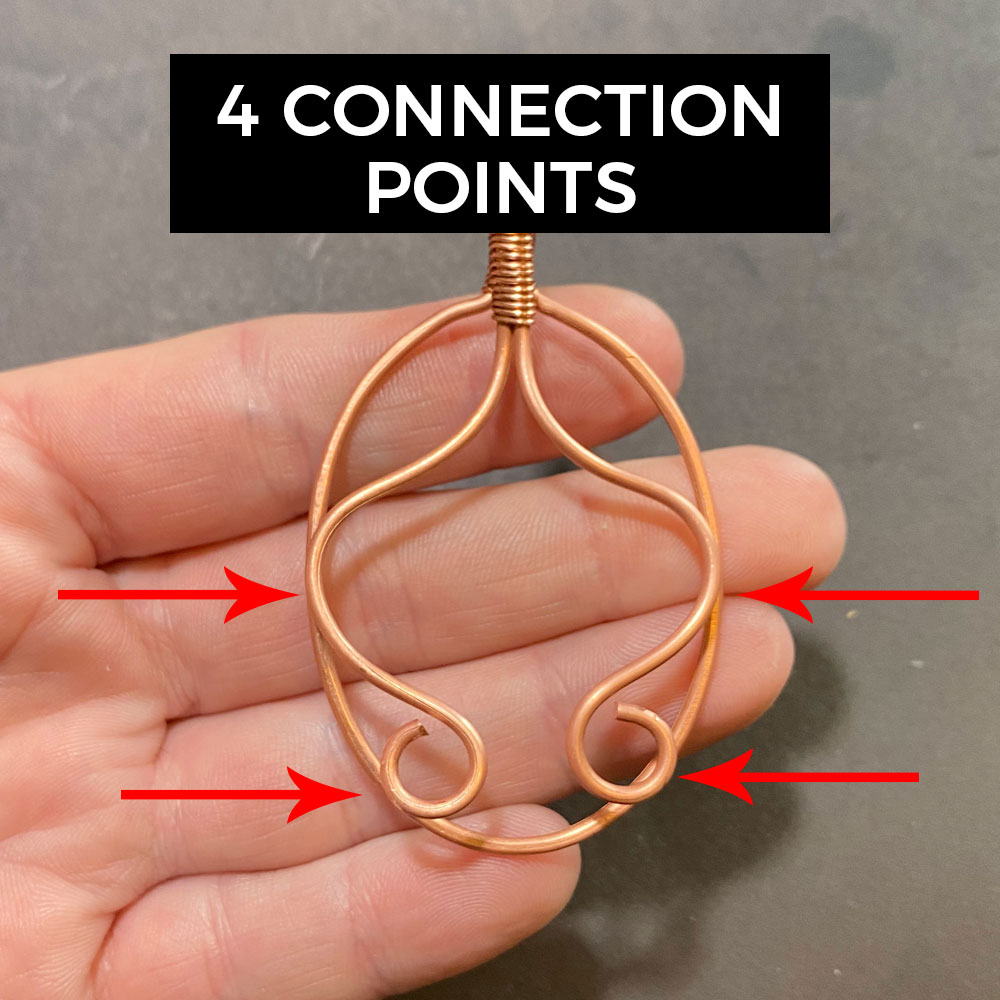
Using round nose pliers, form loops at the end of each wire (fig. 9a, 9b, 9c). This will complete the back of the pendant.
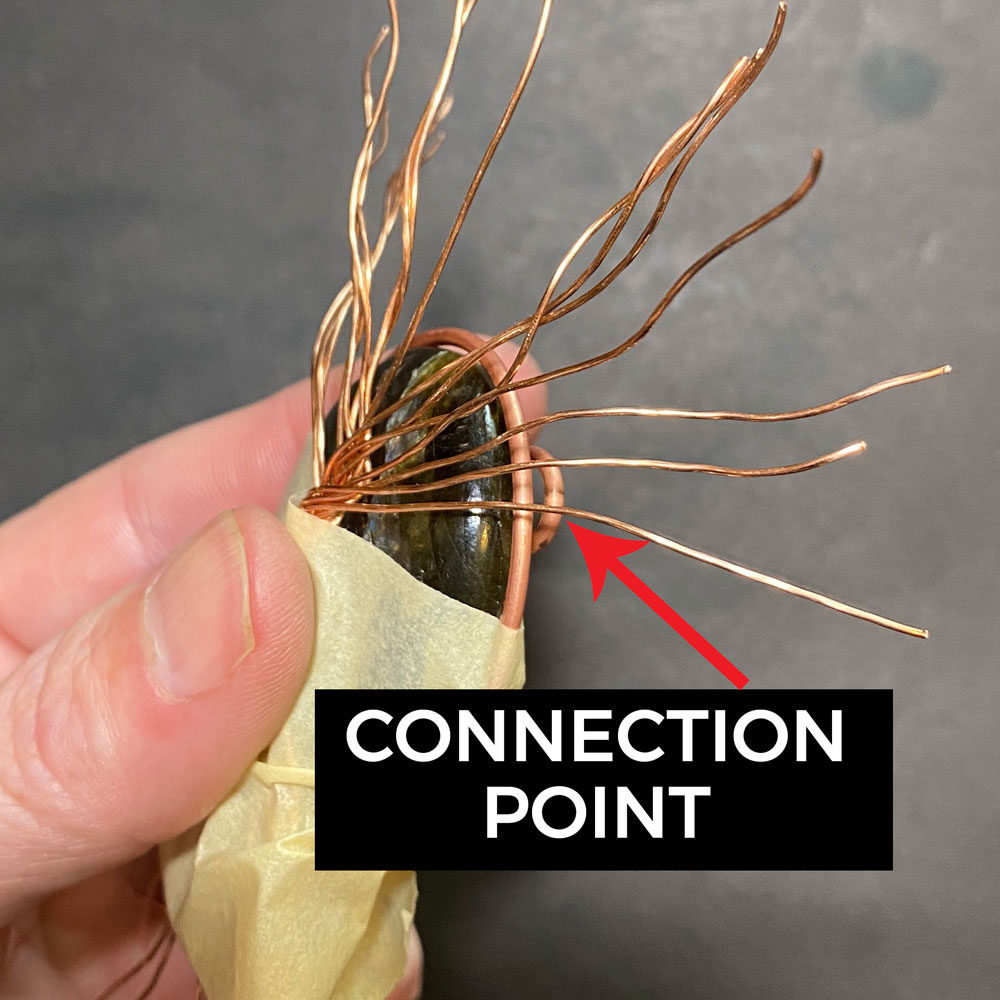
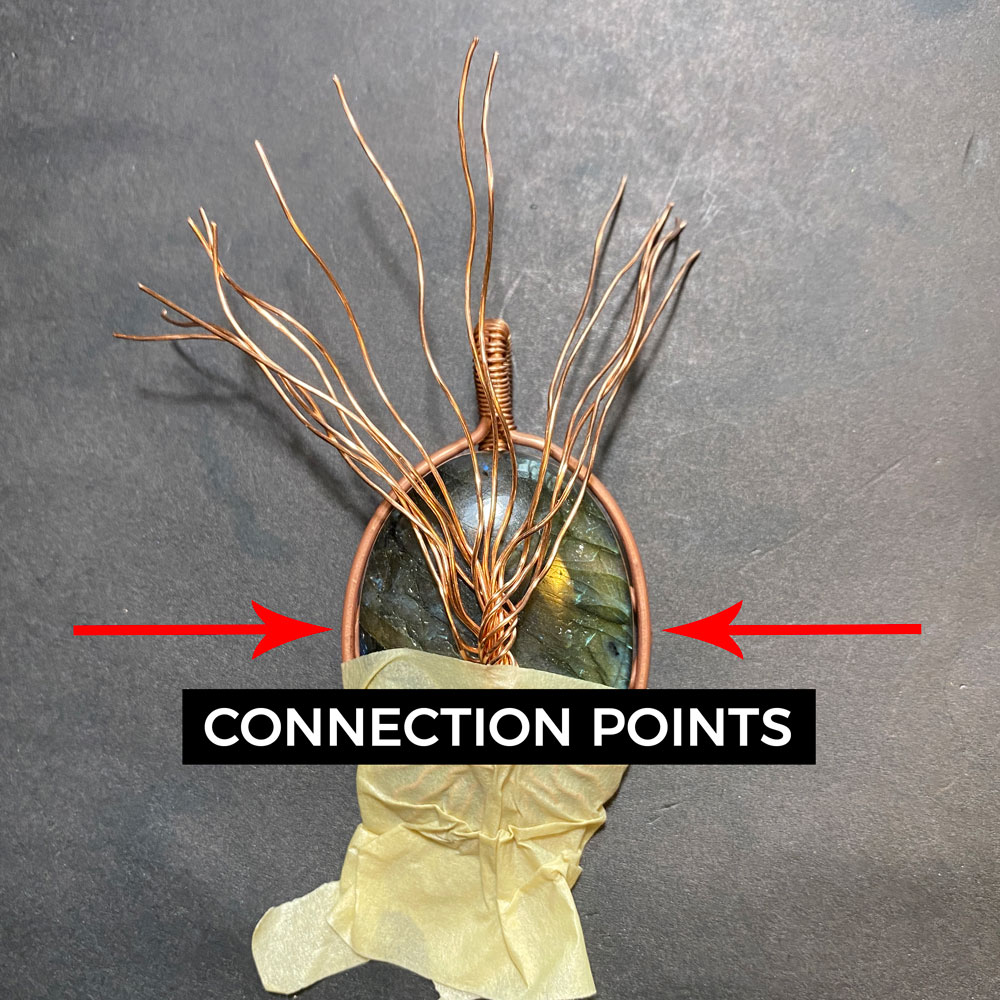
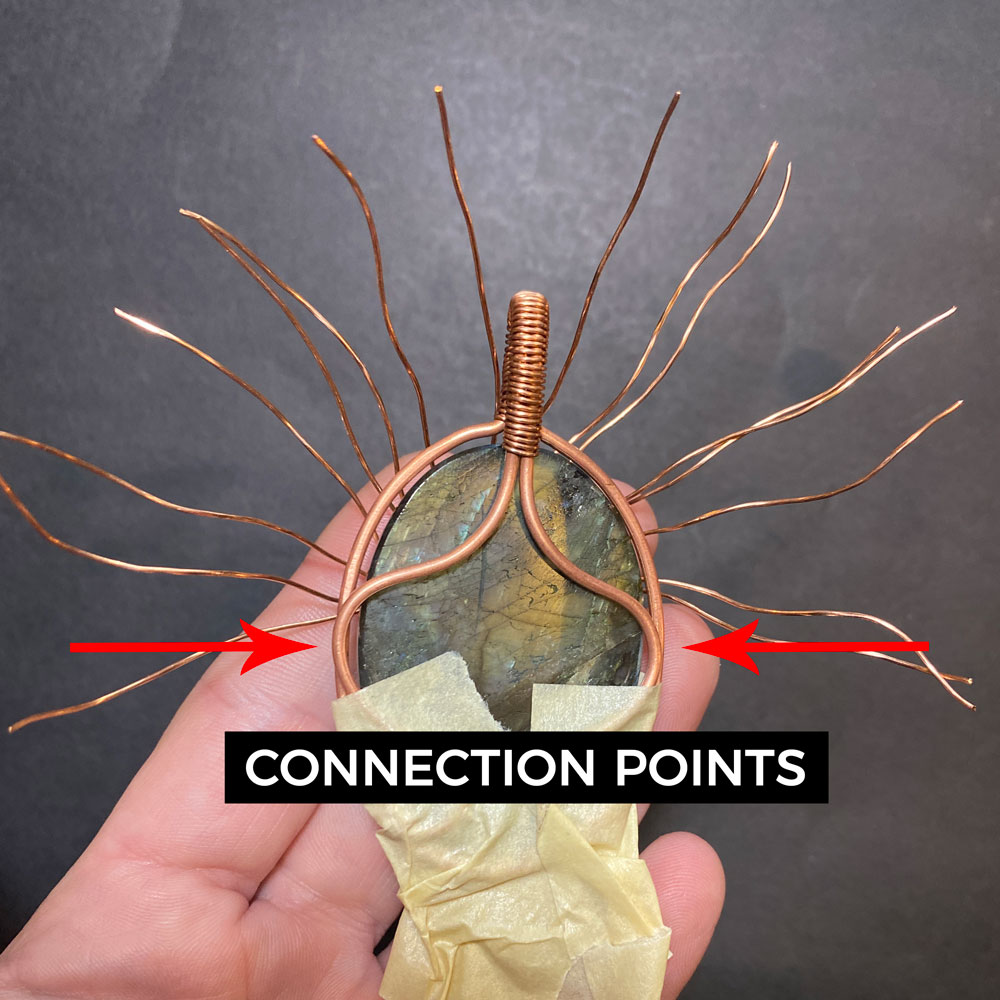
As you can see, this creates 4 connection points. This is where the branches and roots will attach the back to the frame (fig. 9d, 9e).

Prefer this wire-wrapping tutorial in a PRINTABLE FORMAT?
Click here for the PDF version of the Tree of Life Wire-Wrap Tutorial
Step 10
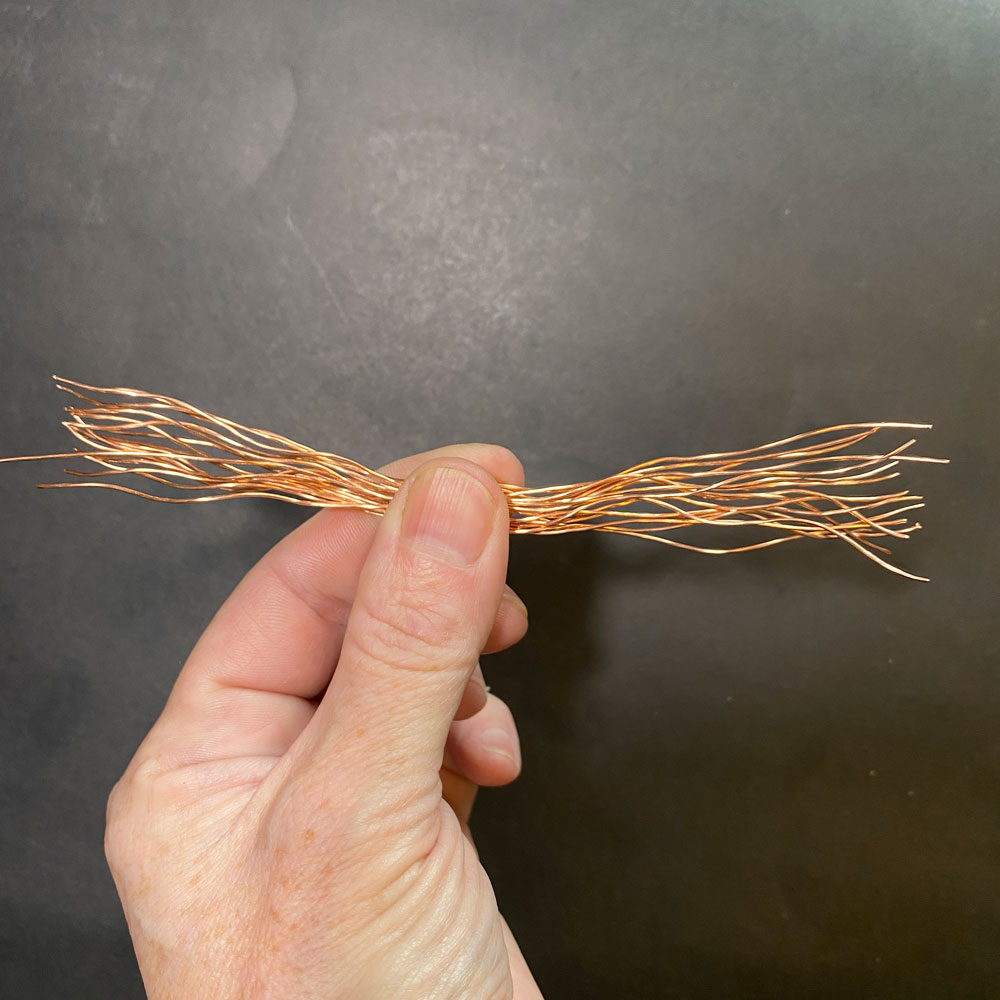
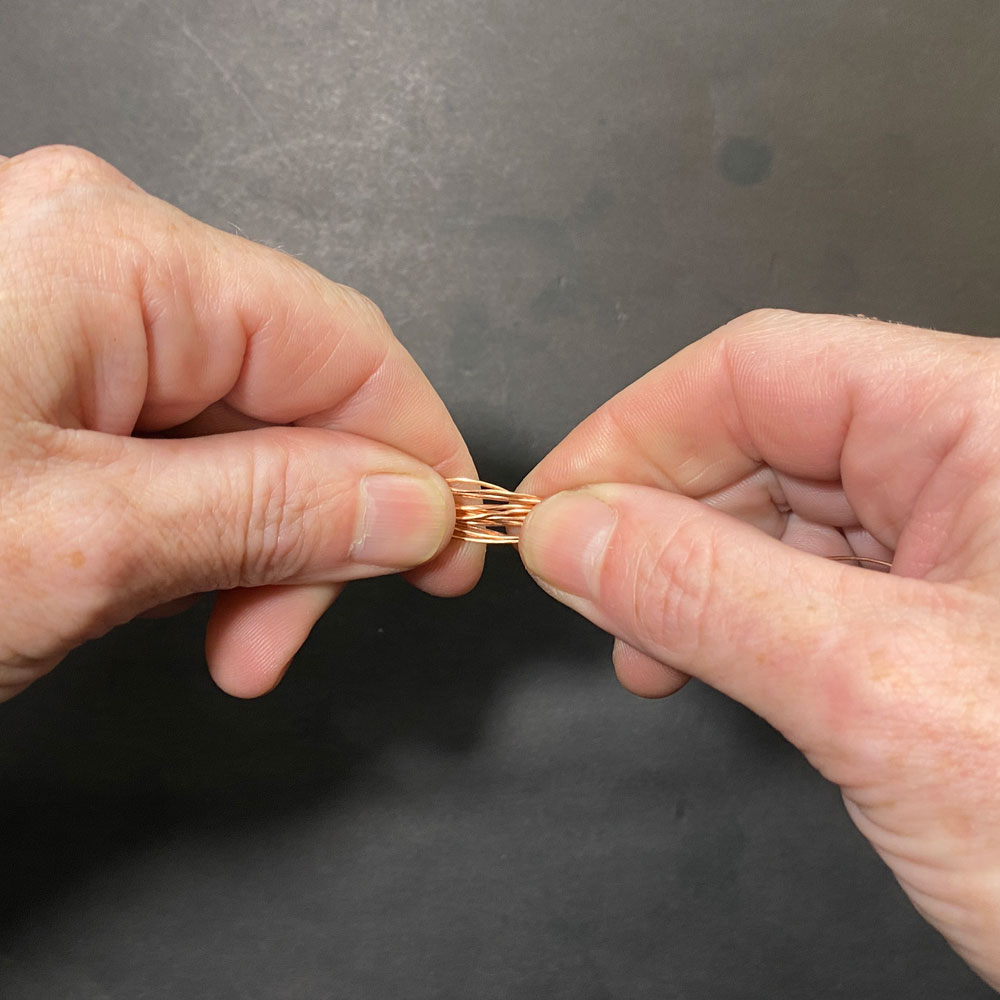
Gather your strands of 24 gauge wire. Find the mid-point and start twisting them together. This will start forming the trunk of the tree of life pendant (fig. 10a, 10b, 10c, 10d).


Step 11
Once you have a couple of twists done, place on your cabochon (fig.11a) .
This is just to give you an idea of how much room the trunk takes. Make sure you leave yourself enough room for your roots and your branches.
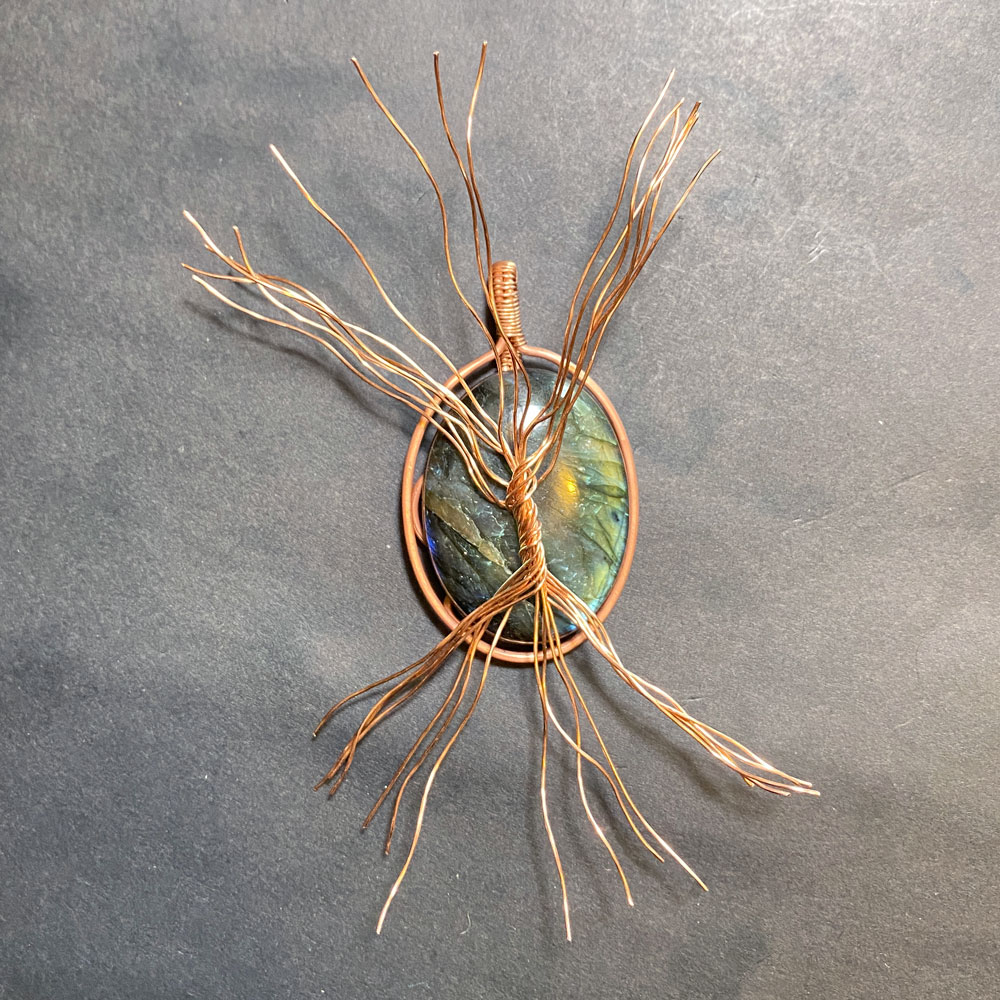
Spread out the branches and roots to give you a visual idea of your design. If your trunk is too long, untwist the trunk a little (fig. 11b, 11c).


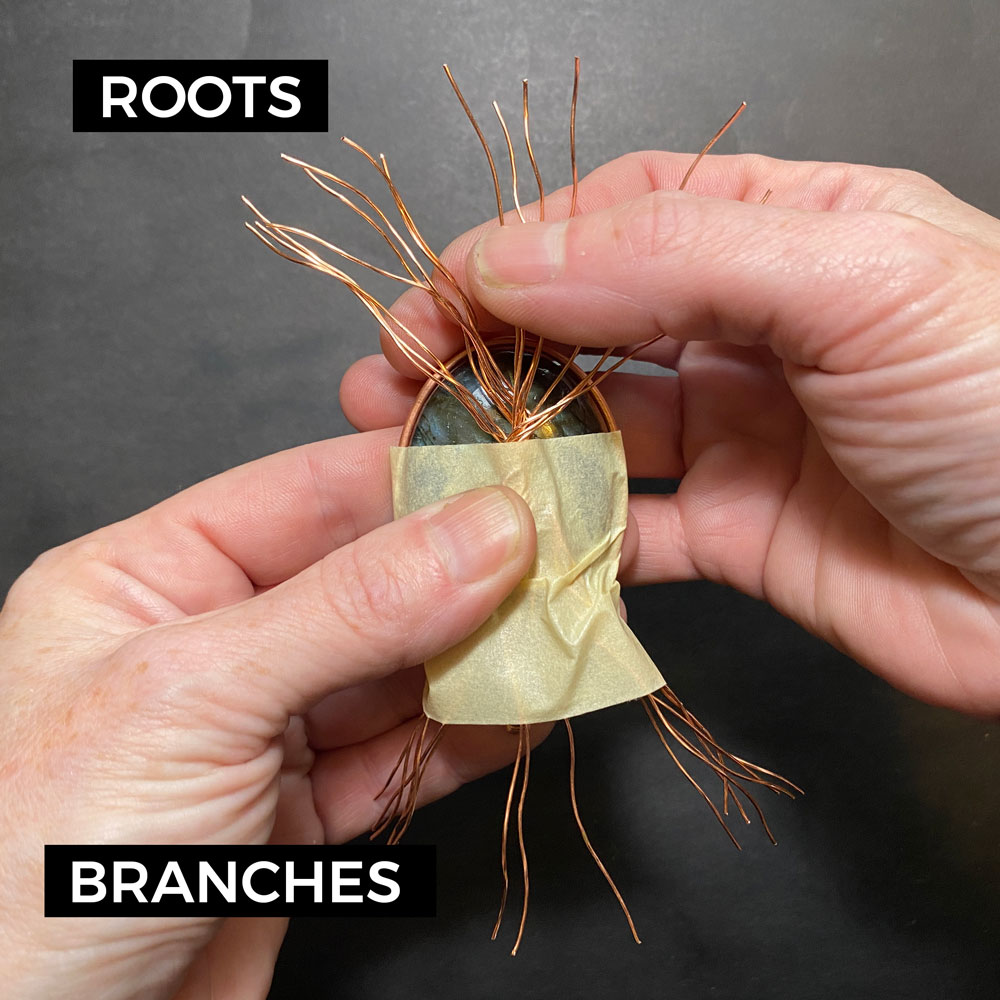
Step 12
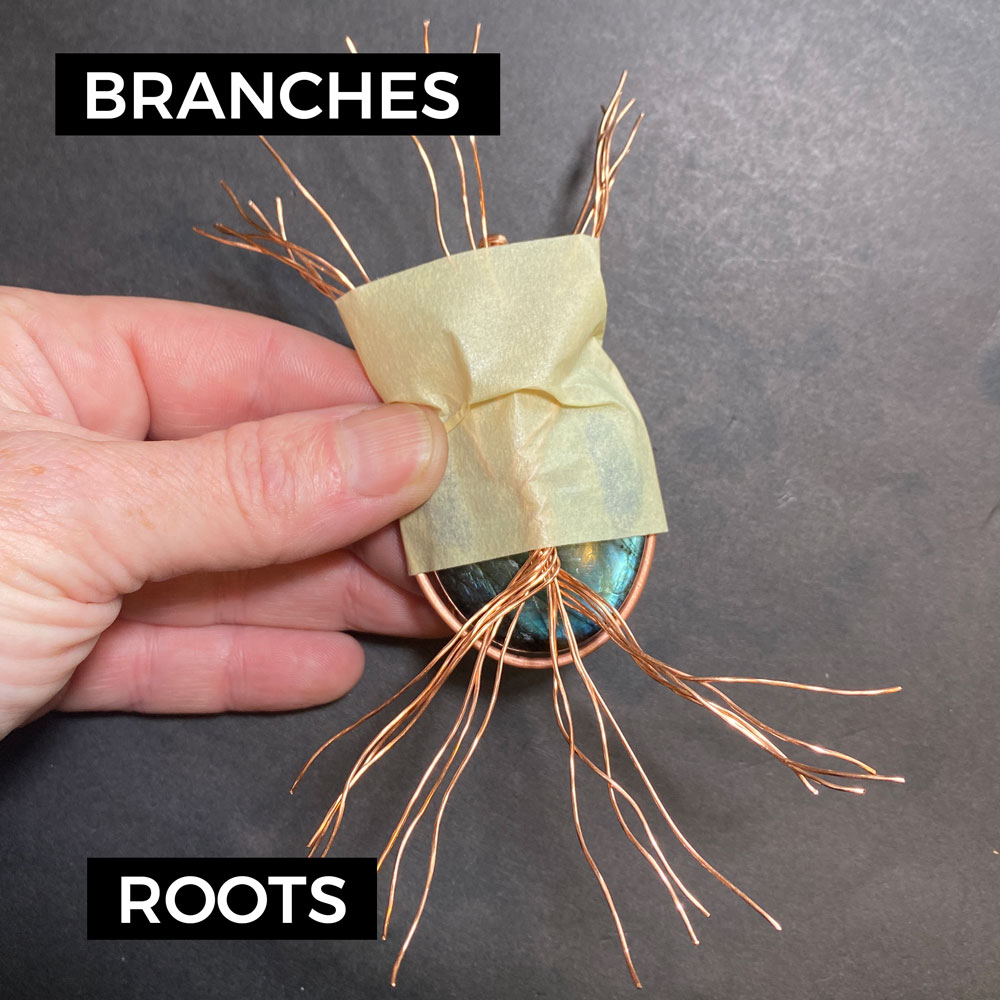
Once you are happy with your root and branch coverage, carefully move your branches upwards (fig. 12a).
Place a piece of masking tape over the top part of trunk and the branches. Wrap the tape around to secure the cabochon.
Make sure that you do not cover the bottom connection points.
These will be connected to the frame with the roots. Using your fingers, carefully spread out the roots (fig. 12b, 12c, 12d).

Prefer this wire-wrapping tutorial in a PRINTABLE FORMAT?
Click here for the PDF version of the Tree of Life Wire-Wrap Tutorial
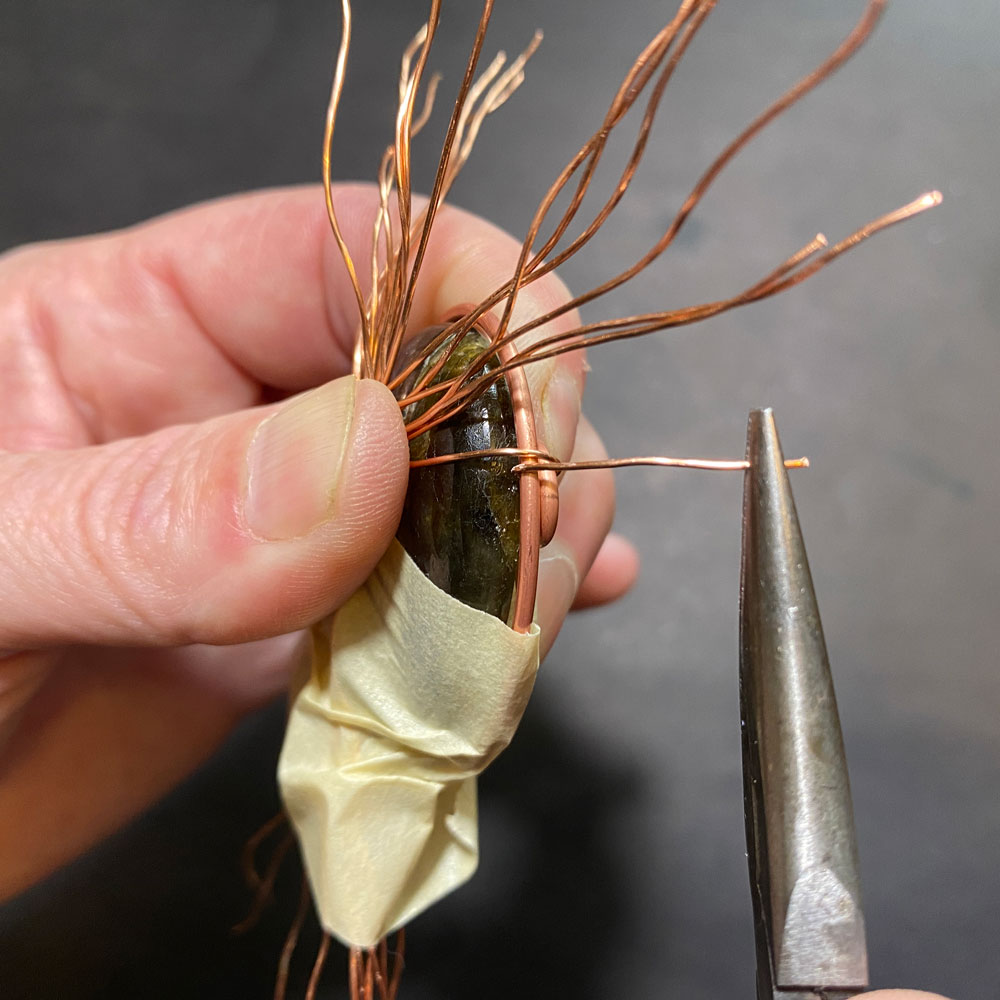
Step 13
Now it’s time to start with securing your roots.
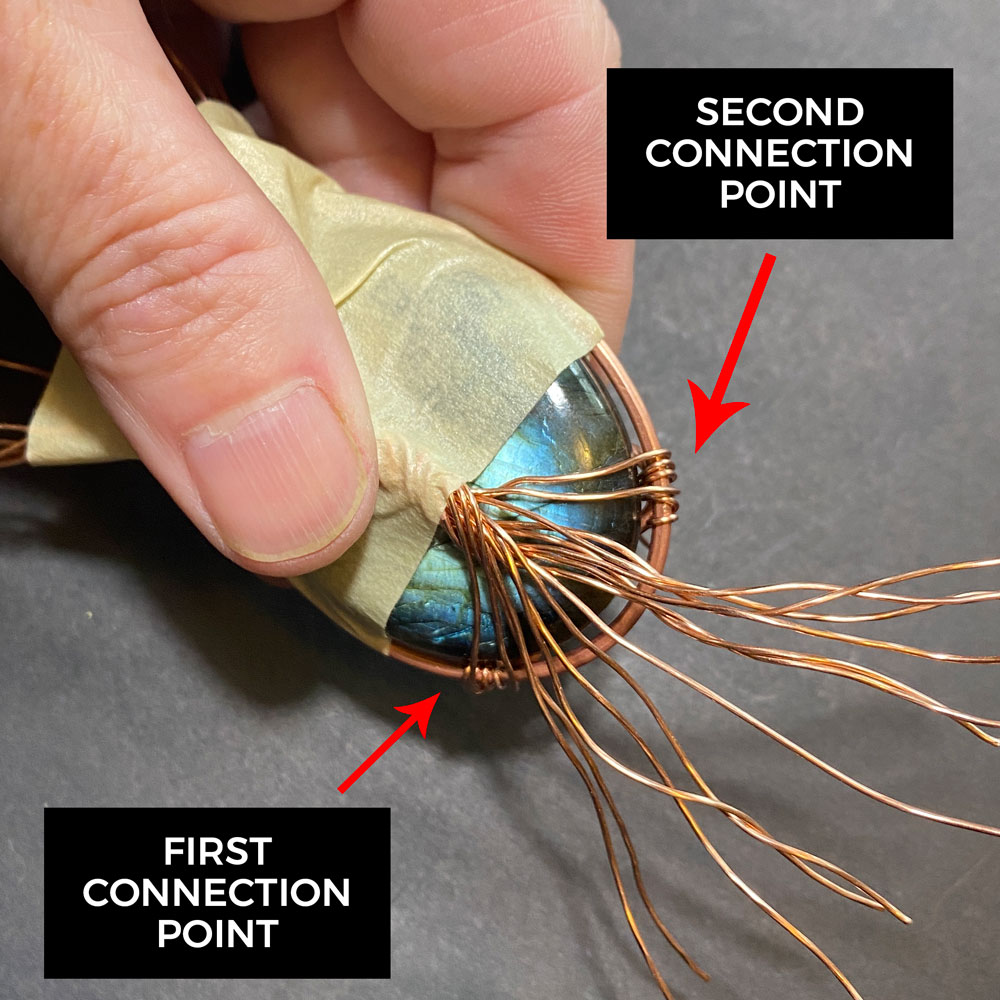
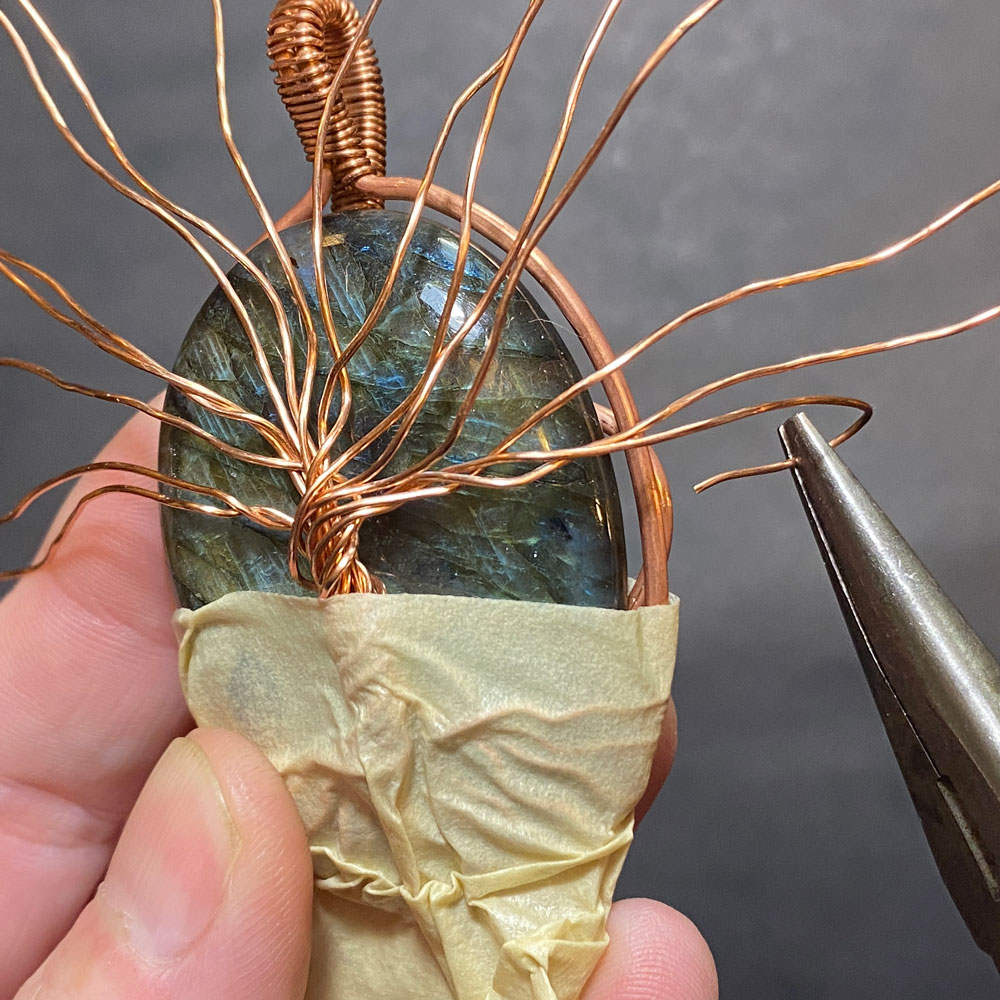
First we start with the connection point on the left of the Tree of Life pendant.
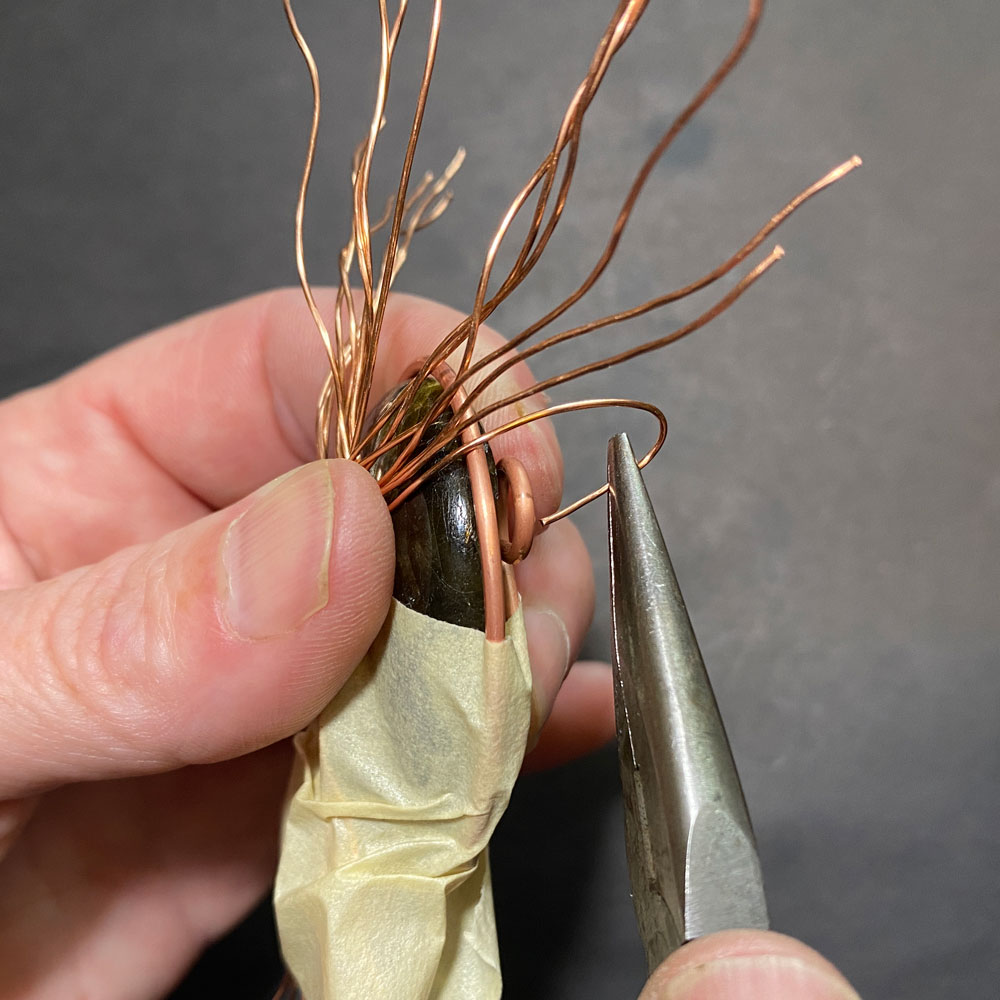
Using the last root on that side, feed the wire through the connection point and the frame.
Make 2 loops to make sure it is secure (fig. 13a, 13b, 13c, 13d).
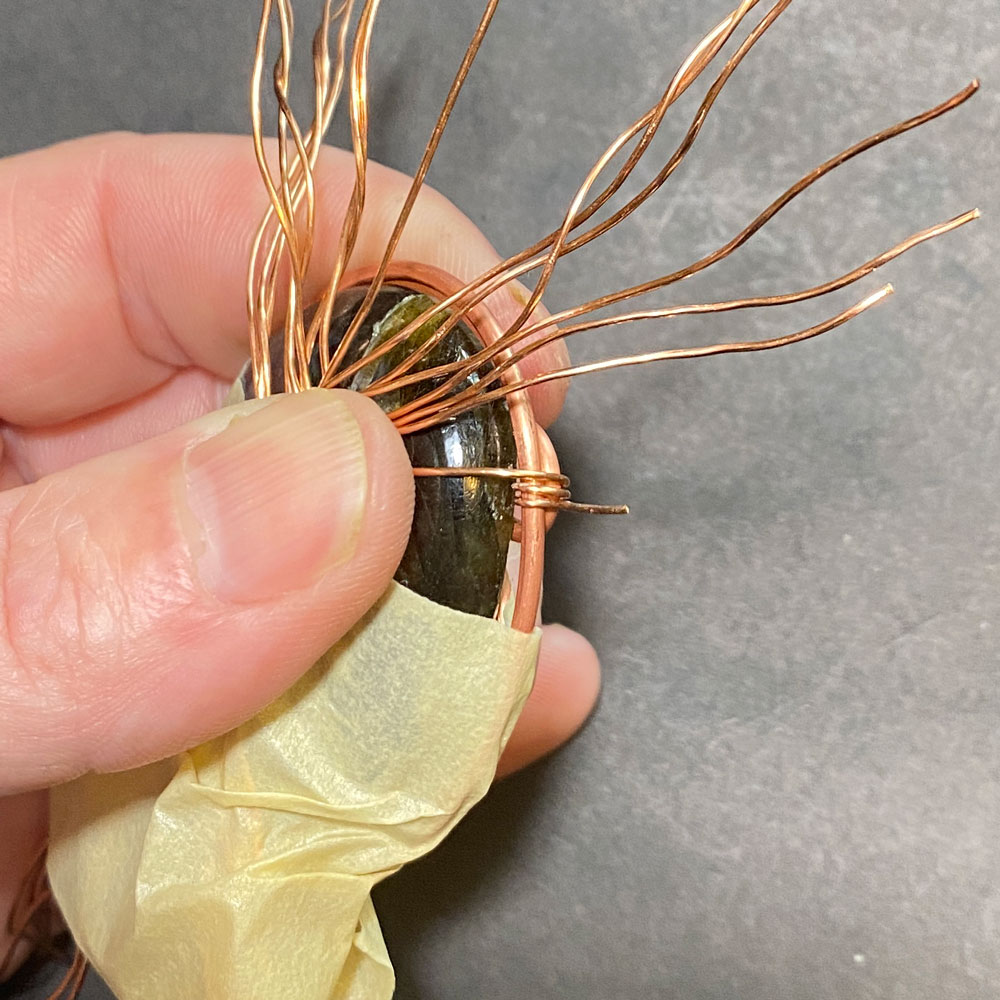
Step 14
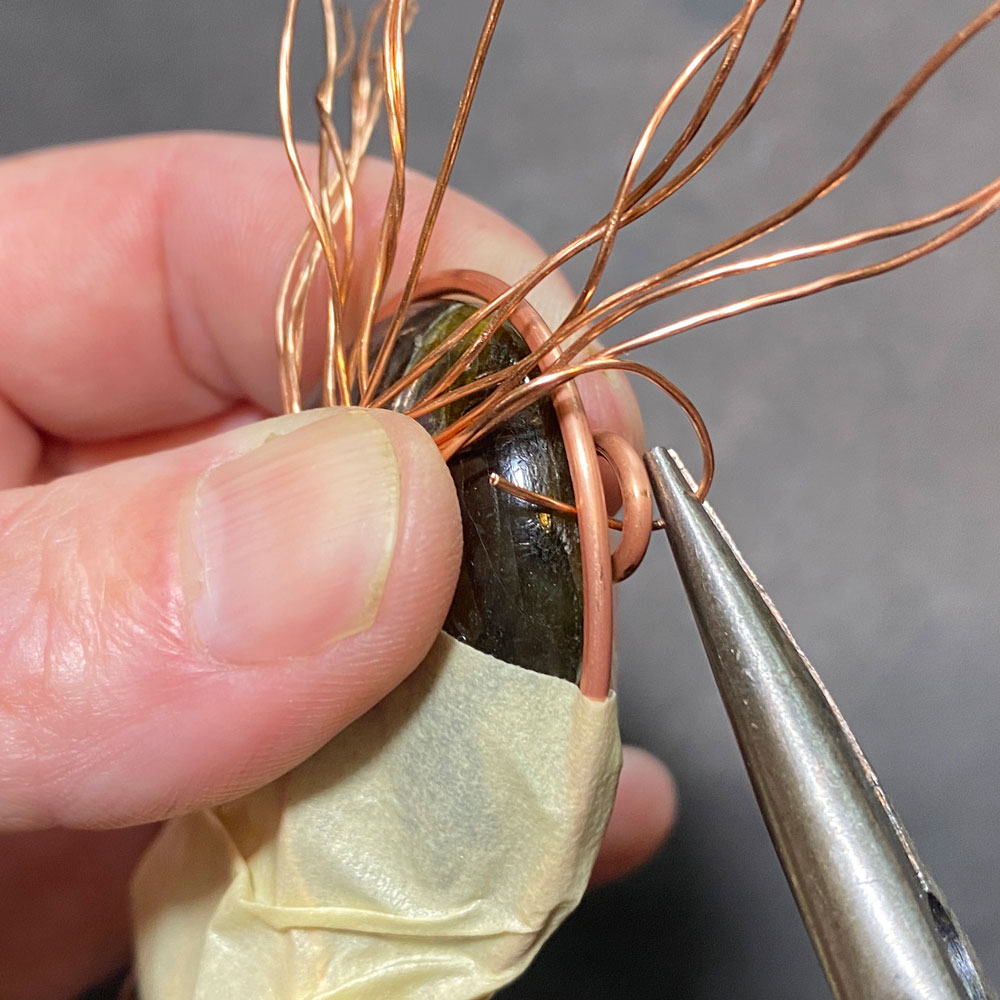
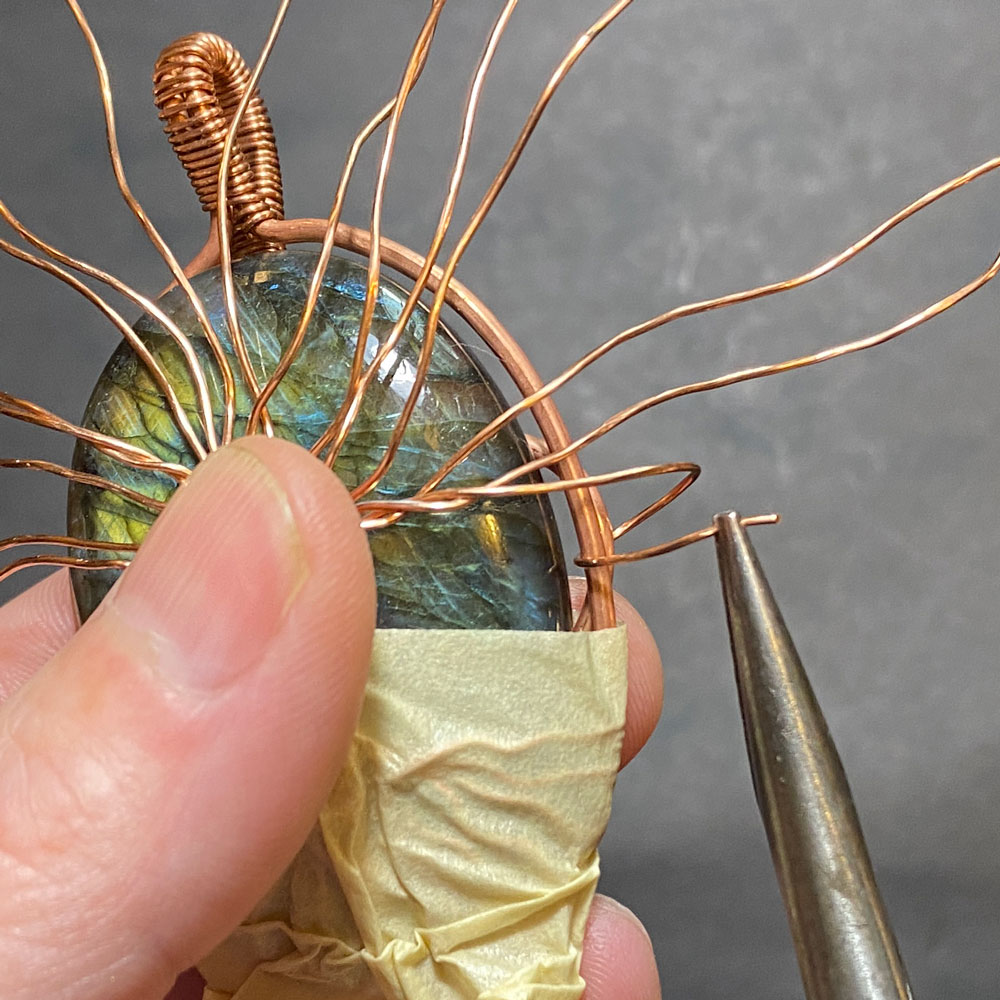
Attach a second root – this will make sure the connection point is well secured.
Make 2 loops (fig. 14a, 14b).
Repeat the process on the right side of the pendant – secure 2 roots with 2 loops each (fig. 14c, 14d).
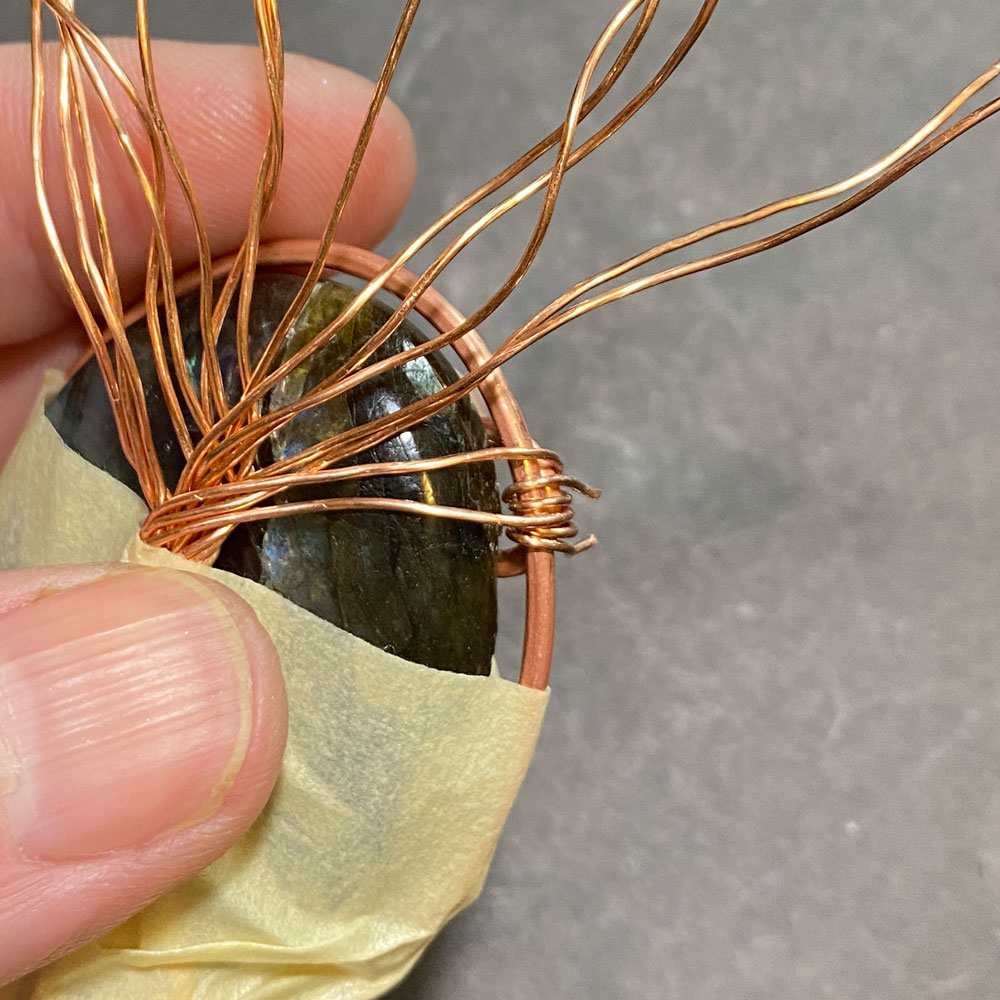
Step 15
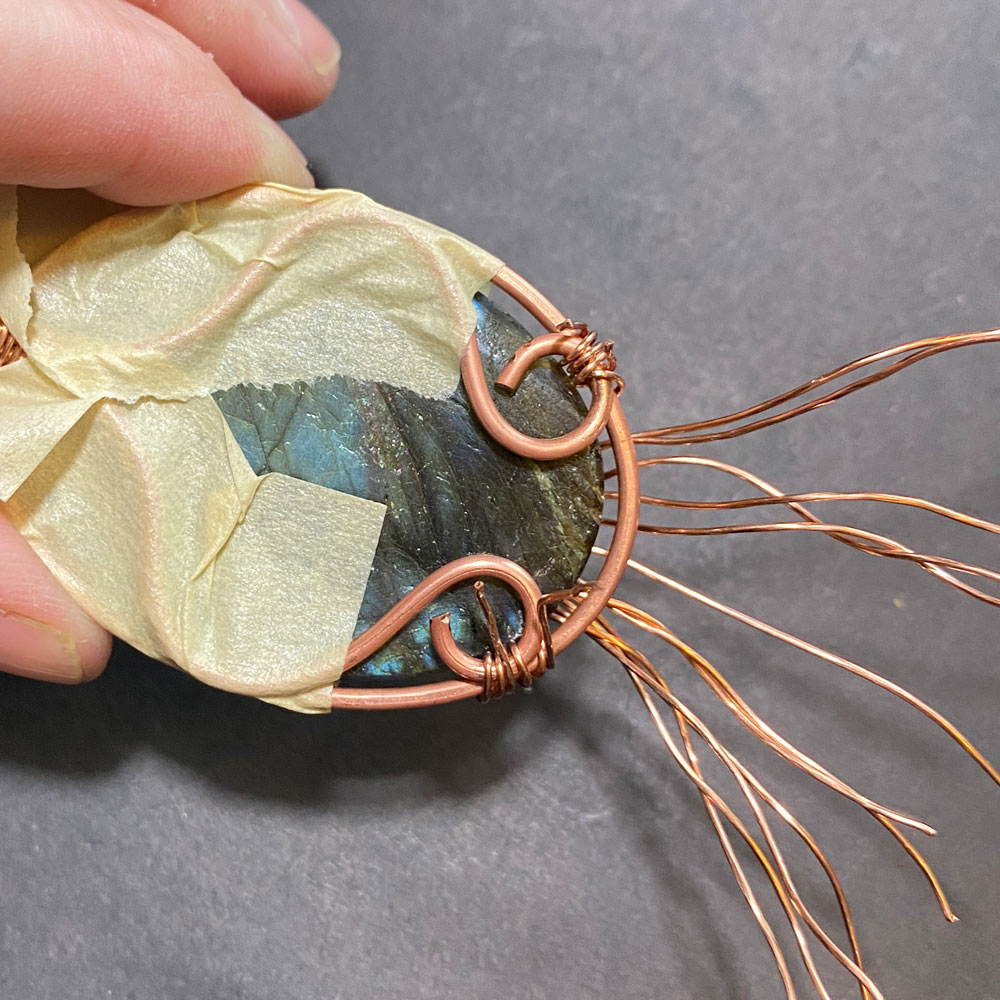
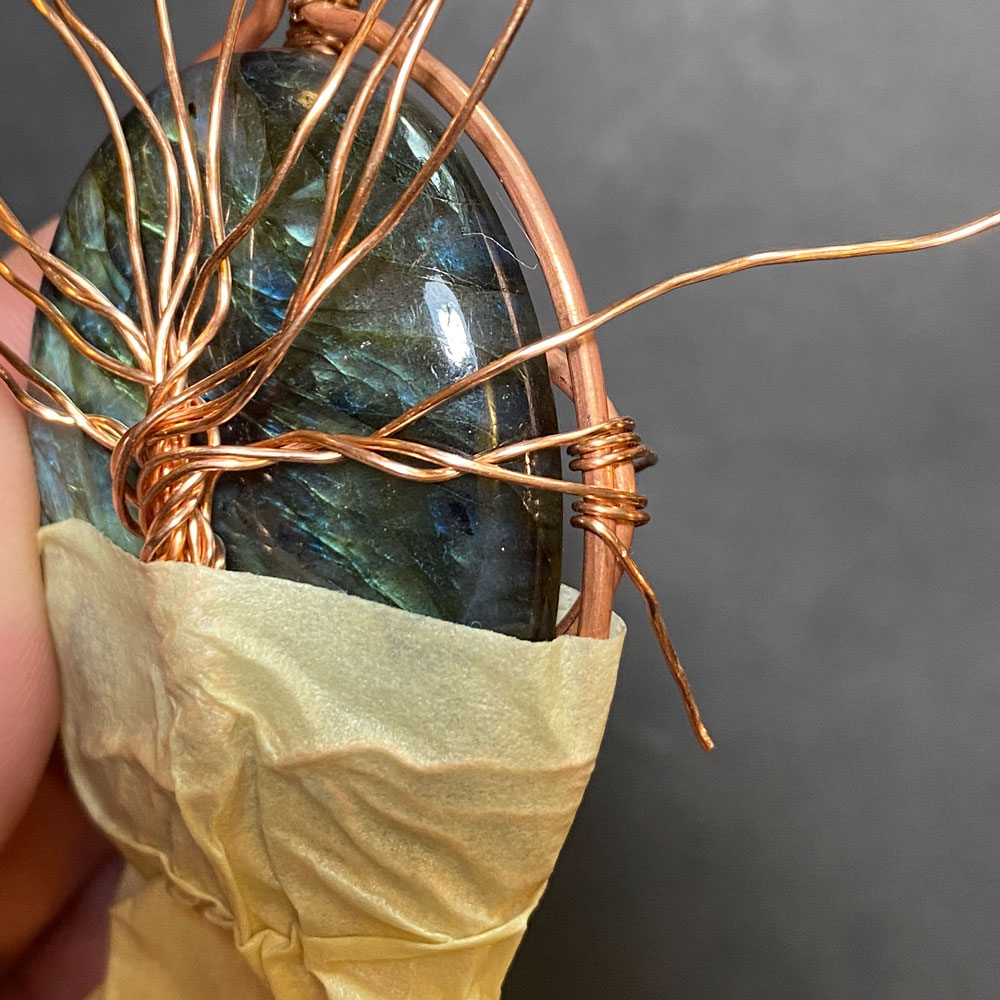
Now that both connection points are secure, start securing each root to the frame (fig. 15a, 15b, 15c).


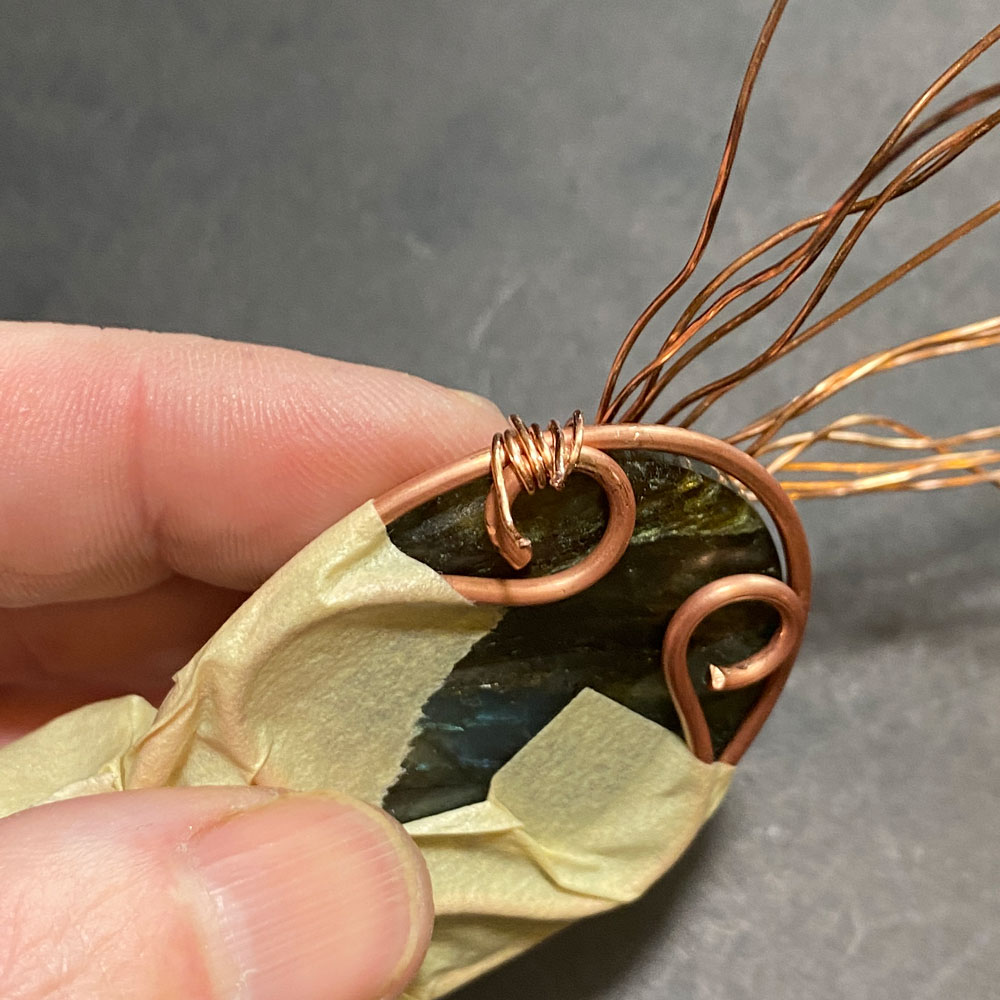
Step 16
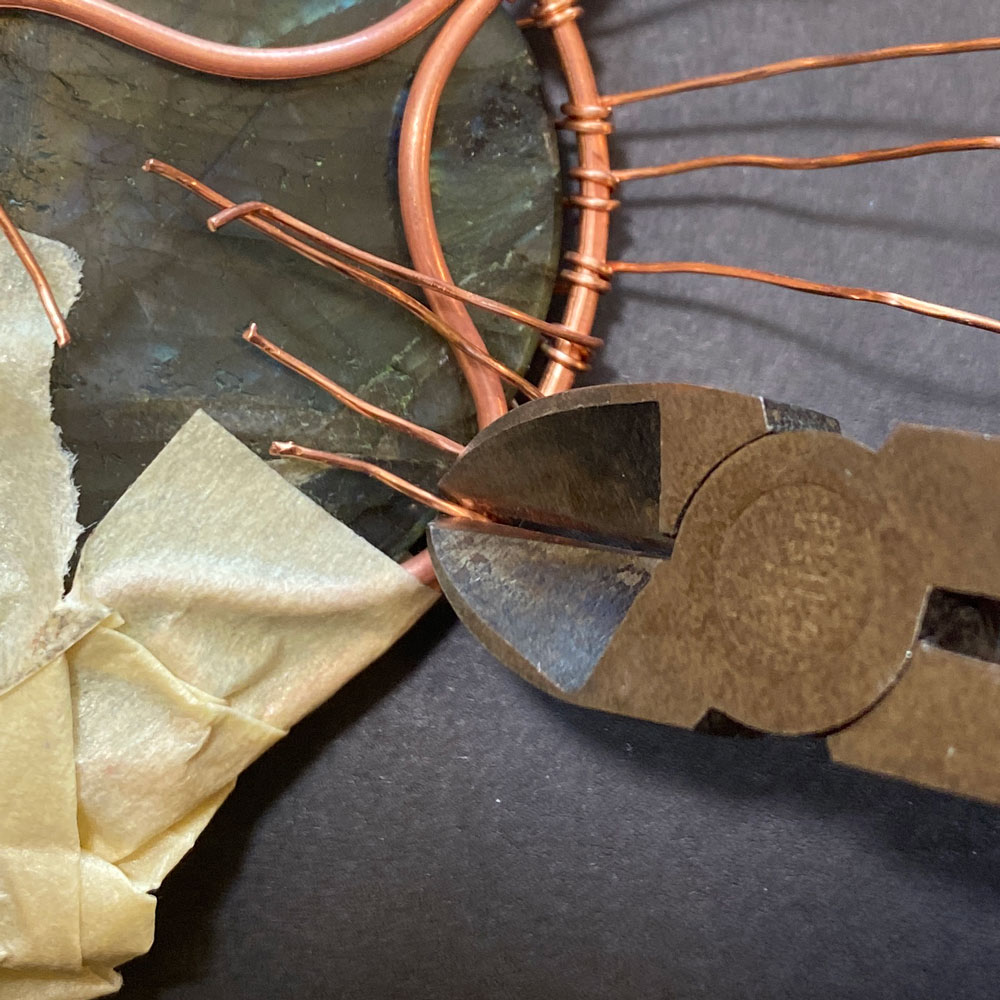
Using a pair of wire cutters, cut all excess wire and tuck in with needle nose pliers (fig. 16a, 16b, 16c).


Prefer this wire-wrapping tutorial in a PRINTABLE FORMAT?
Click here for the PDF version of the Tree of Life Wire-Wrap Tutorial
Step 17
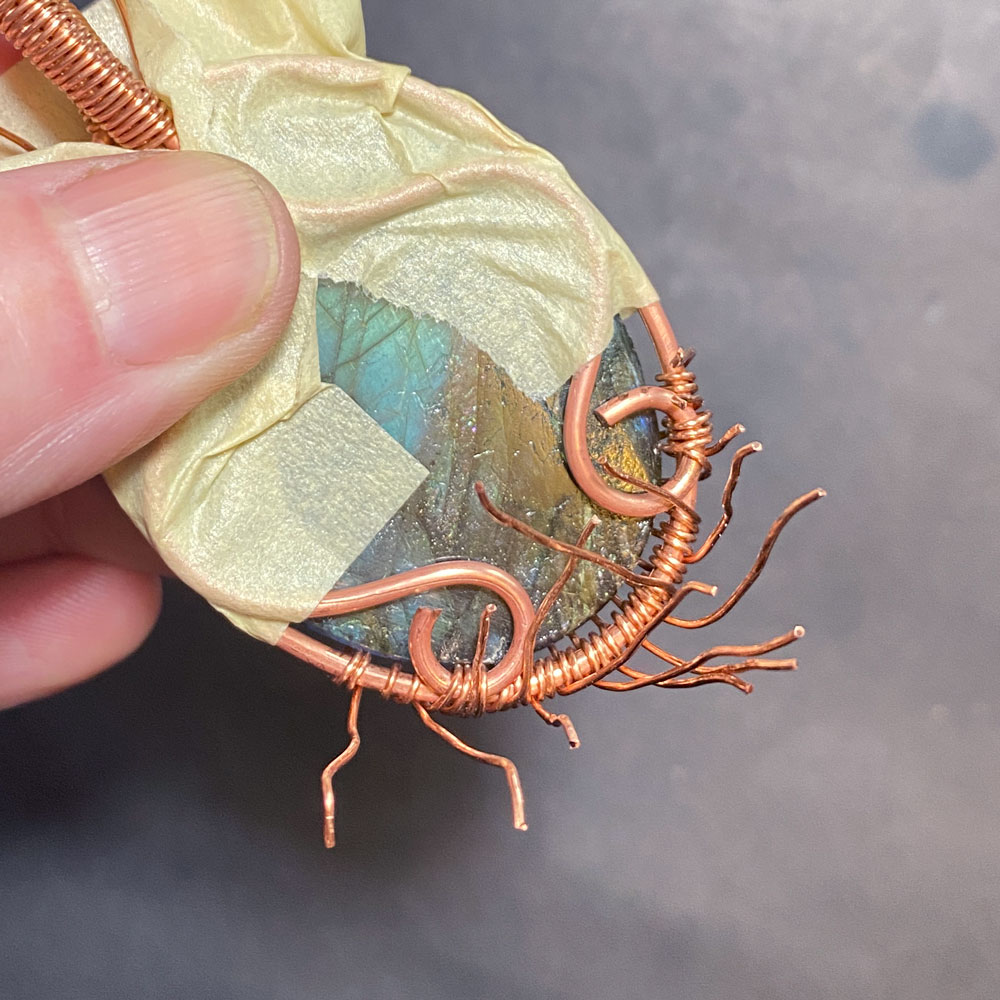
Using your needle nose pliers, carefully make some kinks in the roots. This takes some practice.
Once you have a grip on the wire, twist your wrist to make the kink. Do this for all root wires (fig. 17a, 17b).
Carefully remove tape from your pendant (fig. 17c).


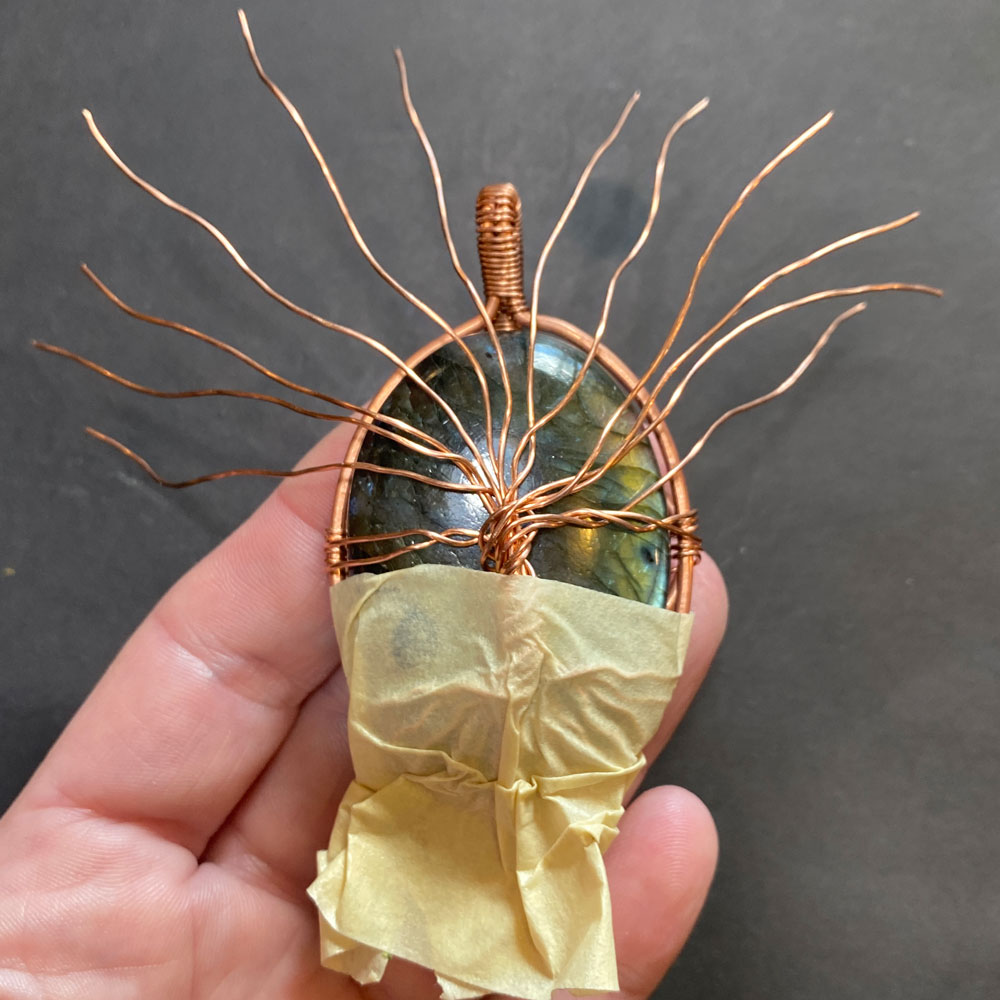
Step 18
Now that your roots are done, it’s time to work on the branches of your Tree of Life pendant.
Place a piece of tape over the roots, making sure that the connection points are not covered (fig. 18a).
Spread out your branches – move them around until you are happy with the layout (fig. 18b, 18c).
Secure your first branch on the right side of the pendant. Wrap your wire around the connection point and frame. Make 2 loops (fig. 18d, 18e, 18f).


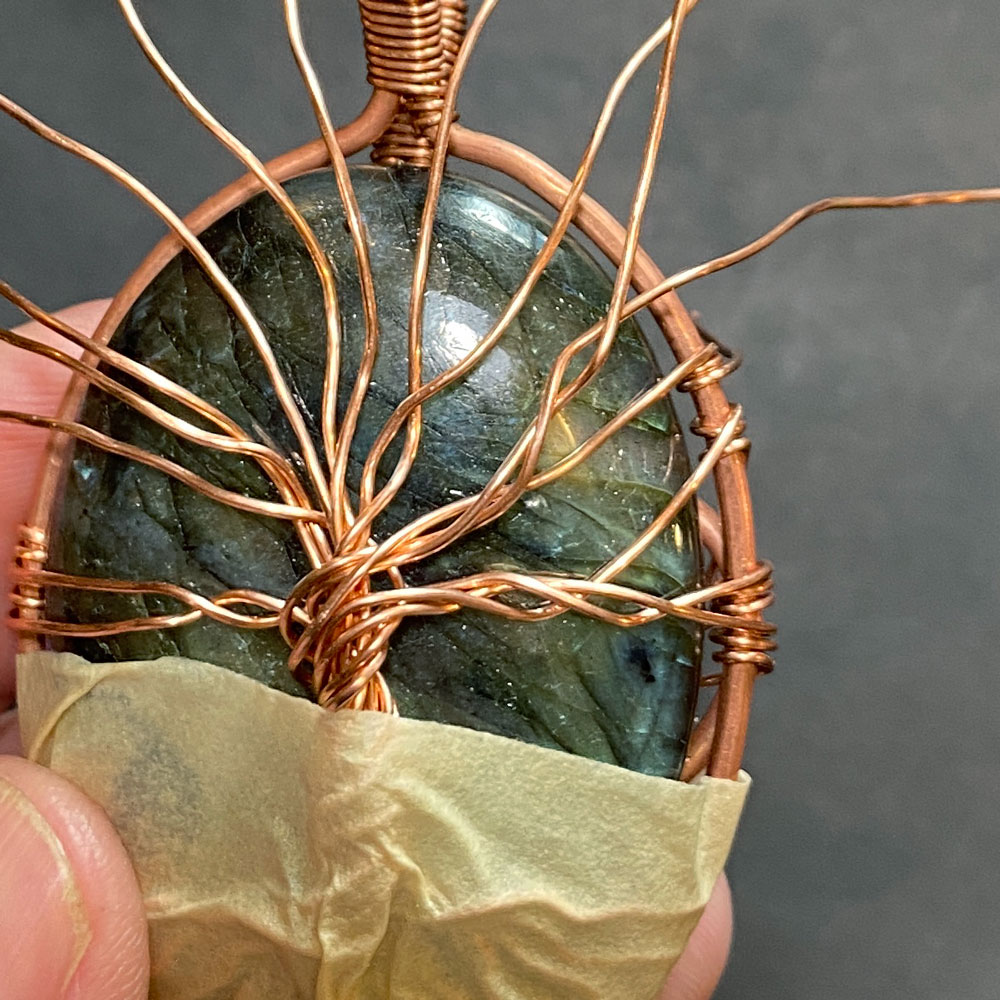
Step 19
Secure a second branch with 2 loops to the connection point (fig. 19a, 19b).
Repeat the process on the other side, securing 2 branches to the connection point (fig. 19c, 19d).


Prefer this wire-wrapping tutorial in a PRINTABLE FORMAT?
Click here for the PDF version of the Tree of Life Wire-Wrap Tutorial
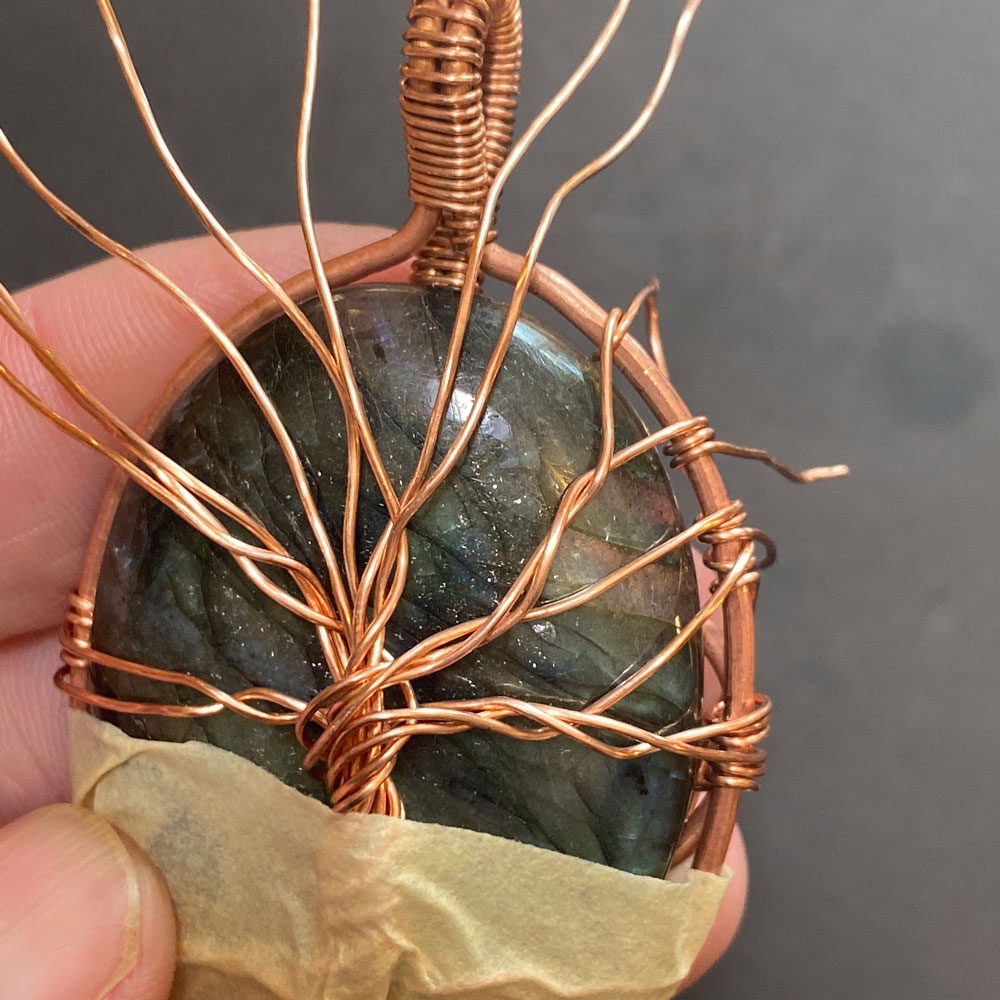
Step 20
Now it’s time to secure the rest of the branches. Start on one side and work you way around. Tie each wire around the frame with 2 loops (fig. 20a, 20b, 20c, 20d).
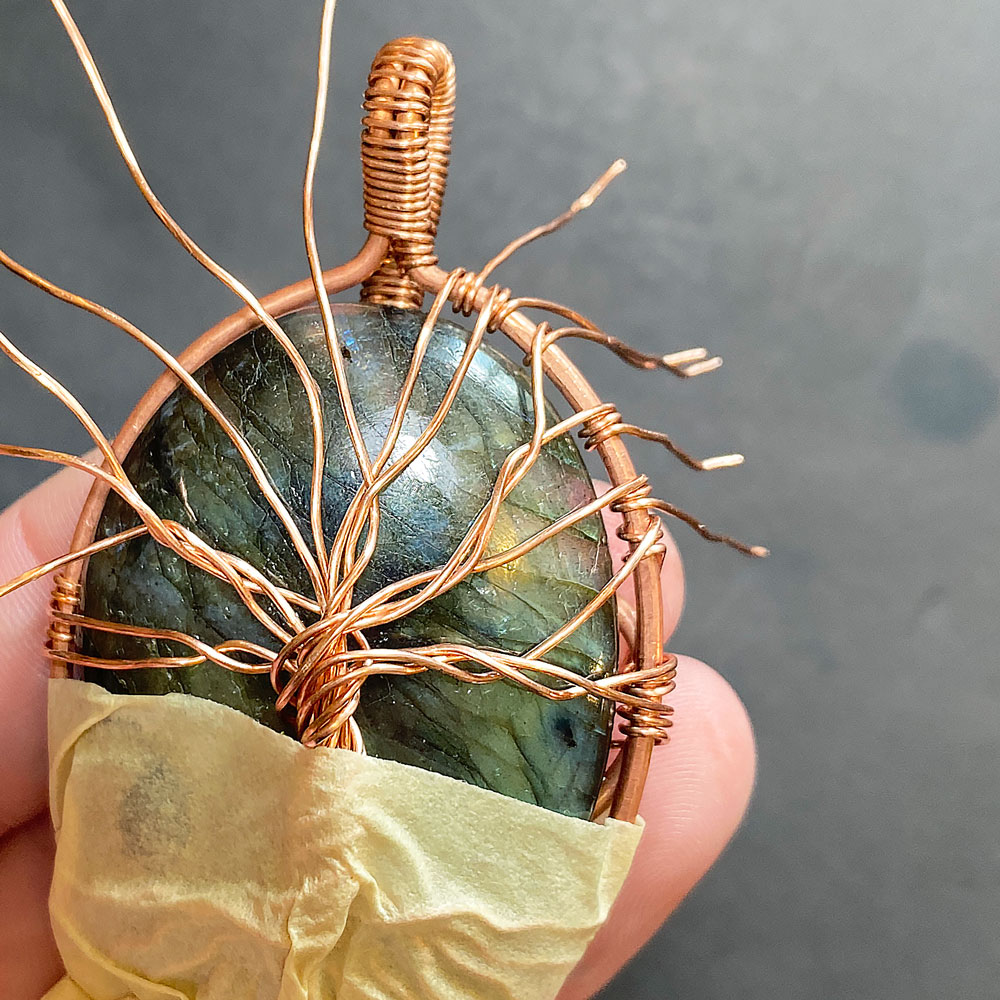

Step 21
Using a pair of wire cutters, cut each wire and tuck the ends in with needle nose pliers.
Work your way around the frame (fig. 21a, 21b, 21c, 21d, 21e, 21f).


Step 22
Next, carefully remove the tape off the pendant (fig. 22a).
Using your needle nose pliers, add kinks to all the branch wires, like you did for the roots.
Your Tree of Life pendant is now complete! (fig. 22b, 22c, 22d)


FINISHED TREE OF LIFE PENDANT


Want to Support me?
If you enjoyed my content, please consider support me on Patreon :). This helps me to create more amazing free content to share with you 🙂
If you’d like to see my work and follow my wire journey, you can find me here:
Facebook
Instagram
Twitter
Pinterest
YouTube
Etsy

