As a blogger, you’ve probably, at some point in your blogging career, wanted to make simple changes to your blog but didn’t know quite how.
Hiring a designer every time would get costly so why not learn basic HTML & CSS and change the design of your WordPress blog all by yourself?
It’s definitely a valuable skill to have if you have your own blog and it also gives you the opportunity to make a little money on the side by doing work for others as a freelancer or virtual assistant.
Although this blog post might seem long, it really only covers the basics of HTML and CSS. You can learn a TON more for free over at W3Schools.com.

FREE WIRE-WRAPPING GUIDE TO YOUR EMAIL!
JOIN NEWSLETTER
We respect your privacy. Unsubscribe at anytime.
With the following tips and tricks, you should get a basic understanding of how everything fits together so let’s dive in!

INTRODUCTION TO HTML
HTML stands for Hyper Text Markup Language and it consists of many different tags which describe different elements of your website. For instance, the <img> tag stands for “image” and <h1> stands for “Headline 1”.
HTML tags always contain the name (usually an abbreviation of what it represents) which is surrounded by brackets. They usually come in pairs which consist of an opening tag and a closing tag. The closing tag always has a slash before the name. Your content is between the tags.

Here’s what a very basic HTML document looks like:
<!DOCTYPE html>
<html>
<head>
<title>Page Title</title>
</head>
<body><h1>My First Heading</h1>
<p>My first paragraph.</p></body>
</html>
This is a super basic HTML website – click here to see it in action: Basic HTML website
CREATE YOUR OWN BASIC WEBSITE
Now it’s your turn to create your first HTML website!
- Open up Notepad on your computer
- Copy the above HTML code and paste it in Notepad
- Change the text if you’d like – not the code, just the content
- Save it to your computer as website.html
- Locate the .html file on your computer and open it – this will open up a browser window
- BAM! Your very own basic website!
At this point, you may be thinking “do I have to know how to write complete HTML documents if I’m using WordPress?”.
The answer is no – not with WordPress anyways. When you’re using a WordPress theme, the HTML document is basically already “written” for you – it’s basically already working behind the scenes.
HOW TO ADD HTML TO YOUR WORDPRESS BLOG
During the time of writing this post, I was using WordPress 5.5.
Follow these steps in order to add HTML to your WordPress blog post:
Step 1 – Click the the “+” icon on the right and click on “Custom HTML”
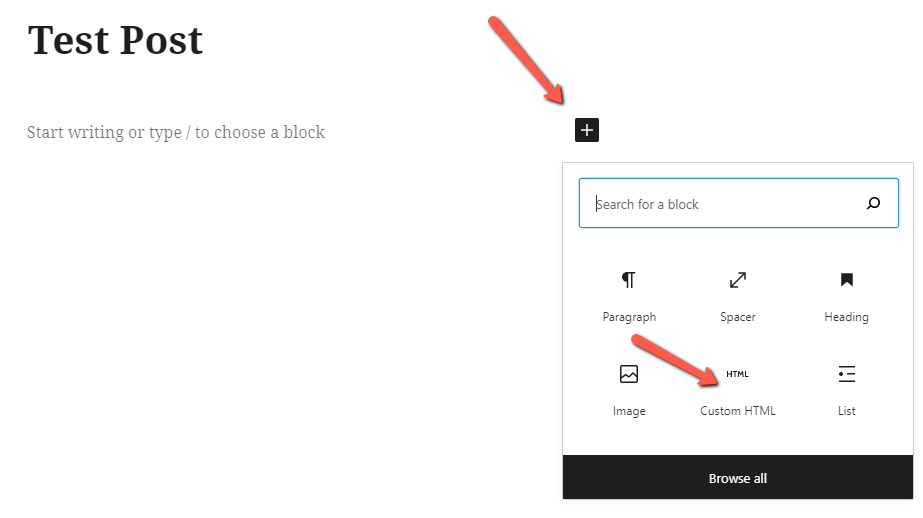
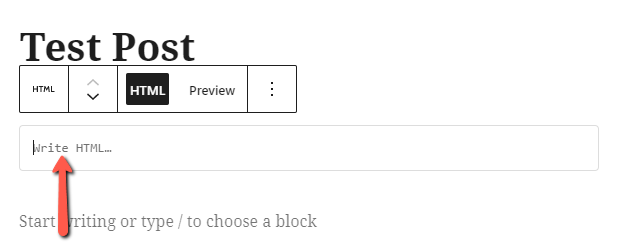
Step 2 – Add your HTML code in the box.
As an example, you can copy and paste the code below to try it out:
<table>
  <tr>
    <td>Cell A</td>
    <td>Cell B</td>
  </tr>
  <tr>
    <td>Cell C</td>
    <td>Cell D</td>
  </tr>
</table>
This is how it should look:
| Cell A | Cell B |
| Cell C | Cell D |

HEADLINES
Headlines are defined with the <h1> to <h6> tags – <h1> is the biggest and <h6> is the smallest.
<h1>Headline 1</h1>
<h2>Headline 2</h2>
<h3>Headline 3</h3>
<h4>Headline 4</h4>
<h5>Headline 5</h5>
<h6>Headline 6</h6>
PARAGRAPHS
Paragraphs are defined with the <p> tag.
<p>This is one paragraph. Marshmallow sweet roll liquorice powder ice cream. Cupcake tiramisu toffee fruitcake. Carrot cake fruitcake sesame snaps lemon drops biscuit gummies marshmallow pie. Pie chocolate cake caramels liquorice. Brownie cheesecake lollipop caramels fruitcake sugar plum toffee gummi bears.</p>

<p>This is another paragraph. Macaroon halvah jelly beans. Danish jelly bonbon dragée toffee gummies jelly-o. Carrot cake powder danish powder muffin jelly-o biscuit toffee fruitcake. Lollipop marshmallow gingerbread brownie. Pastry fruitcake sweet jelly beans dessert candy biscuit sweet carrot cake.</p>
IMAGES
Images are defined with the <img> tag.
It is one of the few tags that works alone – no closing tag. It has to be used with the src attribute to specify the source location of the image.
<img src="https://studio73designsnb.com/wp-content/uploads/2020/07/how-to-add-logo-to-photo-picmonkey-8-1.png">By adding the alt attribute, you can specify text in case the image doesn’t display for some reason. Usually you would text that is relevant about the image.
<img src="https://studio73designsnb.com/wp-content/uploads/2020/07/how-to-add-logo-to-photo-picmonkey-7.jpeg" alt="logo">LINKS
Links are defined by the <a> tag.
It has to be used with the href attribute to specify the destination (website address) – don’t forget the hyphens!
The text that is between the tags is the actual link (the text that readers click on). You don’t have to use text as a link – you can also use an image as a link (more on that below).
<a href="https://studio73designsnb.com">Text that reader clicks on</a>By adding the target attribute, you can specify that the link open in another window – if this is left out, the link will open in the current window.
<a href="https://studio73designsnb.com" target="_blank">Text that reader clicks on</a>If you want to use an image as the link, simply wrap the <a> tag around the <img> tag:
<a href="https://studio73designsnb.com"><img src="https://studio73designsnb.com/wp-content/uploads/2020/07/how-to-add-logo-to-photo-picmonkey-7.jpeg"></a>
LINE BREAK
To insert a line break in a sentence, simply add the <br> tag. This tag does not have a closing tag (like the image tag).
Marshmallow sweet<br>
roll liquorice<br>
powder ice cream.
TEXT FORMATTING
To make text bold, use the <strong> tag:
This is a sentence and <strong>this text is bold.</strong>To italicize text, use the <em> tag:
This is a sentence and <em>this text is italic.</em>LISTS
There are two types of lists: ordered and unordered.
Ordered lists are numbered and unordered lists are not numbered (they have a little disc next to each line item).
Also, when you are working with lists, you’re actually working with 2 different sets of tags.
The first set is to “open” the list (either the <ol> or <ul> tag and then the <li> tag for each list item).
For an ordered list, use the <ol> tag and the <li> tag for each list item:
<ol>
<li>List item #1</li>
<li>List item #2</li>
<li>List item #3</li>
</ol>
For an unordered list, use the <ul> tag and the <li> tag for each list item:
<ul>
<li>List item #1</li>
<li>List item #2</li>
<li>List item #3</li>
</ul>
HTML CLASSES
Now comes the fun part – this is where the magic happens: Assigning classes to elements within your website.
So why would you want to assign classes? To make changes to the look of that particular element.
Notice how all my examples containing code all have a greyish background with a dashed line around them? (like this one):
This is a test block which has been styled thanks to the magic of classes.I did that by assigning a class to a div container and with the help of a little CSS (which I discuss later), I was able to edit that block of text.
First things first – what is a div container?
A div container is basically a “box” that contains your content – you would create one if you wanted to edit that particular content.
For example, if you had a paragraph of text and you wanted that specific paragraph to have a purple background and a different font, you would create a div around that block of text and assign it a class.
When you assign a class to a div container, you’re just basically “naming” that div so you can target it in your CSS code (style.css sheet)
In this example, I have a paragraph and I’m creating a div container to place around the paragraph and I’m assigning a class to it called “example”.
<div class="example">
This is one paragraph and after I assign a class, I will add some code to my CSS code and give it a purple background, white text and a different font. Once you get the hang of using classes, you will love it!
</div>
This is the result:
The CSS code that I am adding to my style.css sheet is:
.example {
background-color: #7b288a;
color: #fff;
padding: 20px;
font-family: “arial”, sans-serif;
font-size: 22px;
margin-bottom: 50px;
}
See how I call out the div that I created? I’m basically telling my blog to style any element with the class “example”.
BONUS TIP: You do not need to always create div containers – you can assign classes to links, paragraphs, images, etc…
Important Things To Note:
- When you assign a class to an element, your changes won’t take effect until you make changes to your CSS file (discussed later)
- You can assign the same class to multiple elements. This makes it easier to edit a bunch of elements at the same time. For instance, if you had several paragraphs within your blog that you wanted to highlight grey. You would assign the same class to each of those paragraphs, and once you add the appropriate code to your CSS, they will all change color at the same time.
- At this point, I just want you to UNDERSTAND the concept of assigning a class – it just basically means that you’re “naming” an element whatever you want so you can target that particular element in your CSS.
- HTML and CSS work together – look at it like this: HTML is where you build it and CSS is where you style it.
For more detailed information on HTML, go to W3Schools – HTML – it is an excellent resource!
Now let’s move on and see how this all fits together!
INTRODUCTION TO CSS
CSS stands for Cascading Style Sheet and it is used to describe how HTML elements are displayed on your screen.
The easiest way to add/edit CSS code is to go to: Appearance => Customize
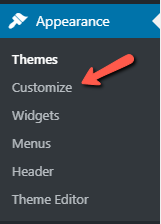
Click on “Additional CSS”
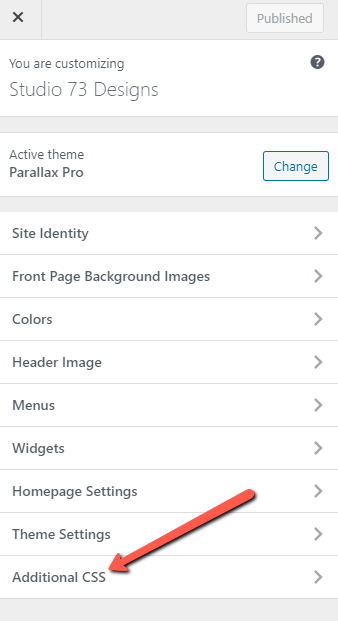
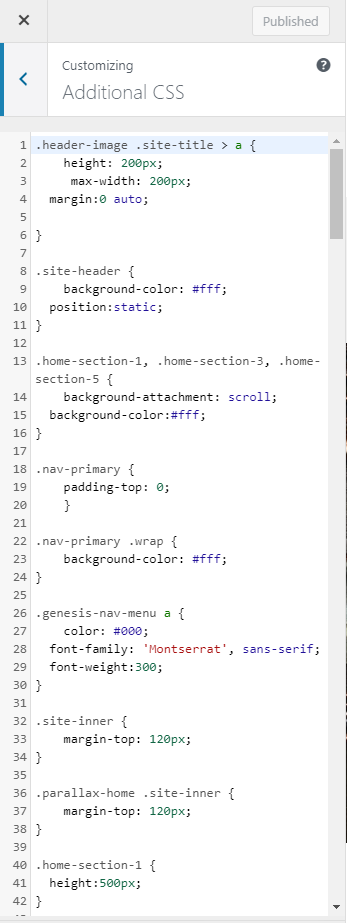
This is where you would add your CSS code.
If you don’t like certain colors, fonts, etc…this is where you make those changes!
Pretty exciting stuff huh?
Before you start making changes, we need to discuss how the code actually works.
A CSS rule set consists of a selector and a declaration. Within the declaration there is a property and a value:

In the example above, the rule is written out on one horizontal line for demonstration purposes but in “real life”, you would actually see it like this:
h1{
color:blue;
}
A declaration block can have multiple declarations which all end with a semi-colon.
The declaration block opens with a curly bracket (after the selector) and closes with a curly bracket. The properties and values within the declarations are separated by a colon.
Here is an example of a CSS rule with multiple declarations:
h1{
color:blue;
font-family:arial, sans-serif;
font-size:16px;
}
So this rule basically means that anything on your site assigned with the h1 tag will have the color blue, arial font and will be 16px in size.
Before I show you how to make all kinds of cool changes to your blog, we should discuss the most common properties you’ll be using.
BACKGROUND-COLOR
The background-color property specifies the background color of an element.
body{
background-color:yellow;
}
BACKGROUND-IMAGE
The background-image property specifies the background of an element as an image.
body{
background-image:url(“image.jpg”);
}
This is the standard syntax for this property. Normally, the full url of the image location would be between hyphens.
BACKGROUND-REPEAT
By default, the background-image is set to repeat horizontally and vertically.
To control this, you can use one of 3 declarations:
background-repeat: repeat-x; (repeats image horizontally)
background-repeat: repeat-y; (repeats image vertically)
background-repeat: no-repeat; (does not repeat image)
So if I wanted to repeat horizontally only, this would be my CSS rule:
body{
background-image:url(“image.jpg”);
background-repeat:repeat-x;
}
BACKGROUND-ATTACHMENT
When working with background images, you can specify whether or not that image will scroll with the page or be fixed.
background-attachment: fixed; (will NOT scroll)
background-attachment: scroll; (will scroll with rest of page)
So if I wanted a fixed image as a background image, this would be my CSS rule:
body{
background-image:url(“image.jpg”);
background-repeat:no-repeat;
background-attachment:fixed;
}
COLOR
The color property determines the color of the text.
h3{
color:#c4db5e;
}
Note: The color code above is called a HEX code – you can find the HEX code for any color at HTML Color Codes
TEXT-ALIGN
The text-align property determines how it is aligned horizontally.
Options:
text-align: center; (horizontally centers the text)
text-align: left; (horizontally aligns text to the left)
text-align: right; (horizontally aligns text to the right)
In this example, my body text will be center-aligned:
body{
text-align:center;
}
TEXT-DECORATION
The text-decoration property is used to add or remove decorations.
Options:
text-decoration: underline;
text-decoration: none;
In this example, I am removing underlines from all my links:
a{
text-decoration: none;
}
TEXT-TRANSFORM
The text-transform property is used to specify lowercase or uppercase letters in your content.
Options:
text-transform: lowercase; (all letters are lowercase)
text-transform: uppercase; (all letters are uppercase)
text-transform: capitalize; (first letters of each word are capitalized)
text-transform: none; (removes any format – use to overwrite another setting)
In this example, I am specifying that all my h3 headlines be uppercase:
h3 {
text-transform: uppercase;
}
LETTER SPACING
The letter-spacing property is used to specify the distance between each letter in a word.
This amount is specified in pixels.
In this example, I am specifying that the letter spacing in all my h2 headlines be 2px:
h2 {
letter-spacing: 2px;
}
WORD SPACING
The word-spacing property is used to specify the distance between each word in a sentence.
This amount is specified in pixels.
In this example, I am specifying that the word spacing in my paragraph be 10px:
p {
word-spacing: 10px;
}
LINE HEIGHT
The line-height property is used to specify the distance between each line.
In this example, I am changing the line height in my paragraph:
p {
line-height: 1.8;
}
FONT FAMILY
The font-family property is used to specify the font.
It is good practice to include an additional font in case the browser cannot display your chosen font.
Usually you would indicate the name of the font you are using and then as a second choice, use the “generic family” of that font (serif, sans-serif, cursive).
In this example, I am changing the font of the body text:
body {
font-family: Open Sans, sans-serif;
}

FONT SIZE
The font-size property is used to specify the size of your font.
Use this for body text, paragraphs, headlines, etc…
In this example, I am changing the font size of my h2 headlines:
h2 {
font-size: 26px;
}
STYLING LINKS
You can style links the same way you would any other web element.
In fact you can style links based on the state that they are in. The four states of a link are:
a:link (normal link)
a:visited (links that have been visited)
a:hover (link when you hover over it)
a:active (the color of the link the moment you click on it)
In this example, I am changing the color of my normal links to blue and also changing them to red when you hover over them:
a {
color:blue;
}
a:hover {
color:red;
}
MARGINS
Margins are used to determine the amount of space outside the border of an element.
In this example, the image has a top margin of 200px and a left margin of 200px.

A margin can have 4 properties:
margin-top
margin-bottom
margin-right
margin-left
PADDING
A LOT of people get margins and padding confused – here’s the difference:
A margin is the amount of room OUTSIDE of an element in relation to its surroundings.
Padding is the amount of space INSIDE an element.
Padding also has 4 properties:
padding-top
padding-bottom
padding-right
padding-left
There’s a ton of stuff you can do with CSS and obviously I can’t cover it all within one blog post. I’ve included the most common CSS rules that you’ll be using – if you want to learn more about CSS, I would encourage you to check out W3Schools. It is a free and awesome resource to learn more about coding with CSS.
MAKING YOUR CHANGES WITH DEVELOPER TOOLS
So now that you’ve learned some HTML and CSS code, it’s time to show you how to make those changes.
In order to do this, you’ll need developer tools. There are several available, depending on which browser you use and whether you are on a PC or Mac.
You can read more about developer tools here and how to activate them.
I use Google Chrome so in this blog post, I am using Chrome Developer tools which can be easily activated by pressing the F12 button (I’m on a PC).
When enabled, it lets you inspect elements on your blog and make changes in real time to see what it looks like before making the actual changes in your style sheet.
Once Chrome DevTools is activated, it will open up a window on the bottom half of your screen. On the left of this window, you’ll see the HTML of your blog and on the right is the CSS code of your blog.
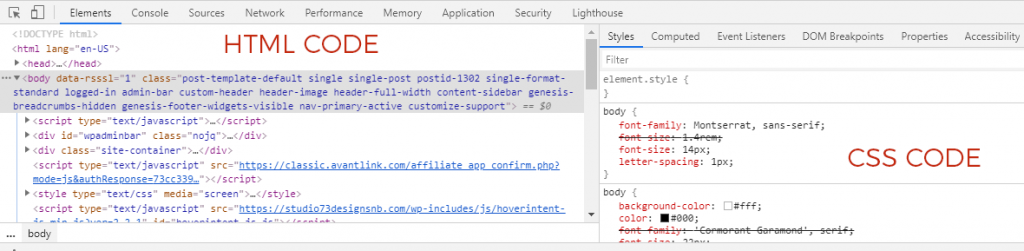
Click on the little arrow icon in the top right – now you can hover the different parts of your blog and the code behind each of those parts.
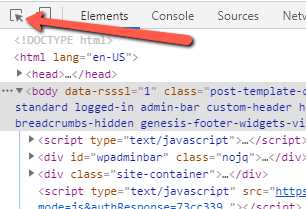
As you hover over different parts of your blog, this will highlight the HTML that belongs to it.
In this example, I hovered over a paragraph (note how it is highlighted) and clicked.

At the same time you hover over the object that you are inspecting and click, the HTML & CSS code will pop up simultaneously down below, in the Chrome DevTools.
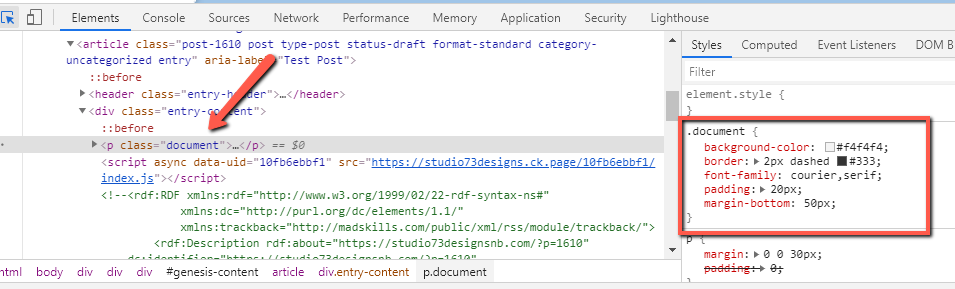
Here’s a closer look at the left side of the panel (HTML code).
The highlighted HTML code tells me that I assigned a class to this paragraph called “document”.

When we look at the right side of the Chrome DevTools, we will see the CSS code pulled from that particular HTML element.
This shows me how I styled any paragraph with the “document” class assigned to it.
In this example, I’ve changed the background color, added a border, changed the font, added some padding and a margin.
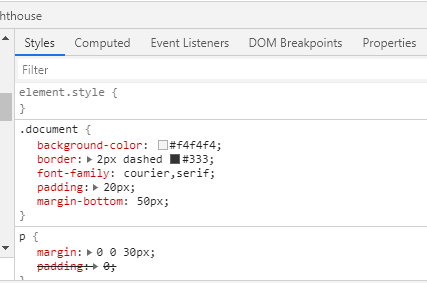
Keep in mind that when you are looking at the CSS on the right panel, you may need to scroll down a bit to find the class name you are looking for.
Learning how to use Chrome DevTools properly takes time, but once you get the hang of it, it will quickly become your new best friend.
Make Changes in Real Time
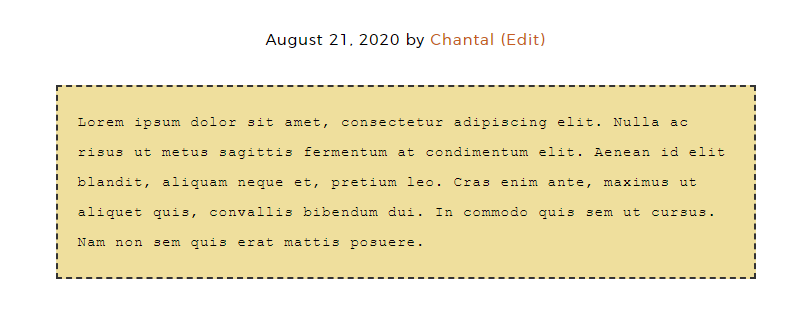
Suppose I want to change the color of the background of that paragraph so it stands out more. How do I do that?
Fortunately, you are able to see what things will look like before you add your CSS code to your style sheet.
I want to try a different color for my paragraph, so I can change the hex color code in my CSS code in Chrome DevTools from #f4f4f4 to # efdf9d.
You can easily do this in real time by clicking into the code and editing it.
This way you can see how it will look BEFORE you permanently make those changes in your CSS code.
Here is a close-up of the code that I edited on the right side.
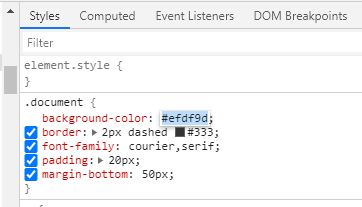
I changed the hex code from #f4f4f4 to #efdf9d which changed it in real time from light gray to a mustard yellow.
Making the Changes Permanent
It’s easy to spend lot of time inspecting various elements on your blog but in order to make any change permanent, you’ll need to add the CSS code to your blog.
Keep in mind that you use Chrome DevTools to make changes to EXISTING HTML elements within your blog.
Sometimes you need to add your own HTML elements within your blog posts (like in the div container example earlier in this tutorial).
Like I said, using web developer tools takes a lot of practice but there are many Youtube video tutorials that can show you this in more depth.
I wanted to put together this tutorial because I know that a lot of bloggers struggle with the technical aspect of running their blogs.
Learning basic HTML & CSS is very important and can save you money (not to mention it’s a lot of fun!).
If you’d like to see my work and follow my wire journey, you can find me here:
Etsy
Facebook
Instagram
Twitter
Pinterest
YouTube

