
Welcome back! The workspace is where you sit down to create, tinker, sometimes also get frustrated… I’m going to take you through some of the essential tools you need to get started on your journey and how to maximize your space to fuel your creative journey.
DISCLOSURE: This post may contain affiliate links, meaning when you click the links and make a purchase, I receive a commission. As an Amazon Associate I earn from qualifying purchases.
Essential Items Needed in a Workspace
1. IKEA Trolleys
IKEA trolleys are fantastic space savers for large tools like hammers, blocks, etc.

FREE WIRE-WRAPPING GUIDE TO YOUR EMAIL!
JOIN NEWSLETTER
We respect your privacy. Unsubscribe at anytime.

2. Containers
Hide your small containers in drawers to keep stones, attachments, and bits and pieces neat and ready whenever you need them.
3. Dedicated Spaces
Everything has a space and return it to its space to keep your tools and accessories in their dedicated space(s) to avoid a messy workspace.
Look at this video by The Art of Metalsmithing for ideas on how to create an effective workspace.
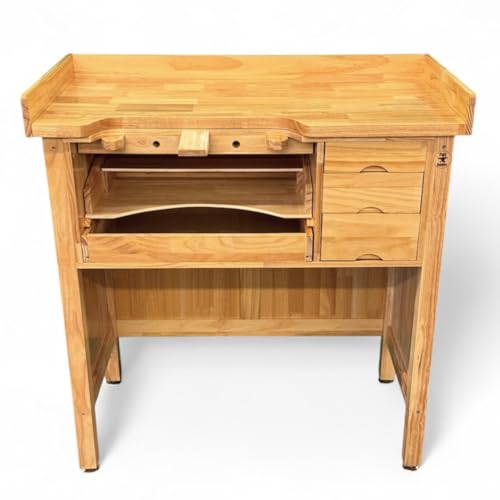
4. Deluxe Solid Wooden Jewelers Bench by PMC Supplies
The Deluxe Solid Wooden Jewelers Bench by PMC Supplies is a beautiful and practical workstation features three closed storage drawers, a lined catch tray, and a pull-out storage tray for all your tools and supplies.
Also, it comes with two pull-out arm supports to ensure you’re comfortable while working on a new creation.
Support for Your Body and Mind
5. Ergonomic Chair
When I get into the ‘zone’, there’s nothing worse than aching back and neck muscles. Yes, it is a problem that I could have avoided from the start…
I have taken the plunge and invested in an ergonomic chair to help reduce strain while I work. My chair has an adjustable backrest, lumbar support for my lower back, and a cushioned seat to ensure my comfort while I’m working.

Lighting Up Your Creativity
6. Magnifying Lamp
I need proper lighting to work on detailed pieces. As Jeanett Caines point out in this video, a magnifying lamp is an essential tool.
From soldering fine details to creating the perfect twist, you’ll need bright light. Invest in a magnifying light that can clip to your desk and you’ll see how easy it becomes to do detailed work without straining your eyes.

Wire Storage Solutions
You’ll remember we’ve covered storing your wire in a previous post (Ideas on How to Store Your Wire for Wire Wrapping Projects), but here are some more tricks I use in the studio:
7. Drawer organizers
My secret weapon for storing different gauges separately and avoiding a tangled mess.
8. Plastic spools
I transfer wire to smaller spools to prevent tangles and make it easier to access and handle.

9. Wire racks
Apart from my wall-mounted rack, I also have a miniature one close by on my desk that holds the smaller spools within reach.
Basic Tools 101: Getting the Basics Right
10. Ruler
A ruler is essential to measure out exact straight lengths of wire, while a measuring tape helps me to ensure I’ve got enough wire for larger projects.
11. Wire Gauge
Without a ring gauge my rings would either be too small or too large—no eyeballing sizes here! A wire gauge is important to ensure I use the right thickness.

12. Mandrel
I use a mandrel to shape rings and bangles due to its cylindrical shape.
13. Hammer and Anvil
Last, but not least, my hammer and anvil are indispensable when I’m adding texture to pieces.
Other tools I would count among my essentials, include:
14. Files and Sandpaper
Take your file and sandpaper to them and smooth them over. I also use them to shape the wire sometimes. These are vital for smoothing rough edges and shaping the wire.

15. Permanent Marker
Sometimes you need to mark out measurements and plan things. I use a permanent marker to mark exact measurements.
16. Rawhide or Nylon Hammer
A rawhide or nylon hammer is a fantastic alternative that’s perfect for shaping fine wire without damaging it.

17. Precision and Clarity
Apart from using rulers, a cutting mat is another must-have in my workspace. I use the the mat to measure long pieces of wire and it protects my workbench’s surface.
The 12-by 18-inch cutting mat is perfect for measuring everything from wires to stones in inches and centimeters. Best of all, it is self-healing, so I never cut through it and damage the smooth work surface!
18. Waffle Flower Water Media Beading Mat
Waffle Flower Water Media beading mat is another great stalwart you may consider. Here are the key takeaways from The Stylish Maker’s video:
- The silicone’s stickiness prevents stones and beads from rolling away.
- Twelve built-in ‘holders’ helps to keep you sane, and your stones organized.
- Raised edges mean you don’t accidentally spill smaller items over your work surface.
- Done creating? Simply roll it up and pop it into a drawer.
Bead Organization
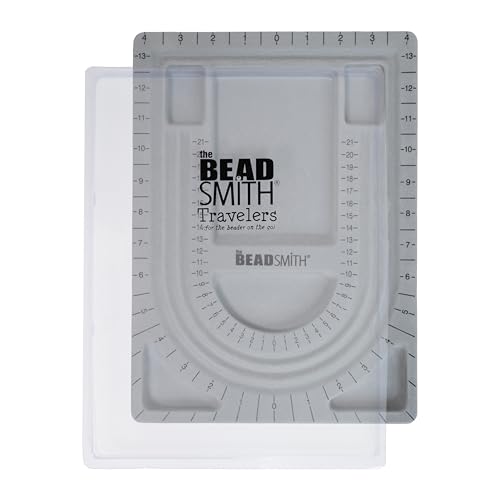
19. Bead Board
Sometimes I need a little bit of extra help when I’m designing pieces or planning where I’d like to use stones.
The Bead Board is a life- and timesaver. The U-shaped design helps to determine the right length for necklaces and bracelets as Tara explains in this video.
The compartments are perfect for holding different kinds of beads, stones, finings, and the like.
Beadsmith Beard Board
Remember, measure twice and cut once and use the Beadsmith Beard Board to take the guesswork out of cutting. The u-shaped design also holds everything in place, so I can move components around until I am happy with the design.
The Taming of the Wire
I cannot go a day without my trusty pliers and cutters. Here are some of the basic ones I always keep handy on my workbench:
20. Wire Cutters
Apart from avoiding wastage, wire cutters with sharp blades are essential to cut wires to the desired length.

Needle-Nose Pliers
Perfect for picking up small objects, manipulating and bending wires into precise sizes, and holding components securely.

Round-Nose Pliers
Smooth, rounded jaws mean you can create the perfect loops and curves for a project.
Chain-Nose Pliers
Similar to round-nose pliers, chain-nose pliers offer a slightly pointed jaw, making them ideal for opening jump rings and creating sharp bends.
Flat-Nose Pliers
These pliers offer a flat gripping surface, useful for holding wire flat while wrapping or shaping it.
Remember, this is not an exhaustive list, and as your skills and projects evolve, you might explore more specialized pliers like bent-nose pliers for specific wire-wrapping techniques.

The Art of Coiling
21. Wire Coiling Gizmo
I battled to create perfect coils until I bought a wire coiling gizmo. What a lifesaver! I get perfect results every time and my coils are uniform throughout.
The best feature is that you can use different wire gauges because the product is supplied with five different 15-inch rods (7 mm, 5 mm, 3 mm, 2.5 mm, 1 mm).
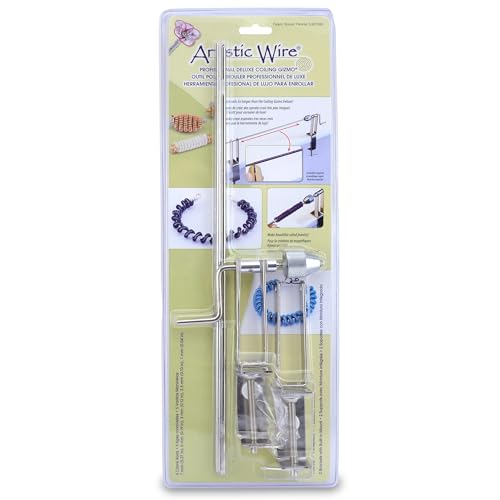
If you’re a visual learner like me, I provide a step-by-step video to guide you through the process.
Note:
Word of advice I missed when I first used my coiling gizmo: keep the wire and crank flush against the metal bar to ensure your coils are nice and tight. It also helps to pull the wire slightly backwards—behind the bar—to achieve perfect results.
Shaping Your Wire
22. Wire Bending Jig
Last but not least, a wire-bending jig is another valuable tool you can use to create precise shapes and angles in your projects.
Hobbywork Wire Bending Jig
Simply pop the jigs into the Hobbywork Wire Bending Jig, select the metal pegs corresponding to your design and start bending shapes. You can use it to create precise shapes and angles for your projects.

The Final Wrap
Remember, it takes time to build up a set of tools. As your projects become more intricate you’ll find that you’ll need more specialized tools.
What’s more, a well-organized and equipped workspace allows you to be creative and work without interference and enjoy your art.