• Skip to main content
  • Skip to secondary menu
  • Skip to primary sidebar
  • Skip to footer
Studio 73 Designs

Studio 73 Designs

Wire Jewelry Making & Wire Wrapping Techniques

  • Start Here!
  • FREE Wire-Wrapping Guides
  • Shop Tutorials
    • Cart
    • Checkout
  • Contact
  • Join Member
  • Member Login
Join PREMIUM MEMBERSHIP (FREE-TRIAL): 70+ Wire Wrapping Tutorials: Gain access to ALL step-by-step tutorials with high-quality images, no ads, plus all future tutorials. Check it out HERE.

Wire-Wrapping Dainty Spiral White Cube Stone Cage Pendant Tutorial

April 13, 2024 by Madelynn

Greetings my dear wire wrappers!

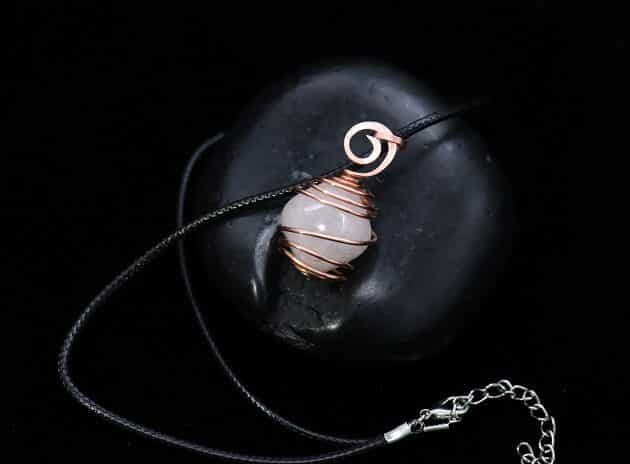
Show off your chic personality with our dainty spiral cage pendant while wearing your favorite gemstones.

Learn creative ways to elevate your jewelry design in our Wire-Wrapping Dainty Spiral White Cube Stone Cage Pendant Tutorial.

My instructions are easy and guided with step-by-step pictures so you can keep your progress in check.

wire wrap jewelry

FREE WIRE-WRAPPING GUIDE TO YOUR EMAIL! 

JOIN NEWSLETTER

SEND GUIDE TO EMAIL

We respect your privacy. Unsubscribe at anytime.

Let’s kickstart your wire-wrapping journey today. Happy wrapping!

Wire Wrapping Dainty Spiral White Cube Stone Cage Pendant Tutorial 0
Wire Wrapping Dainty Spiral White Cube Stone Cage Pendant Tutorial

LEVEL: BEGINNER

MATERIALS + TOOL

  • Gold Copper Wire (18 AWG)
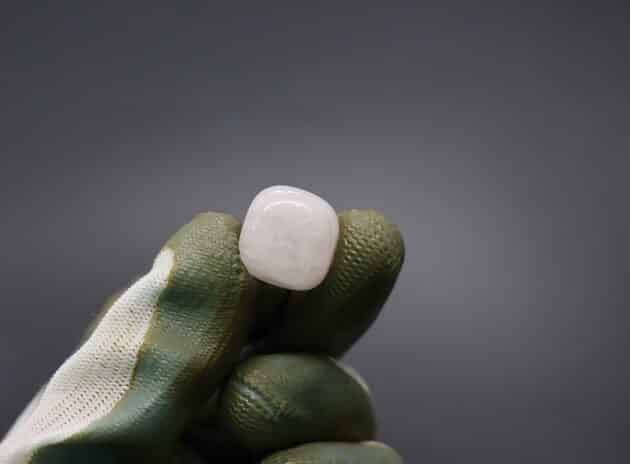
  • Square White Stone
  • Wire Cutter
  • Stepped Bail-Making Pliers
  • Nylon Jaw Pliers
  • Round Nose Pliers
  • Mini Long Needle Nose Pliers
  • Ball Pen Hammer Two-sided Flat/round Head
  • Metal Base Plate
  • Masking Tape
  • Triangle Diamond Needle Files
  • Finest Steel Wire Wool

DAINTY SPIRAL WHITE CUBE STONE CAGE PENDANT-Cover


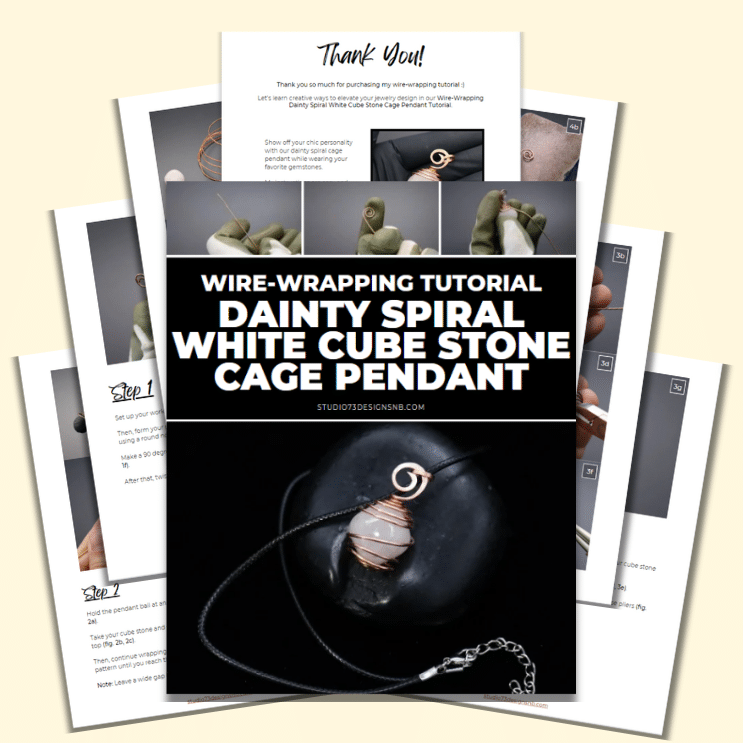
Prefer this wire-wrapping tutorial in a PRINTABLE FORMAT? (High Resolution Photos)

Click here for the PDF version of “Wire-Wrapping Dainty Spiral White Cube Stone Cage Pendant Tutorial”


WIRE-WRAPPING DAINTY SPIRAL WHITE CUBE STONE CAGE PENDANT TUTORIAL

Step 1 of 6

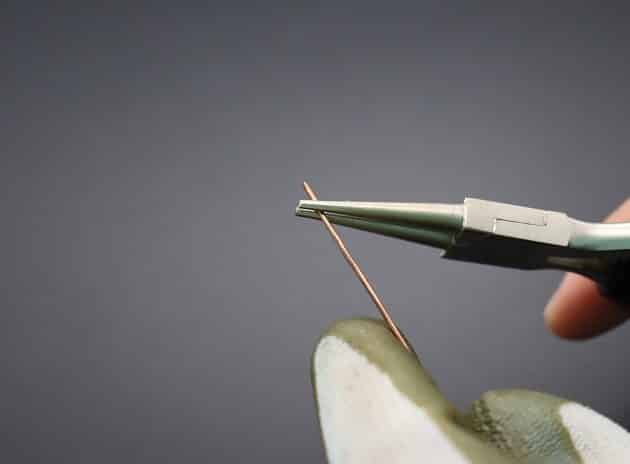
Set up your work table with items from the Materials and Tool list (fig. 1a).

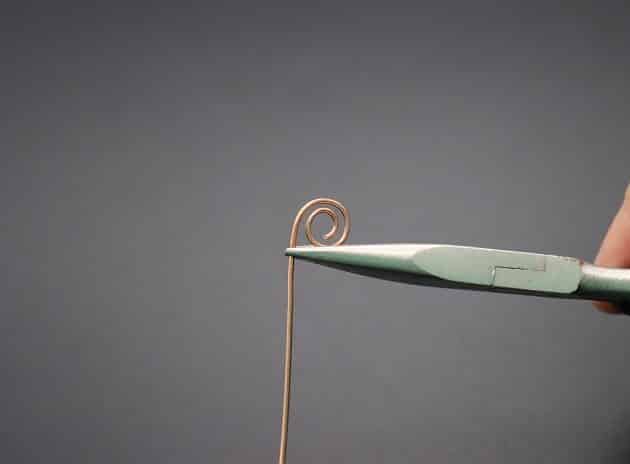
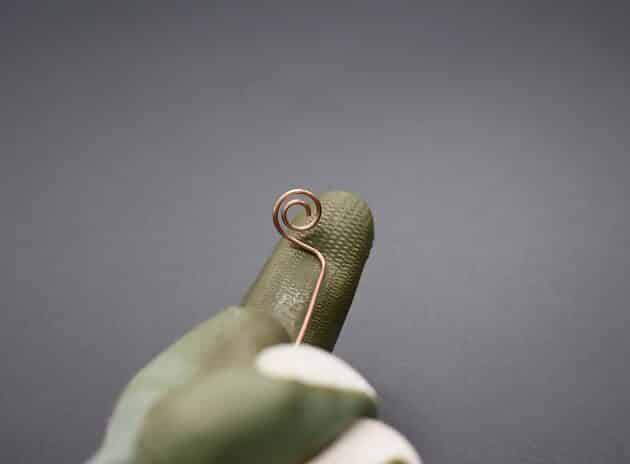
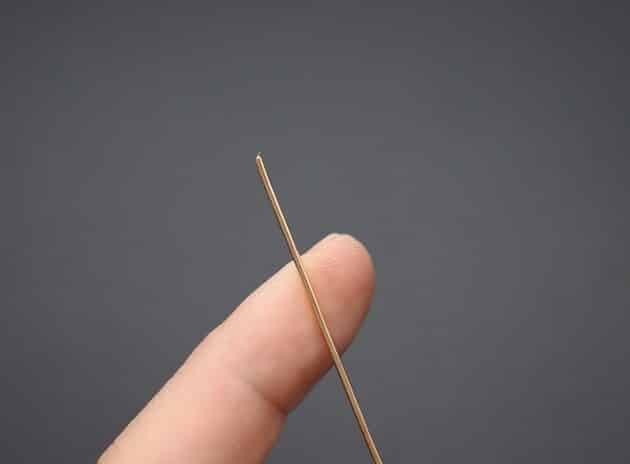
Then, form your pendant bail by twisting a string of 18-gauge gold copper wire using a round nose pliers (fig. 1b, 1c, 1d).

Make a 90 degree bend at the end of your bail using a needle nose pliers (fig. 1e, 1f).

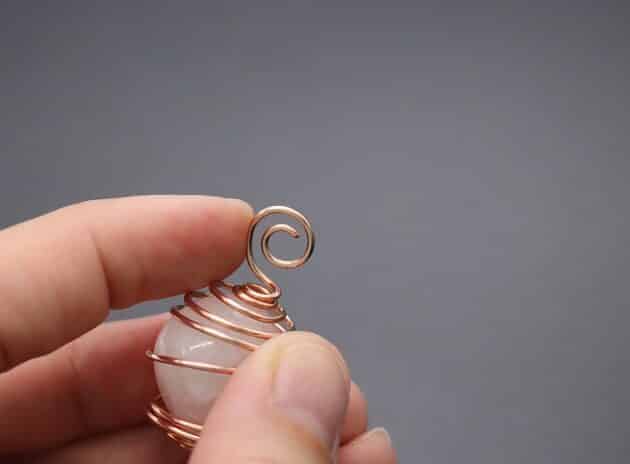
After that, twist the remaining wire into a spiral cap as shown (fig. 1g, 1h).

Wire Wrapping Dainty Spiral White Cube Stone Cage Pendant Tutorial 1
fig. 1a
Wire Wrapping Dainty Spiral White Cube Stone Cage Pendant Tutorial 2
fig. 1b
Wire Wrapping Dainty Spiral White Cube Stone Cage Pendant Tutorial 3
fig. 1c
Wire Wrapping Dainty Spiral White Cube Stone Cage Pendant Tutorial 4
fig. 1d
Wire Wrapping Dainty Spiral White Cube Stone Cage Pendant Tutorial 5
fig. 1e
Wire Wrapping Dainty Spiral White Cube Stone Cage Pendant Tutorial 6
fig. 1f
Wire Wrapping Dainty Spiral White Cube Stone Cage Pendant Tutorial 7
fig. 1g
Wire Wrapping Dainty Spiral White Cube Stone Cage Pendant Tutorial 8
fig. 1h

Step 2 of 6

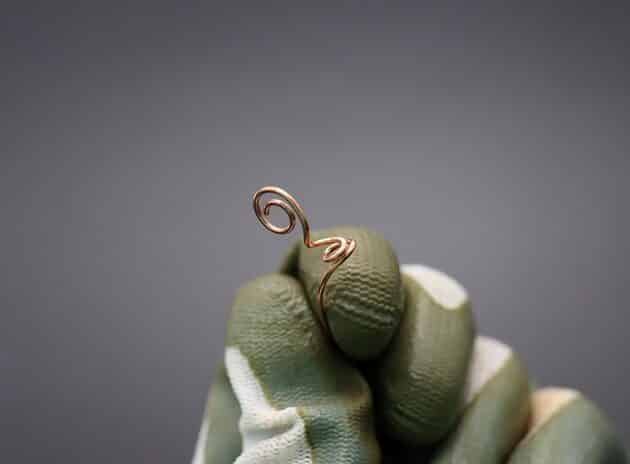
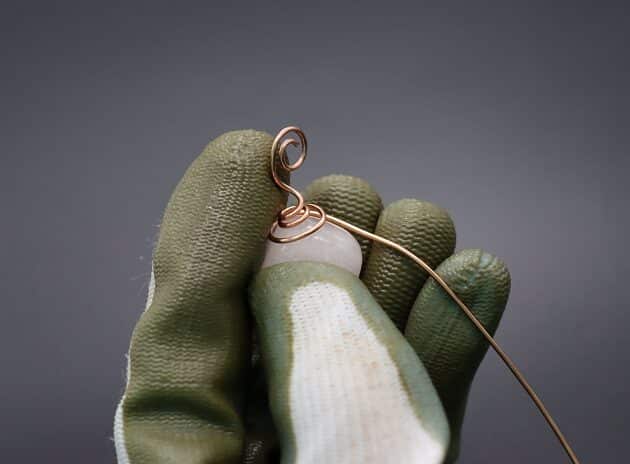
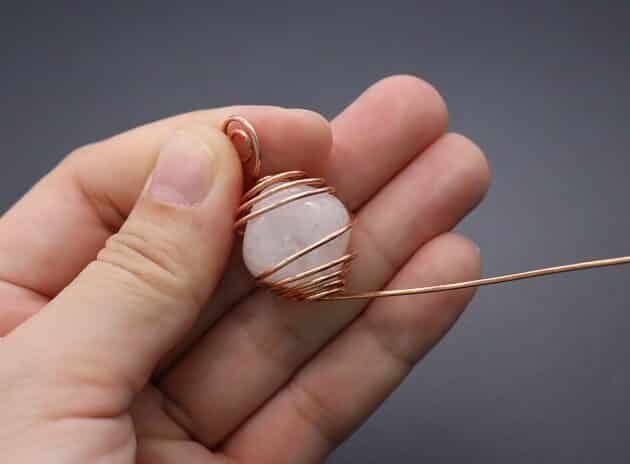
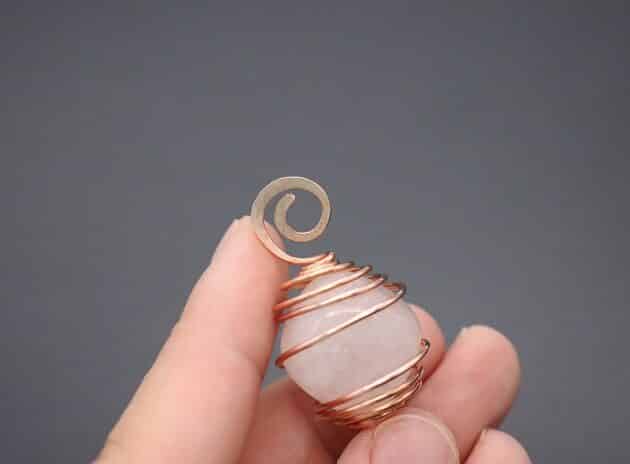
Hold the pendant bail at an upright position and the spiral cap at the bottom (fig. 2a).

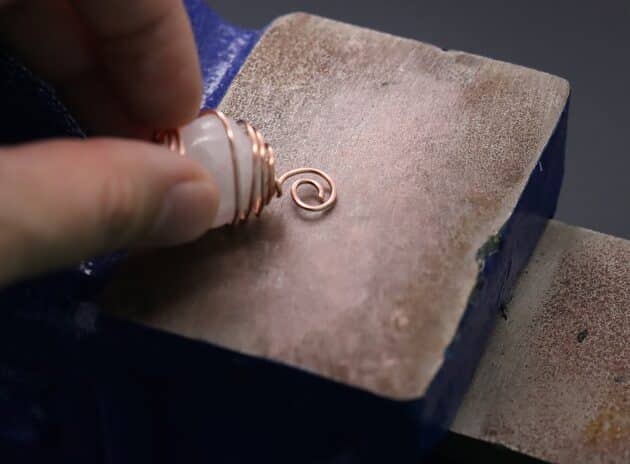
Take your cube stone and place the spiral cap on one of its corner as the pendant top (fig. 2b, 2c).

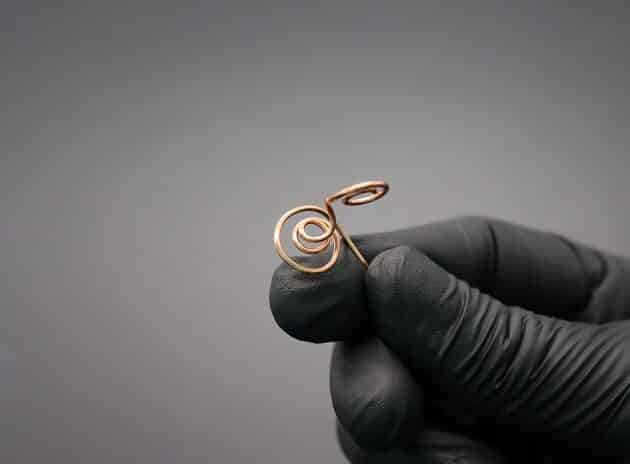
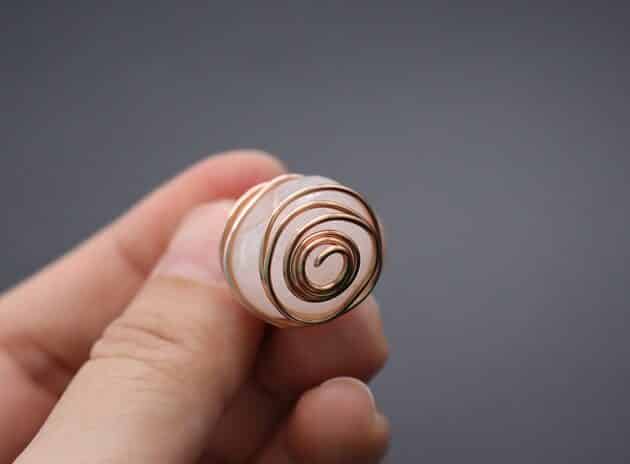
Then, continue wrapping the remaining wire around your cube stone in a spiral pattern until you reach the bottom (fig. 2d, 2e, 2f).

Take note to leave a wide gap in between spirals at the middle of your cube stone.
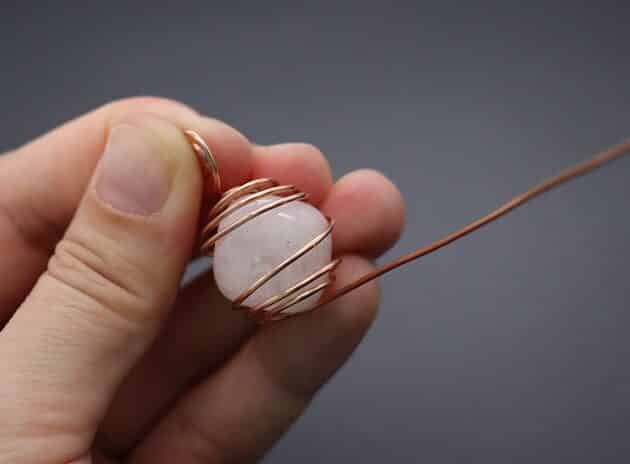
Wire Wrapping Dainty Spiral White Cube Stone Cage Pendant Tutorial 9
fig. 2a
Wire Wrapping Dainty Spiral White Cube Stone Cage Pendant Tutorial 10
fig. 2b
Wire Wrapping Dainty Spiral White Cube Stone Cage Pendant Tutorial 11
fig. 2c
Wire Wrapping Dainty Spiral White Cube Stone Cage Pendant Tutorial 12
fig. 2d
Wire Wrapping Dainty Spiral White Cube Stone Cage Pendant Tutorial 13
fig. 2e
Wire Wrapping Dainty Spiral White Cube Stone Cage Pendant Tutorial 14
fig. 2f

Step 3 of 6

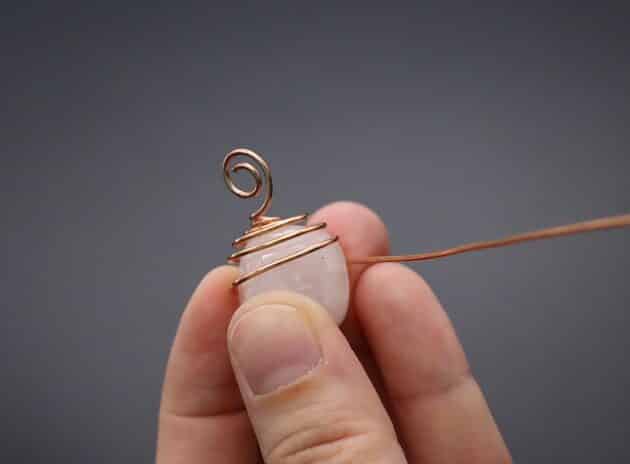
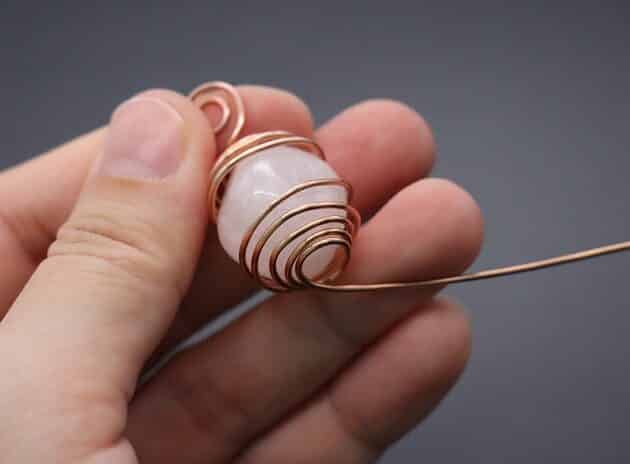
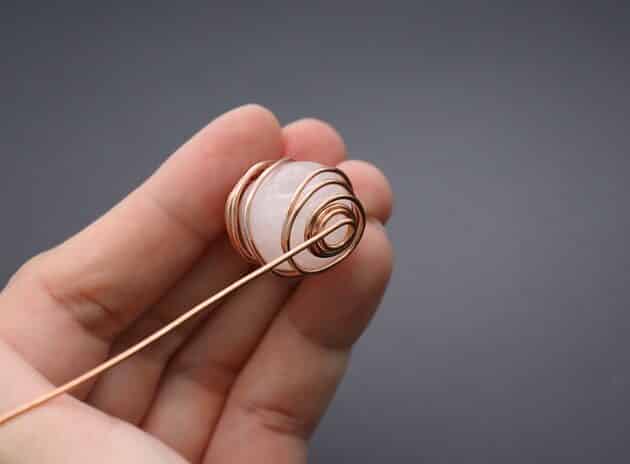
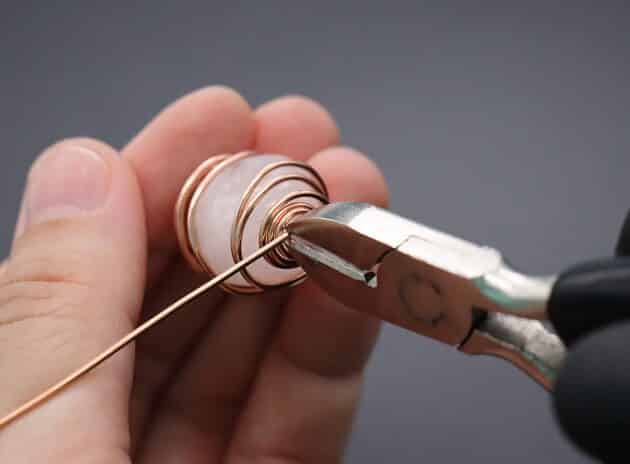
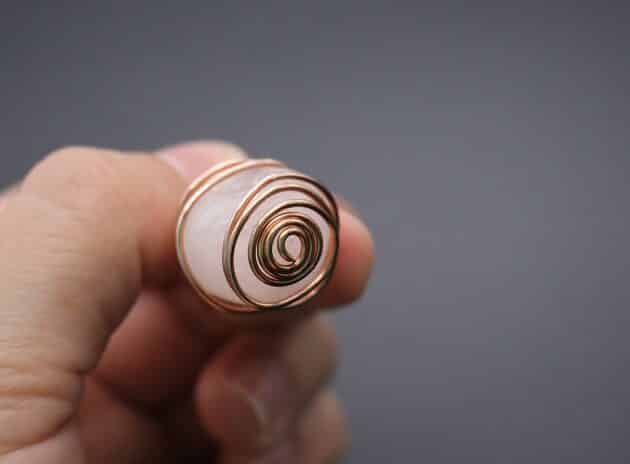
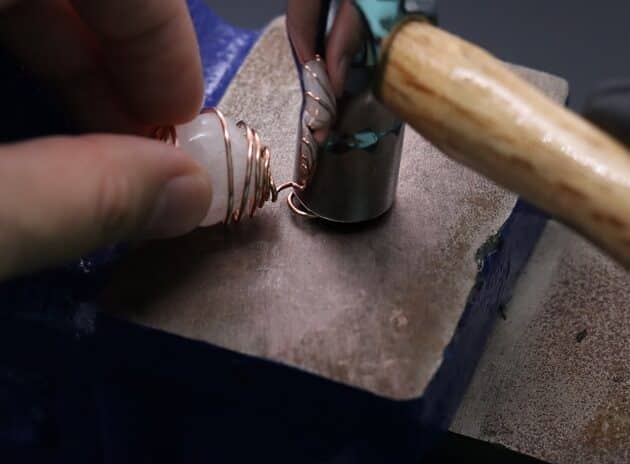
Finish off the spiral cage design with tight coils at the bottom of your cube stone (fig. 3a, 3b).

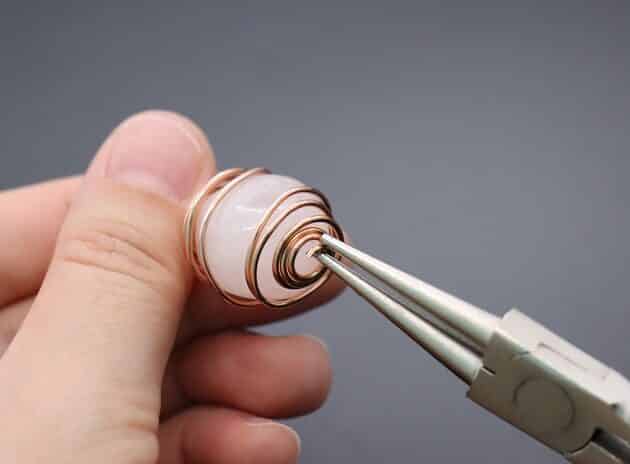
Then, trim off the excess 18-gauge wire with a wire cutter (fig. 3c, 3d, 3e).

Further tighten the ending coils of your spiral cage with a round nose pliers (fig. 3f, 3g).
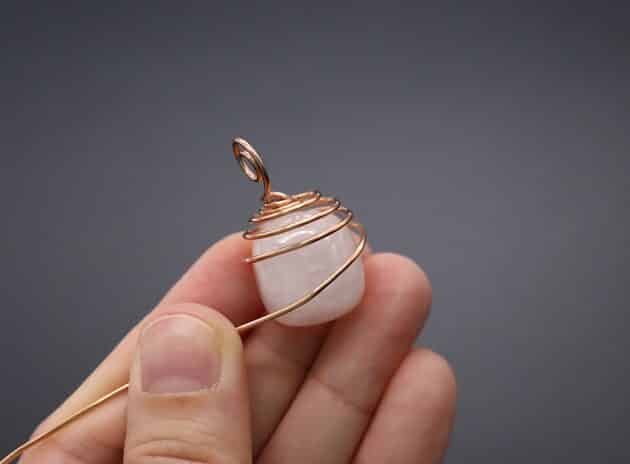
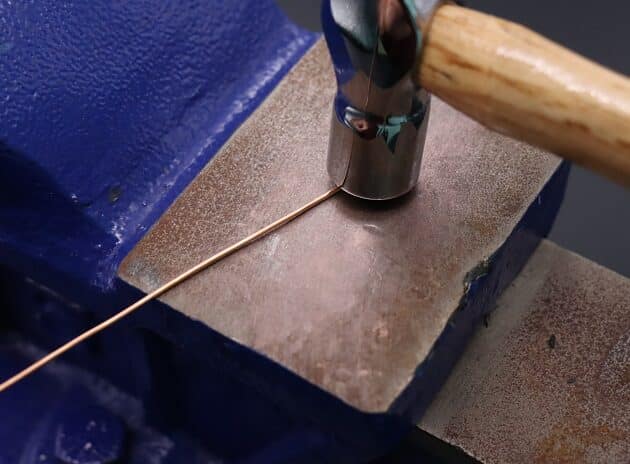
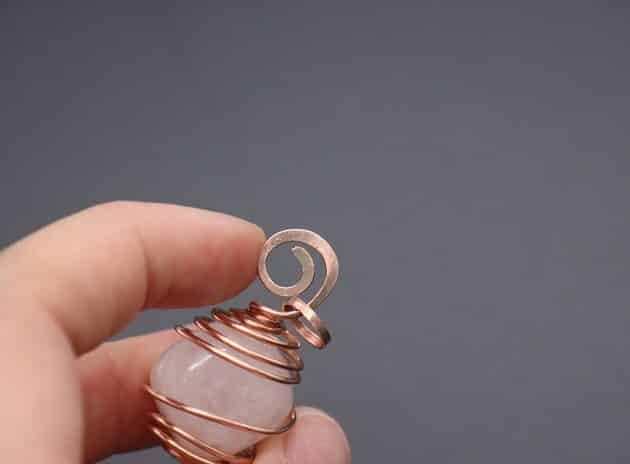
Wire Wrapping Dainty Spiral White Cube Stone Cage Pendant Tutorial 15
fig. 3a
Wire Wrapping Dainty Spiral White Cube Stone Cage Pendant Tutorial 16
fig. 3b
Wire Wrapping Dainty Spiral White Cube Stone Cage Pendant Tutorial 17
fig. 3c
Wire Wrapping Dainty Spiral White Cube Stone Cage Pendant Tutorial 18
fig. 3d
Wire Wrapping Dainty Spiral White Cube Stone Cage Pendant Tutorial 19
fig. 3e
Wire Wrapping Dainty Spiral White Cube Stone Cage Pendant Tutorial 20
fig. 3f
Wire Wrapping Dainty Spiral White Cube Stone Cage Pendant Tutorial 21
fig. 3g

Step 4 of 6

Moving on, let’s add a texture contrast onto your pendant by introducing a flat element.

Place your pendant bail on a base metal plate of jewelry anvil and lightly hammer it (fig. 4a, 4b, 4c).

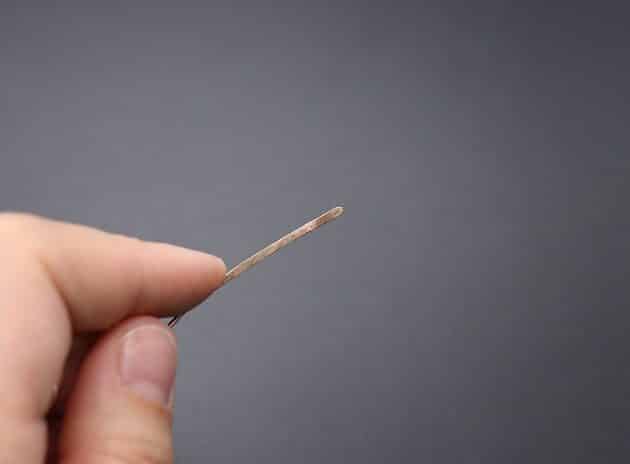
This is how your flatten pendant bail should look like (fig. 4d).

Wire Wrapping Dainty Spiral White Cube Stone Cage Pendant Tutorial 22
fig. 4a
Wire Wrapping Dainty Spiral White Cube Stone Cage Pendant Tutorial 23
fig. 4b
Wire Wrapping Dainty Spiral White Cube Stone Cage Pendant Tutorial 24
fig. 4c
Wire Wrapping Dainty Spiral White Cube Stone Cage Pendant Tutorial 25
fig. 4d

Step 5 of 6

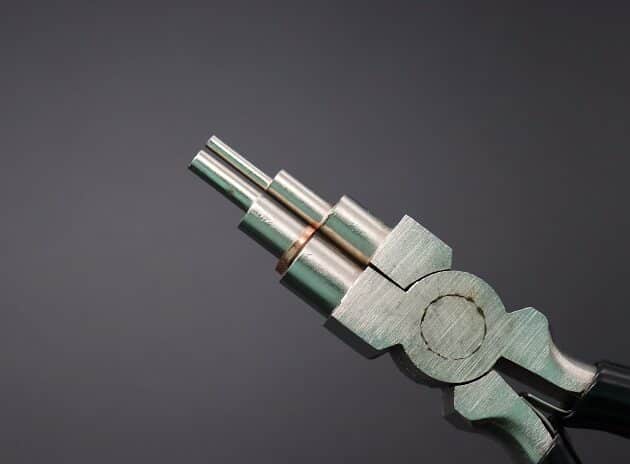
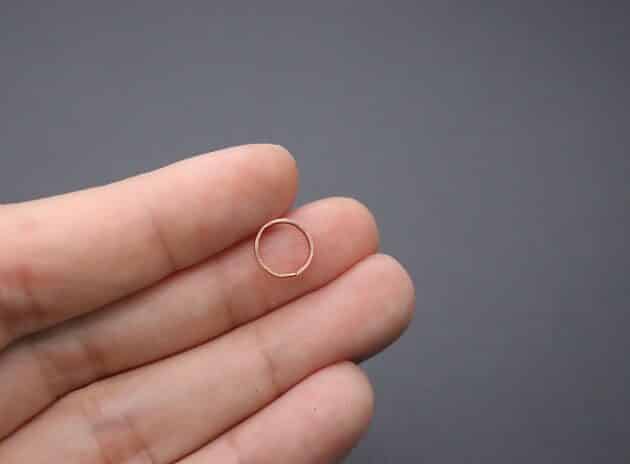
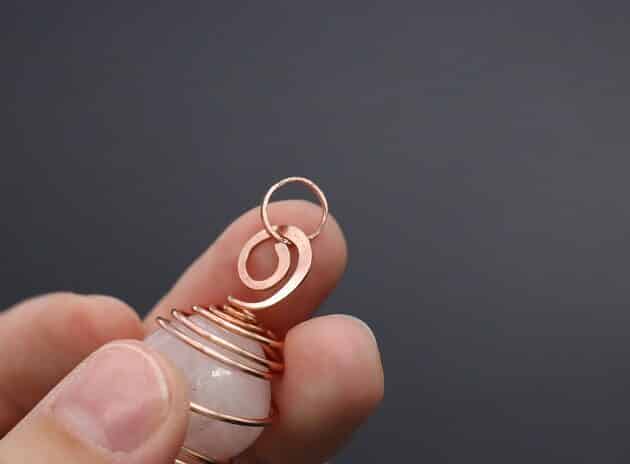
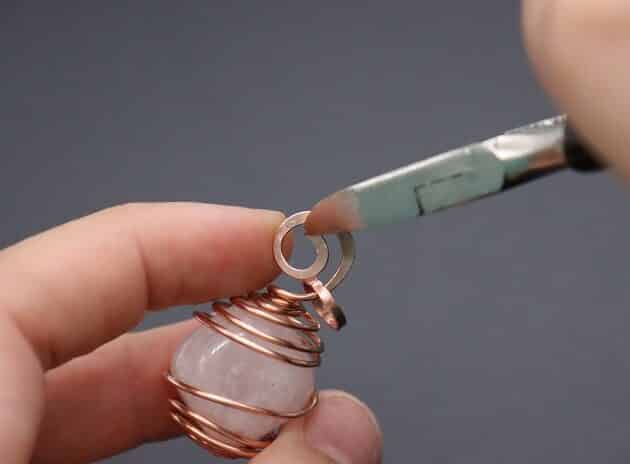
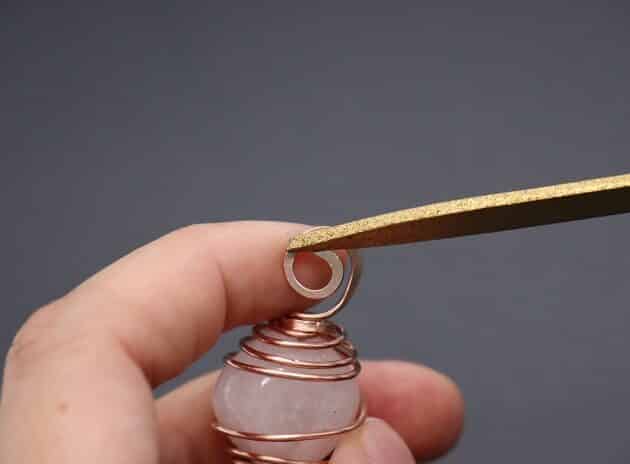
Now, let’s make a DIY jump ring for your beautiful spiral cage pendant to hang it on your necklace.

Place a piece of 18-gauge gold copper wire on the base metal plate and flatten it with a hammer (fig. 5a, 5b, 5c, 5d).

Then, curl the flatten wire into a small ring with your stepped bail-making pliers (fig. 5e).

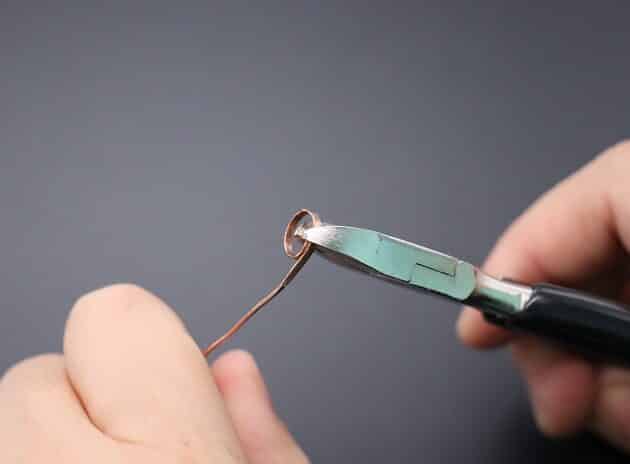
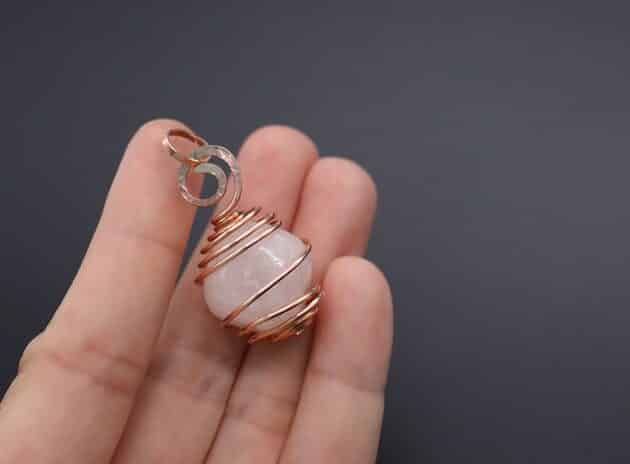
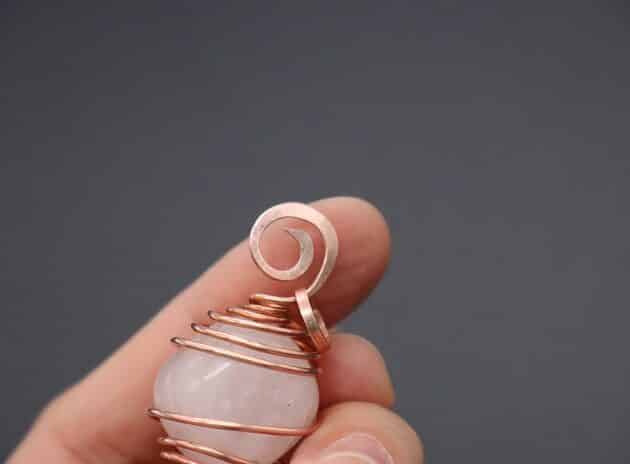
After that, trim off the excess wire and slip your jump ring onto the top of your pendant bail (fig. 5f, 5g, 5h, 5i, 5j).
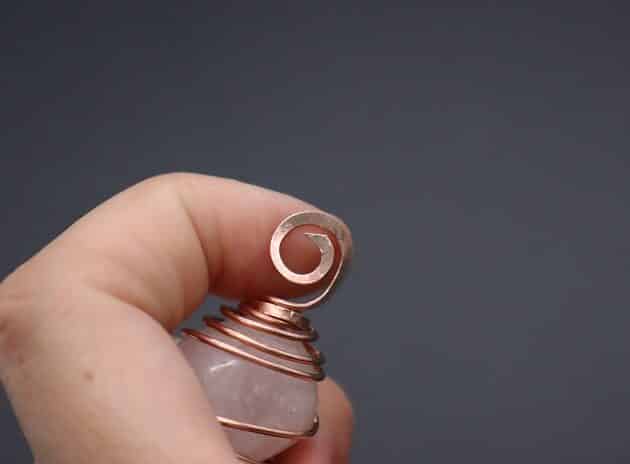
Wire Wrapping Dainty Spiral White Cube Stone Cage Pendant Tutorial 26
fig. 5a
Wire Wrapping Dainty Spiral White Cube Stone Cage Pendant Tutorial 27
fig. 5b
Wire Wrapping Dainty Spiral White Cube Stone Cage Pendant Tutorial 28
fig. 5c
Wire Wrapping Dainty Spiral White Cube Stone Cage Pendant Tutorial 29
fig. 5d
Wire Wrapping Dainty Spiral White Cube Stone Cage Pendant Tutorial 30
fig. 5e
Wire Wrapping Dainty Spiral White Cube Stone Cage Pendant Tutorial 31
fig. 5f
Wire Wrapping Dainty Spiral White Cube Stone Cage Pendant Tutorial 32
fig. 5g
Wire Wrapping Dainty Spiral White Cube Stone Cage Pendant Tutorial 33
fig. 5h
Wire Wrapping Dainty Spiral White Cube Stone Cage Pendant Tutorial 34
fig. 5i
Wire Wrapping Dainty Spiral White Cube Stone Cage Pendant Tutorial 35
fig. 5j

Step 6 of 6

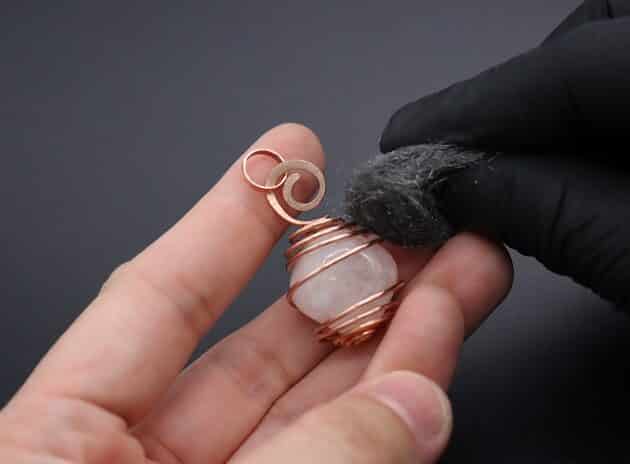
Finally, polishing your spiral cage pendant!

Use a finest steel wire wool to dust dirt off your pendant (fig. 6a, 6b).

An optional step if you prefer a sharp angle design, you can trim off the rounded end of your pendant bail (fig. 6c, 6d, 6e).

Remember to file the trimmed edges of your pendant with a triangle needle file.

This is to avoid getting caught on your clothes or other delicate surfaces (fig. 6f, 6g).

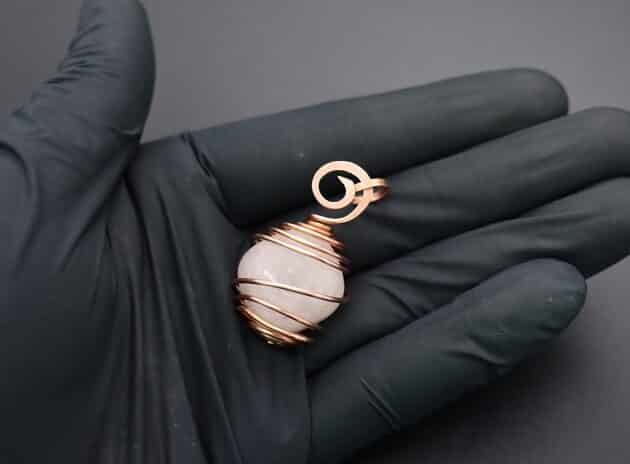
Superb! You have completed your tutorial.

Wire Wrapping Dainty Spiral White Cube Stone Cage Pendant Tutorial 36
fig. 6a
Wire Wrapping Dainty Spiral White Cube Stone Cage Pendant Tutorial 37
fig. 6b
Wire Wrapping Dainty Spiral White Cube Stone Cage Pendant Tutorial 38
fig. 6c
Wire Wrapping Dainty Spiral White Cube Stone Cage Pendant Tutorial 39
fig. 6d
Wire Wrapping Dainty Spiral White Cube Stone Cage Pendant Tutorial 40
fig. 6e
Wire Wrapping Dainty Spiral White Cube Stone Cage Pendant Tutorial 41
fig. 6f
Wire Wrapping Dainty Spiral White Cube Stone Cage Pendant Tutorial 42
fig. 6g

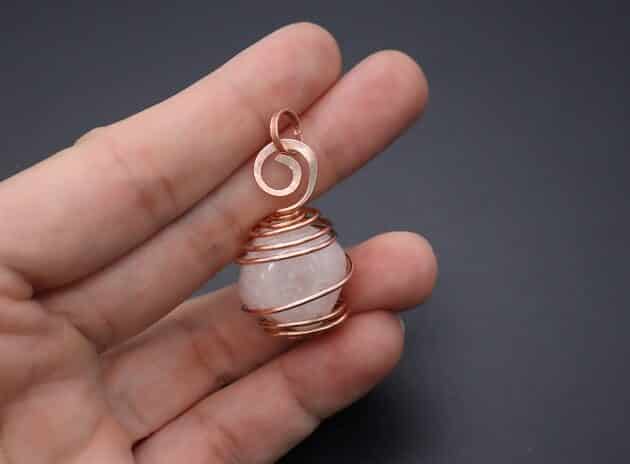
COMPLETED WIRE-WRAPPING DAINTY SPIRAL WHITE CUBE STONE CAGE PENDANT

Wire Wrapping Dainty Spiral White Cube Stone Cage Pendant Tutorial 43
Completed Wire Wrapping Dainty Spiral White Cube Stone Cage Pendant

Want to Support me?

If you enjoyed my content,  please consider support me on Patreon:). This helps me to create more amazing free content to share with you 🙂


If you’d like to see my work and follow my wire journey, you can find me here:

Facebook Instagram Twitter Pinterest YouTube Etsy

madelynn signature

Filed Under: Tutorials/DIY

Primary Sidebar

MadelynnHey there! Thanks for visiting 🙂

My name is Madelynn and I’m the owner of Studio 73 Designs.

Studio 73 Designs is managed by a team of wire wrapping jewelry enthusiasts 🙂 Cheers!

Follow Me

  • Facebook
  • Instagram
  • Pinterest
  • Twitter
  • YouTube

ARE YOU INTERESTED IN WIRE-WRAPPING?

Sign up below and get access to my FREE wire-wrapping guides!

Sign Up
Wire Wrapping Tutorials
Wire Wrapping for Beginners Start Here
Beginner's Guide to Jewelry Wire for Wire-Wrapping
Wire Wrapping Tools and Supplies for Beginners
How to wire wrap stones without holes wire-wrapping tutorial for beginners
Wire Wrapping Tutorials DIY Jewelry Kits

Footer

ARE YOU INTERESTED IN WIRE-WRAPPING?

Sign up below and get access to my FREE wire-wrapping guides!

Sign Up

Site Navigation

Home
About
Contact
Blog
Privacy Policy
Disclaimer
Terms & Conditions

Follow Me

  • Facebook
  • Instagram
  • Pinterest
  • Twitter
  • YouTube

© 2026 · Studio 73 Designs

wire-wrapping tutorials

Learn Wire-Wrapping

Want to create beautiful wire-wrapped jewelry? Join membership today and get access to 70+ step-by-step wire-wrapping tutorials with high-quality images

Learn More
x